Arduino Uno is the most common board used by high school and college students because of its simplicity and compatibility. There are a number of projects that can be created using Arduino Uno by interfacing different devices. In this guide, we have controlled the frequency of the buzzer with the help of potentiometer and Arduino Uno.
How to control buzzer frequency using potentiometer with Arduino Uno
The potentiometer is an analog device which is used in the electrical circuits to alter the resistance of the circuit. Since it’s an analog device its values range from 0 to 1023 so we have used it for varying the frequency of the buzzer. The components required for altering the frequency of the buzzer are:
- Piezo buzzer
- Connecting wires
- Potentiometer
- Arduino Uno
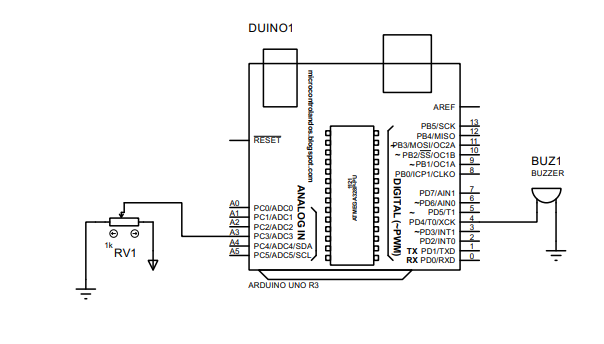
We have posted an image of the schematic of the circuit that controls the frequency of the buzzer:
Hardware assembly for altering the buzzer sound frequency by potentiometer
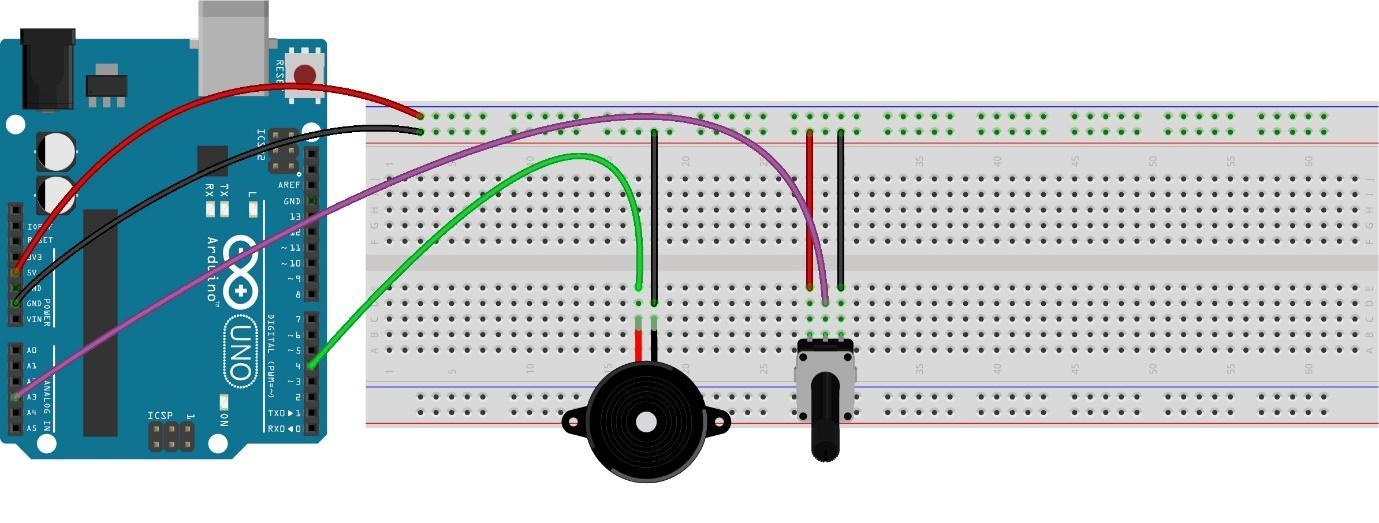
The image posted below is the hardware assembly diagram to further give a clear picture of the circuit connections:
We have connected the components in such a way that first we have placed the potentiometer and the buzzer on the breadboard. Next the green wire connects the buzzer to the digital pin 4 of the Arduino and the output pin is connected with the analog pin A3 of the Arduino using the pink wire.
To supply the voltage and grounding the components we have used the 5 volts and the ground pin of the Arduino Uno.
Arduino code for controlling the buzzer sound frequency by potentiometer
The Arduino code for controlling the buzzer sound frequency is given
int BUZZER = 7; // Arduino pin assigned to Buzzer
int frequency;// variable for storing the frequency
void setup() {
Serial.begin(9600);// initializing the serial communication
pinMode(BUZZER, OUTPUT); /*Assigning the buzzer the Output mode*/
}
void loop() {
int POTValue = analogRead(POT); // read the input on analog pin
frequency=map(POTValue,0,1023,0,255);/* scalarizing the value of the potentiometer into PWM values*/
tone(BUZZER,frequency);/*using tone function to generate the tone of the frequency given by POT*/
Serial.print("\n Value of the potentiometer: ");
Serial.println(POTValue);// displaying the POT values
Serial.print("");
Serial.print("Frequency of the buzzer: ");
Serial.print(frequency);// displaying the frequency
Serial.print("");
delay(500);// time after which the loop function will start again
}
To alter the sound of the buzzer using the potentiometer we have written the code in such a way that first we have assigned the Arduino pins for the potentiometer and the buzzer. Next we have declared the variable for storing the values of potentiometer.
Coming to the setup function we have set the baud rate for communication and assigned the buzzer to operate in the output mode.
In the loop function we have first obtained the values of potentiometer using the analogRead() function and then to convert those values to frequency we have used the map function.
By using the map function, we have scalarized the values of the potentiometer having the range of 0 to 1023 to the range of 0 to 255. We have scalarized to this range because values within these ranges are accepted by the analog pins of the Arduino.
Furthermore, we have generated the sound of the scalarized values using the tone function. The tone function is used generating tone on the given frequency and to read more about the tone function read the guide here.
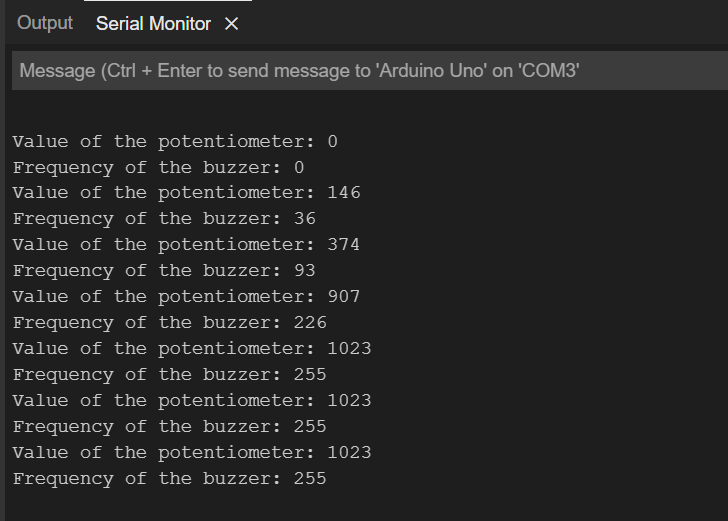
To summarize the working of Arduino code we can say that as we rotate the knob of the potentiometer the values of the frequency changes and the sound of the buzzer also changes accordingly.
Hardware implementation of changing the buzzer sound frequency by potentiometer
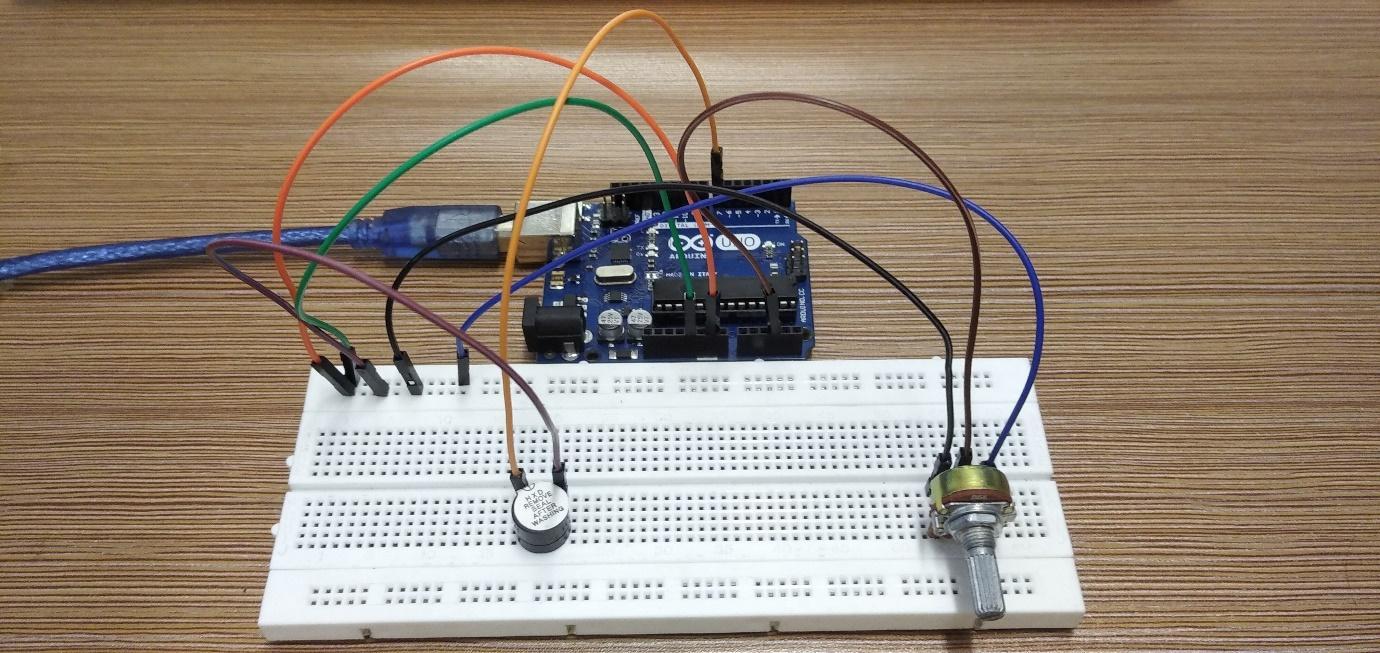
The image posted below shows the hardware assembled for creating the buzzer sound frequency changer circuit.
We have posted the image below that shows the change in the frequency as the value of the potentiometer changes:
Conclusion
Buzzers are the output devices that are used in the projects or appliance where sounding the alarm or tone is necessary. Similarly, the buzzers can also be used for indication purposes by generating different sounds at different frequencies. We can generate different sounds from buzzers by changing the frequency of the sound. So in this guide to alter the frequency of the sound of the buzzer we have used the potentiometer with Arduino Uno.


