How to make car parking system using Arduino Uno
Nowadays automobiles are equipped with the sensors that help the drivers to cover up the blind spots while parking the cars. To create the parking sensor first we have to shortlist the components that are required to build the circuit for the parking system:
- 1 Ultrasonic Distance Sensor (HC-SR04)
- Arduino Uno
- Connecting wires
- Breadboard
- 1 16×2 LCD
- 1 Potentiometer
- 1 Buzzer
The image below shows the circuit designed using the components listed above:
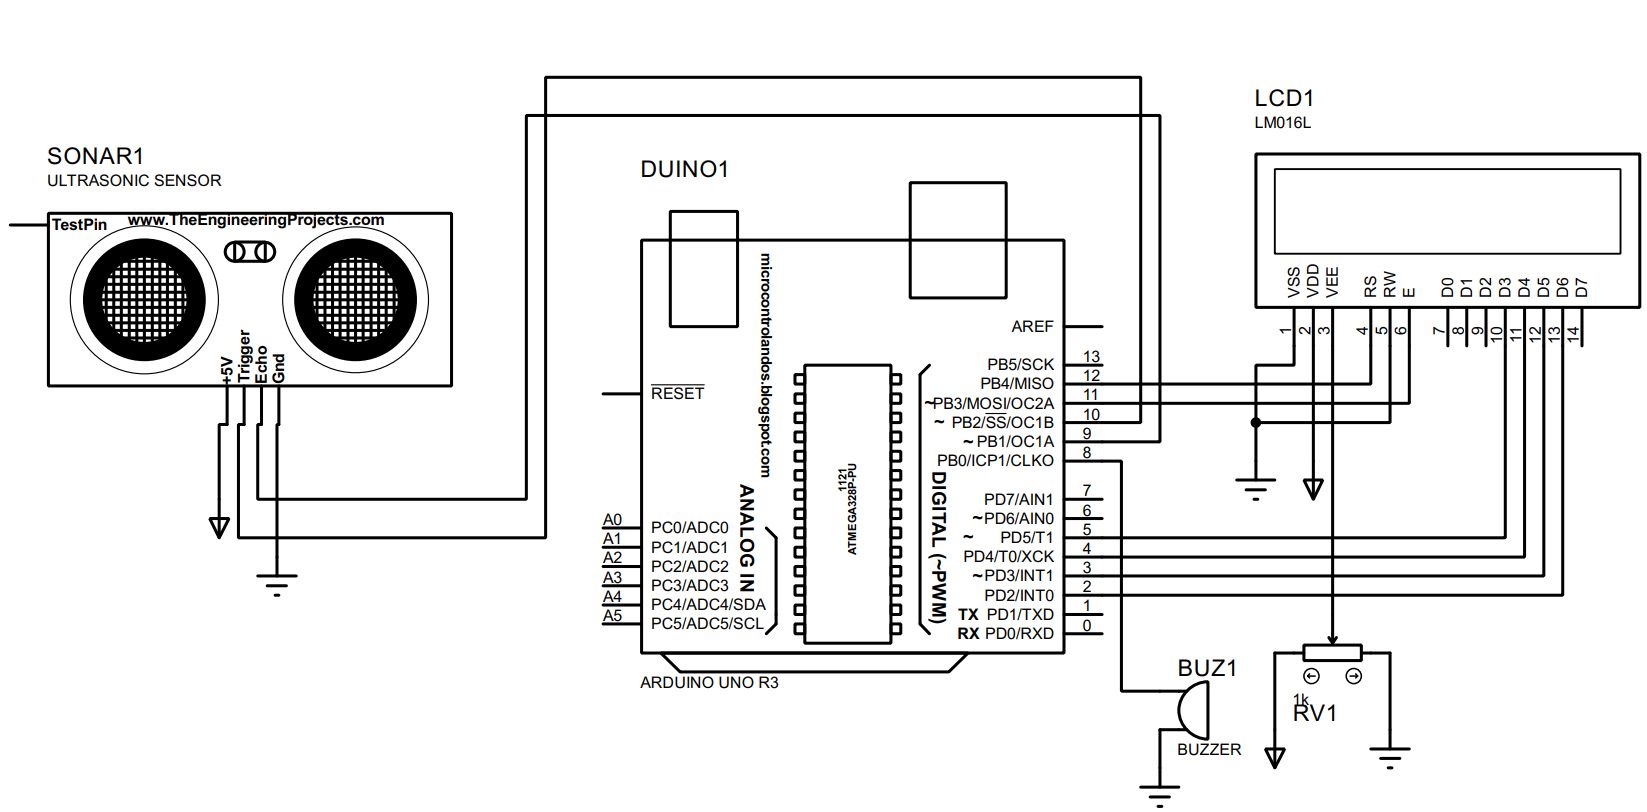
Hardware assembly for car parking system using ultrasonic distance sensor and Arduino Uno
To implement the circuit given above in the diagram on the hardware we have given the hardware assembly to get an idea of how the circuit will look like on the breadboard. Moreover, another purpose of the hardware assembly is to further clarify the connections of different components used in the circuit. The image below is the hardware assembly for circuit created to make the parking system using ultrasonic distance sensor with Arduino Uno
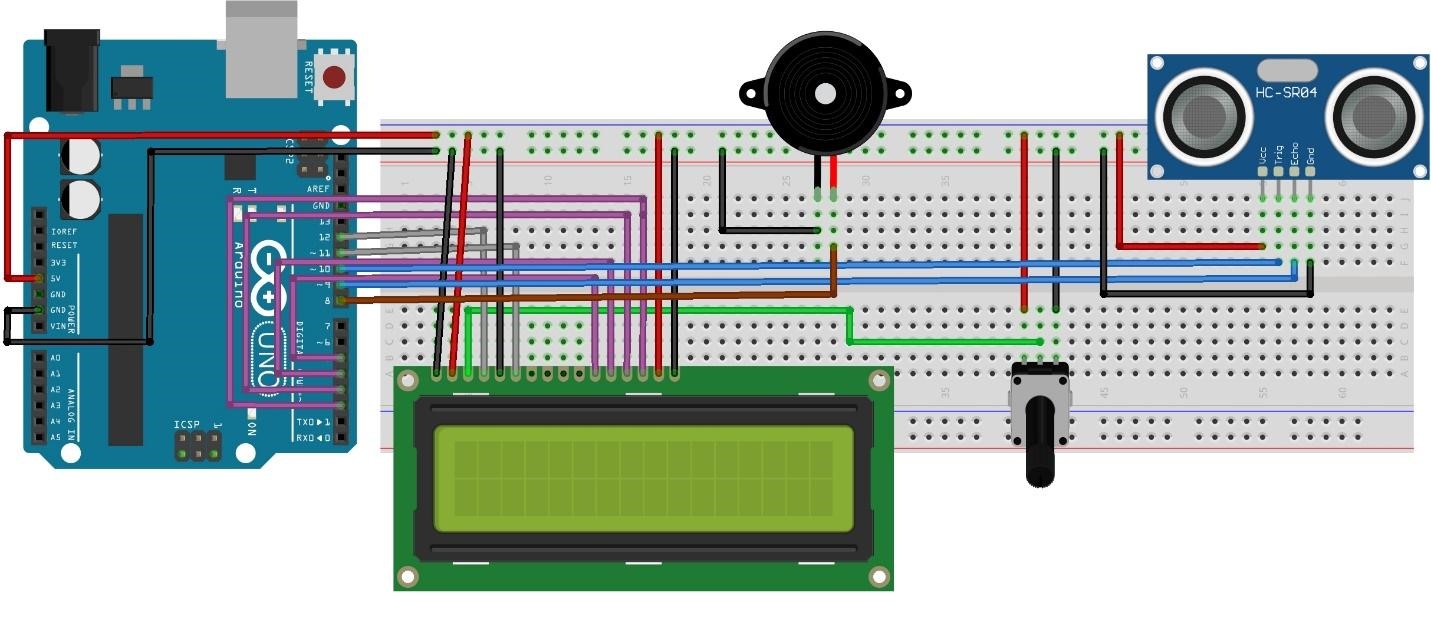
For making the parking system we have connected the trigger and echo pin of the distance measuring sensor to the pin 10 and 9 of the Arduino Uno represented by the blue wires in the image above. Further for sounding the alarm we have used a buzzer whose one pin is grounded, and the other is connected to pin 8 of the Arduino Uno.
To display the distance and alarm the user we have used the liquid crystal display (LCD) having a size of 16×2 and the connection with Arduino are represented by purple and green wires. To power up the circuit we have used the 5-volt and ground pin of the Arduino Uno.
Arduino code for making car parking system using distance sensor and Arduino Uno
To make the parking sensor using Arduino we have to program the microcontroller and the respective code is given below:
#define trigger 10 /* assigning Arduini pin to trigger pin of HC-SR04*/
#define echo 9/* assigning Arduini pin to echo pin of HC-SR04*/
#define buzzer 8/* assigning Arduini pin to buzzer */
LiquidCrystal lcd(12, 11, 5, 4, 3, 2); /*/* assigning Arduino pins for LCD*/
float time;/* variable in which the time for the pulse will be saved */
float distance; /* variable in which distance covered by the pulse is saved */
void setup() {
/* dealing working modes of buzzer and pin of HC-SR04*/
pinMode(buzzer, OUTPUT);
pinMode(trigger, OUTPUT);
pinMode(echo, INPUT);
lcd.begin(16, 2); /* defining the size of LCD*/
lcd.setCursor(5, 0);
lcd.print("Arduino ");
lcd.setCursor(0, 1);
lcd.print(" Parking Sensor");
delay (5000);
lcd.clear();
}
void loop() {
/*generating the pulse by giving HIGH and LOW to HC-SR04*/
digitalWrite(trigger, HIGH);
delay(1);
digitalWrite(trigger, LOW);
time = pulseIn(echo, HIGH);/* reading the time of the pulse received */
distance = (time / 2) / 29.1; /* finding the distance from the obstacle in cm*/
lcd.clear();
lcd.setCursor(0, 0);
lcd.print("Distance:");
lcd.print(distance);/* printing the distance on LCD*/
lcd.setCursor(13,0);
lcd.print("cm");
if (distance <= 30) /* if distance is less than 30 cm then increase the intensity of Alarm and show warning on LCD*/
{
lcd.setCursor(1,1);
lcd.print(" Stop! ");
/* sounding the alarm using buzzer */
digitalWrite(buzzer,HIGH);
delay(50);
digitalWrite(buzzer,LOW);
delay(50);
digitalWrite(buzzer,HIGH);
delay(50);
digitalWrite(buzzer,LOW);
delay(50);
digitalWrite(buzzer,HIGH);
delay(50);
digitalWrite(buzzer,LOW);
}
if (distance > 30 && distance <= 40) /* if distance is greater than 30 cm and less than 40 decrease the intensity of Alarm slightly*/
{
digitalWrite(buzzer,HIGH);
delay(50);
digitalWrite(buzzer,LOW);
}
if (distance > 40 && distance <= 60)/* if distance is greater than 40 cm and less than 60 cm decrease the intensity of Alarm */
{
digitalWrite(buzzer,HIGH);
delay(200);
digitalWrite(buzzer,LOW);
}
if (distance > 60 )/* if distance is greater than 60 cm the intensity of Alarm will be too LOW*/
{
digitalWrite(buzzer,HIGH);
delay(500);
digitalWrite(buzzer,LOW);
}
delay(500);
lcd.clear();
}
For measuring the distance of the oncoming obstacle we have used the following equation:
Here in the equation we have divided the time taken by the pulse from transmission till receiving to the sensor after collision and divided it with two. Next we have divided the whole value by 29.1 to get the distance in centimeters.
To make the parking system we have specified three if conditions for the distance. When the distance values get small the intensity of the alarm increases and a warning is displayed on the LCD as well. However, when the distance values get bigger the intensity of the alarm decreases. Moreover, the distance values are also displayed on the LCD and to read more about how to measure distance of obstacles using the distance sensor visit the link how to interface distance sensor with Arduino .
Hardware demonstration for parking system using distance sensor with Arduino Uno
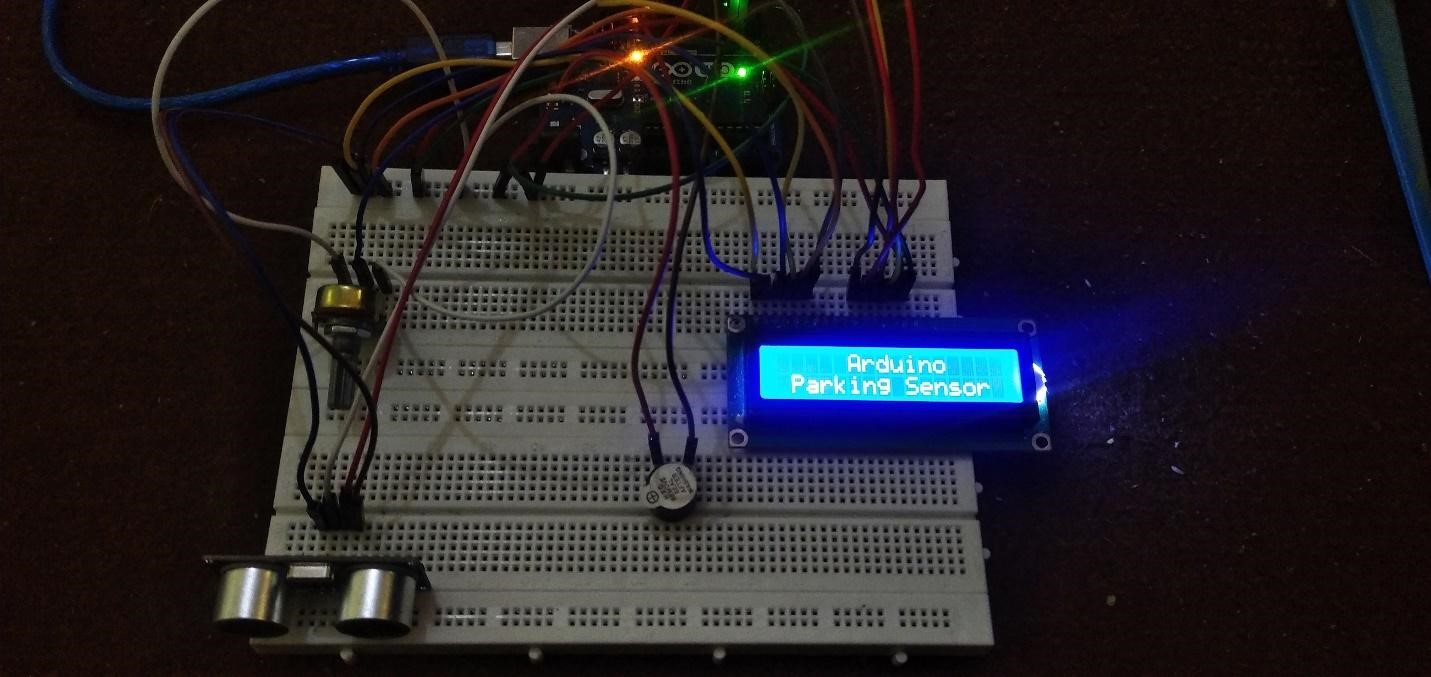
We have implemented the circuit design given above on actual hardware according to the hardware assembly described above. The image below is the hardware implementation for creating the parking sensor using Arduino Uno.
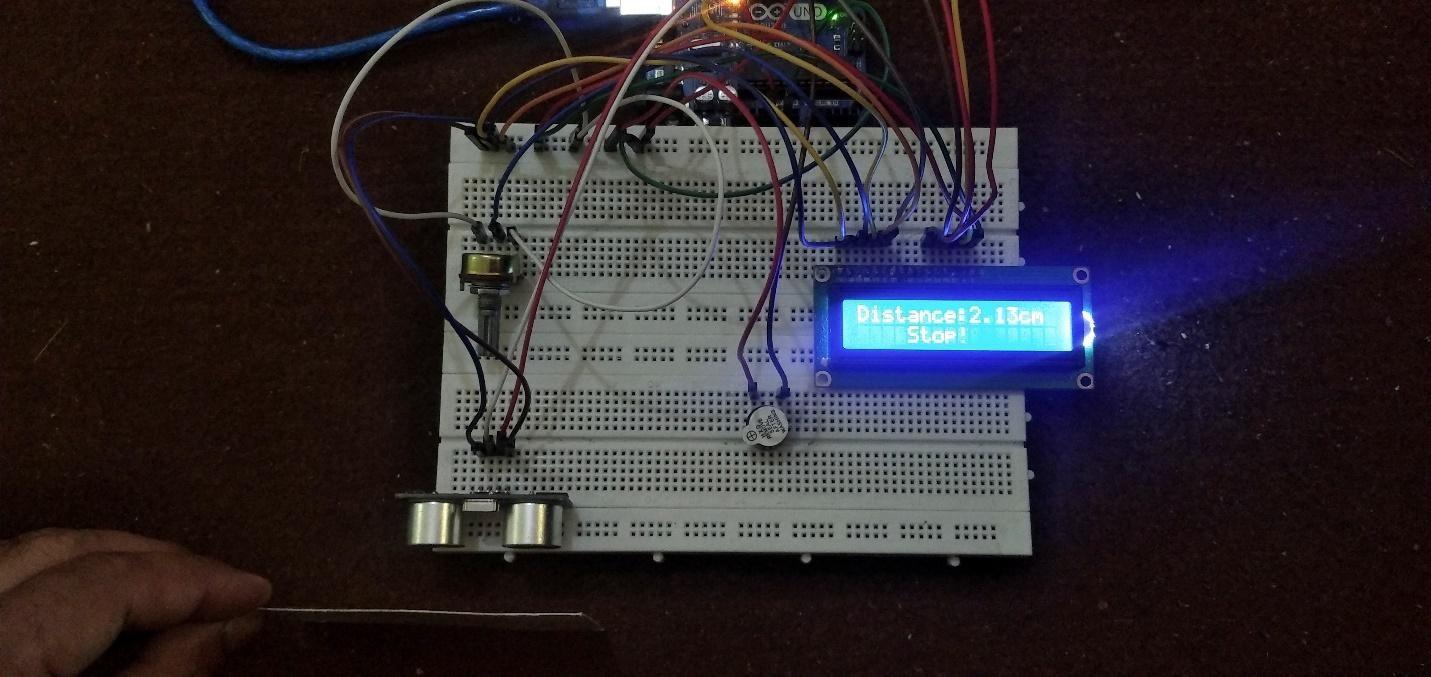
When the obstacle is far from the sensor there will be no waring on the LCD only its distance will be displayed in the LCD as in the figure below:

When the obstacle is near to the sensor then it will also show warming on the LCD and will increase the intensity of the alarm.
Conclusion
The use of parking systems in cars has brought ease for the drivers especially when they have to park the cars in tight places or turning cars on tight turns. The parking system we made uses an ultrasonic distance sensor for measuring distance of coming obstacles and lets the user know by changing its alarm intensity that the obstacle is near. Similarly, it also displays the distance of the sensor from the obstacle on LCD which can also give the idea how far is the obstacle. To understand how we can make parking sensors we have provided the Arduino sketch and the circuit design that we implemented on hardware.