Note that this is an X11 application only, Wayland support hasn’t been added to the application at the time of writing this article.
Some of the AutoKey features are:
- Supports abbreviations that can automatically expand a few characters into any of your commonly used sentences and text blocks.
- Supports sending arbitrary keystrokes and mouse clicks.
- Supports specifying rules for a specific application window.
- Python 3 scripts can be used for writing automation rules.
- Ability to control window functions like maximizing, resizing and moving.
- Comes with a set of preconfigured examples for easier scripting.
- Ability to show custom menu popups with a list of choices.
- Ability to record keystrokes and mouse clicks.
- Ability to set hotkeys without modifier keys.
- Automation scripts are portable and can be easily shared with other users.
This guide will show you some AutoKey examples that are useful for Linux gamers. To get started, let’s install Autokey Ubuntu packages from its GitHub page. Download the files mentioned below from here
- autokey-common_x.xx.x-x_all.deb
- autokey-gtk_x.xx.x-x_all.deb or autokey-qt_x.xx.x-x_all.deb (download only one)
After downloading the files, run the following commands in order:
$ sudo apt install ./autokey-gtk_0.95.8-0_all.deb
Example 1: Setting <F5> Key for Automatic Game Saving
It is common to see many PC games using <F5> key for quick saving and <F9> for quick loading. However, many other PC games, especially console ports have a tedious way to save game where you have to navigate through multiple menu options. Here is a quick mockup I have drawn that illustrates this (excuse my drawing skills):
The game wants you to hit <Esc> key to pause the game, then <Down> arrow key, then <Enter> key to save the game, followed by <Esc> key again to return to the game. This entire process can be easily automated and mapped to <F5> key using AutoKey. Check out the script code below:
keyboard.send_key('<escape>')
time.sleep(0.25)
keyboard.send_key('<down>')
time.sleep(0.25)
keyboard.send_key('<enter>')
time.sleep(0.25)
keyboard.send_key('<escape>')
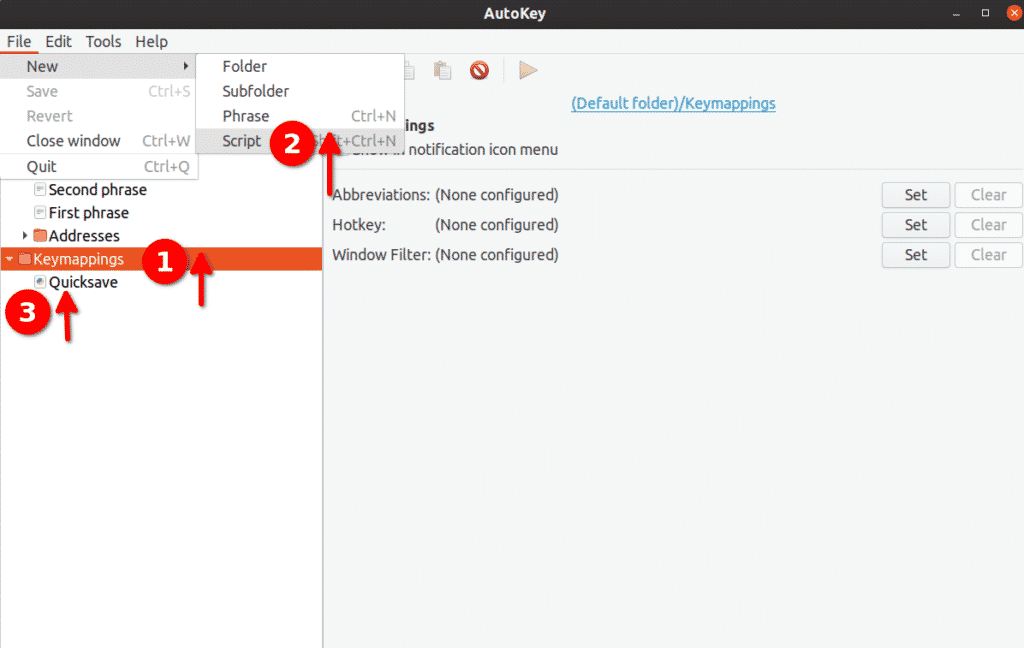
To add this script to AutoKey, launch the app and then click on a visible folder or click on a custom folder created by you to highlight it. Click on File > New > Script menu option to create a new script inside that folder, as shown in the screenshot below:
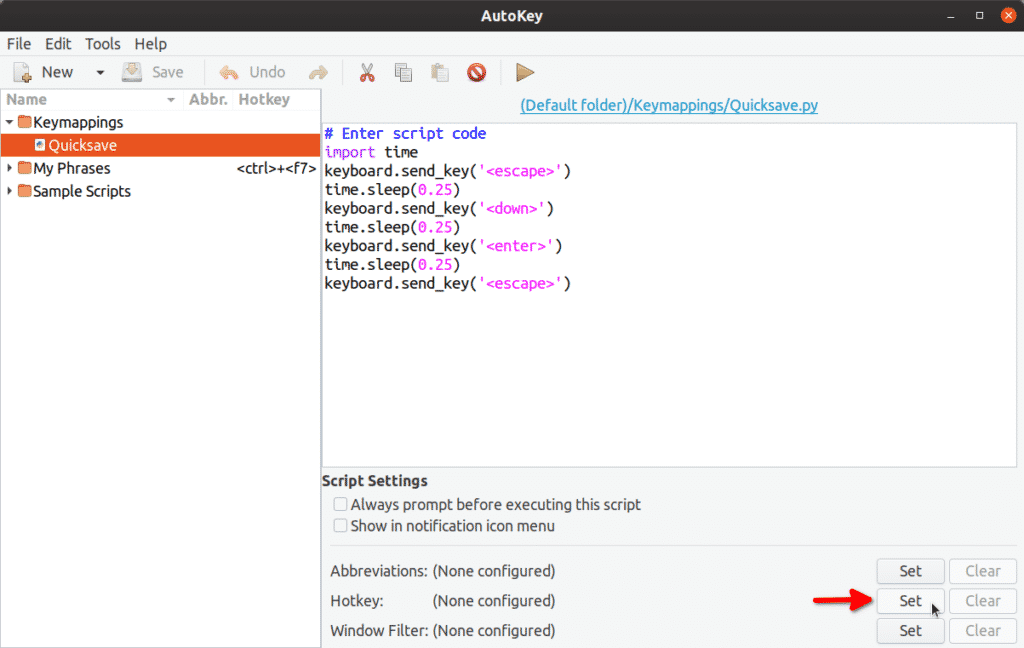
Rename this script to “Quicksave” and put the above code inside it. Then click on “Hotkey” button at the bottom, as shown in the screenshot below:
On the next screen, click on “Press to Set” button and then hit <F5> key to map it to the script.
Click on “OK” and press <CTRL+S> to save the script. Always remember to save the script otherwise nothing will be executed when you press the mapped hotkey.
Quicksave keymapping is now ready to be used. Next time when you press <F5> key, a series of keypresses will be executed in order.
Note that we have changed the functionality of <F5> key globally throughout the OS, as long as AutoKey is running and docked to the system tray. To restrict it to a particular window or application, you will have to specify window rules by clicking on “Window Filter” button at the bottom.
You can use the same script above to create a script for quick loading as well. You just have to remove the line for <Down> arrow key and then map the script to <F9> key.
If you are looking for correct key names to use in AutoKey Python 3 scripts, a list of all special keycodes usable in AutoKey can be found here. Any key not mentioned in the page above can be inserted using single or double quotes. Example: keyboard.send_key(‘5’), keyboard.send_key(‘p’) and so on.
Example 2: Drink Two Health Potions in a Row in a Role Playing Game
Assuming the hotkey to drink health potion in your game is <H>, the script would be:
The value of the repeat variable can be changed to any other number as well. You can follow the steps in the first example to map the script to your desired hotkey.
Example 3: Burst Mode for Gun in a Shooter Game
Using the code below, you can map <E> key to shoot a gun thrice in a row. The original way to shoot in the game is to press left mouse click once.
mouse.click_relative_self(0, 0, 1)
mouse.click_relative_self(0, 0, 1)
mouse.click_relative_self(0, 0, 1)
The above script will execute left mouse click three times in a row. Extra statements can be added if you want to execute left click more than three times.
You can follow the steps in the first example to map the script to <E> hotkey.
Example 4: Create a Custom Game Menu / Turn a Real Time Game into a Turn Based Game
Using the list menu functionality of AutoKey, we will show a menu as an overlay on top of a running game. This menu will steal focus from the game and return it after a mouse click is executed on one of the menu items. Once the focus is returned, an automated keystroke will be executed that invokes a function inside game.
Take a look at this picture:
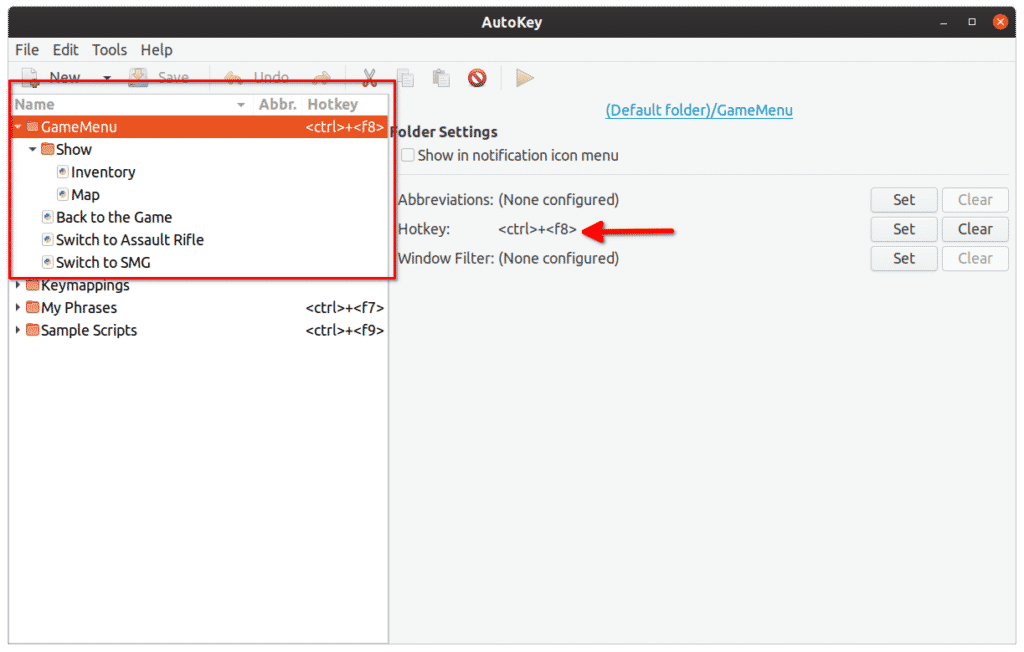
In the “GameMenu” folder, I have created a subfolder called “Show”. Both “GameMenu” and “Show” folder have child items. Here is the code I have put inside each child item:
- Inventory: keyboard.send_key(‘i’)
- Map: keyboard.send_key(‘m’)
- Back to the Game: keyboard.send_key(‘<escape>’)
- Switch to Assault Rifle: keyboard.send_key(‘2’)
- Switch to SMG: keyboard.send_key(‘1’)
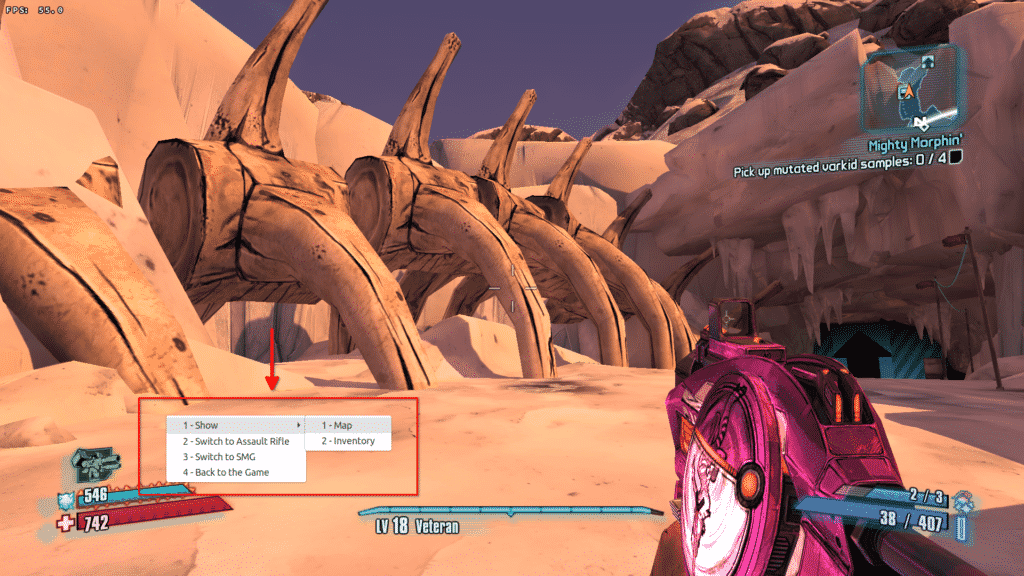
Here the “GameMenu” folder is mapped to <CTRL+F8> key and this is what it looks like inside running game:
Each menu item has a number prefixed before its label. You can invoke any menu item by pressing the corresponding number key on your keyboard. For example, pressing <2> key here will switch the gun to assault rifle.
A small GIF demo of this example (click on the image or right click and open the GIF in a new tab if animation stops below):
This method may not work with all games, depending on the way they handle windowed and full-screen rendering. Some games don’t pause when focus is stolen while others do. If the game pauses when focus is lost, you have essentially converted a real time game into a turn based game using this AutoKey script.
This example will work with games on a case by case basis. However in my testing, I have achieved pretty good results with both native and Steam Proton / Wine games.
Conclusion
All the examples mentioned here are basic, mainly focused for Linux gamers. They cover only a part of AutoKey’s powerful API. AutoKey can automate a lot of your workflow using its scripting features for everyday or complex software as well. A few more examples are available in the official documentation of the app.


Dear Nitesh Kumar,
When it’s not a bad time,
With AutoKey, how would it be possible to repeat key presses?
Not sure if it’s possible, but if it is pretty sure you’re the one who could do it.
That is because of your article. https://linuxhint.com/autokey_automate_linux_games/
Not that you would have time, but here’s my goal.
———————————————————————
Up arrow activates key press down repeat. (The cursor control key to the right of the right ctrl.)
Right arrow activates key toggle key.
Down arrow turns off both scripts.
keypress repeat: (repeats while the key is pressed by user)
-for example hold “e” after hitting up arrow / cancel on down arrow
->e down
->sleep 0.2 seconds +random delay 0-0.1 seconds
->e up
->sleep 0.2 seconds +random delay 0-0.1 seconds
keypress toggle: (repeats for maybe 2 hours)
-for example press “e” after hitting right arrow / cancel on down arrow
->e down
->sleep 0.2 seconds +random delay 0-0.1 seconds
->e up
->sleep 0.2 seconds +random delay 0-0.1 seconds
This is doable but you may need additional tools, mainly “xdotool” and “xbindkeys”. Xdotool allows you to simulate keyboard and mouse input. Xbindkeys can be used to assign scripts to keyboard shortcuts. Note that the way keyboard input works on Linux, repeating keys may be turned off automatically when you press any other key. You can also use the AutoKey app mentioned in the article. But in-case repeat mode is not interrupted when you press any other key, you can try using the “xinput” command to disable keyboard and then re-enable it by running two consecutive commands in a script.
Here are some documentation links that should help you:
http://manpages.ubuntu.com/manpages/xenial/man1/xbindkeys.1.html
http://manpages.ubuntu.com/manpages/trusty/man1/xdotool.1.html
https://github.com/autokey/autokey/wiki
The AutoKey wiki includes some example scripts that you want to go through. Thanks.