What is a while loop
Loops are very handy in any situation, especially when we want to repeat the same process according to some condition.To understand the usage of the while loop, let’s say, we have a user who has 30 components of the project and we ask the user to input the name of the component after every minute till 30 minutes. If we write the code in which after every 1 min, it is asked the user to enter the component and then print it, and again after 1 minute asks the user to enter input till 30 minutes, it will consume a lot of time as well as the code will become bulky which reduces the efficiency of code
This can be made easy by using the while loop, in which we can put the condition of time in the while loop that is less than 30 min, and ask the user to enter a component after every minute. This will be a code of about 5-6 lines and will fulfill the purpose as well.
Likewise, it can be used in Arduino programming. First, we will discuss the general syntax of using a while loop in Arduino programming.
Syntax of using the “while loop” in Arduino
The general syntax of using the “while loop” is:
{
//code or set of statements
}
The explanation of the above syntax is very easy to understand:
- Write any condition in the round brackets “()” with the “while” keyword, till that condition is true the system will execute the code written in the body of the while loop
- If the condition is false, it will exit from the body of the while loop
What is the flow chart of the while loop in Arduino
The most convenient way to understand the usage concept of anything is through visual explanation. For the visual understanding of the “while loop” in Arduino, consider the flow chart:

When the while loop is executed, the compiler will initialize the while loop and check the condition. If a condition is true, the compiler will execute the code of the body of the while loop, and if it is false it will skip the execution of the while loop body, and the compiler will execute the next statements outside the while loop.
What is Arduino programming structure
Before moving to the examples, first, have a little bit of understanding of Arduino programming structure. In Arduino programming, we have two main components in the program structure:
void setup(): The void setup function runs only once, as it is the beginning of the program. You can declare different variables, and take different inputs from the user. For example turning a circuit on, that would happen only once.
void loop(): In this function the code runs infinitely like if we want to run LEDs for an infinite time period, we can use void loop()
Now, we will consider some examples of the while loop in Arduino which will help us understand the usage of the while loop.
Example 1: Consider the following code:
void setup()
{
Serial.begin(9600);
while(i<=10)
{
Serial.println("Welcome to LinuxHint");
i=i+1;
}
}
void loop()
{
}
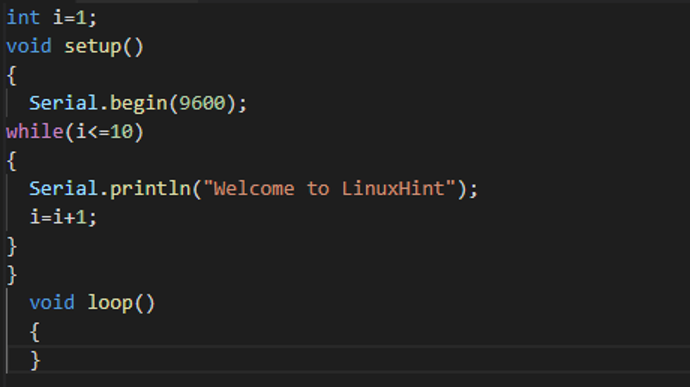
Explanation: The above code is simple which displays the “Welcome to LinuxHint” ten times in the serial monitor output. The explanation of the code is:
- We declared a variable “i” and stored “1” in it
- For serial communication, at the baud rate 9600, we used “Serial.begin(9600)” function
- Used the while loop as discussed in the general syntax and conditioned it to execute the loop until the value of “i” is equal and less than 10
- As we are using Arduino connected to the computer, we will use the serial communication for printing “Welcome to LinuxHint”
- In the last statement, we are incrementing the value of “i” by 1
To display the output, we will verify, upload, and then with the help of serial communication run the code:

In the above output, we can see that “Welcome to LinuxHint” is printed on the serial monitor output six times because when the value of “i” is incremented to 7 the condition becomes false, the compiler was out of the loop.
Example 2: Now, consider the following code:
void setup()
{
Serial.begin(9600);
while(i<100)
{
i++;
}
Serial.println("The number of iterations is ");
Serial.println(i);
}
void loop()
{}
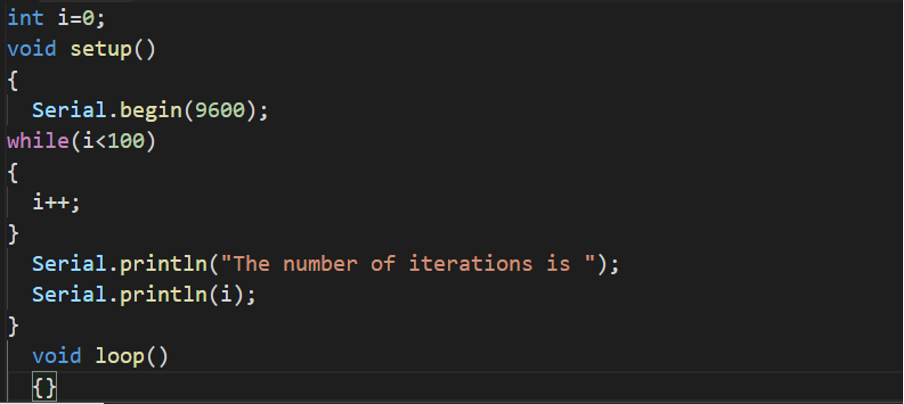
Explanation: In this code, we are displaying the number of iterations and the explanation to the above code is:
- We declared a variable “i” with a value of 0
- We used serial communication to connect Arduino to the computer and set the baud rate (9600)
- With the help of the while loop, we increment the value of “i” to the number of iterations by setting the condition of “i<100”
- Outside the while loop, again using the serial communication, we displayed the value of “i” on the serial monitor output
We will verify and run the code:

In the above output, the value of iterations has been displayed which is 100.
Conclusion
A while loop in Arduino can be used for the finite as well as an infinite loop and also it can be used when we need to run statements repeatedly. In this write-up, we have explained the while loop and the general syntax of using it. We also discussed the flowchart of while loop working as a visual demonstration is easy to understand. And then we discussed some examples of the while loop on a basic level for better understanding.