Using serial monitor of Arduino IDE
From the name we can say that this is some kind of a display monitor that displays the data of inputs and outputs of the Arduino code using serial communication with the Arduino board. So, to use the serial monitor you first know how to open the serial monitor on the Arduino IDE and we have illustrated the process with the help of images given below.
For opening the serial monitor you have to click on the blue colored magnifying glass icon on the top menu bar at the extreme right side of Arduino IDE:

Once you have clicked that blue icon of serial monitor it will open at the bottom of the Arduino IDE as shown in the image given below:

Before using the serial monitor there are a few options in the serial monitor that you must be aware of, and those things are highlighted in the image below:
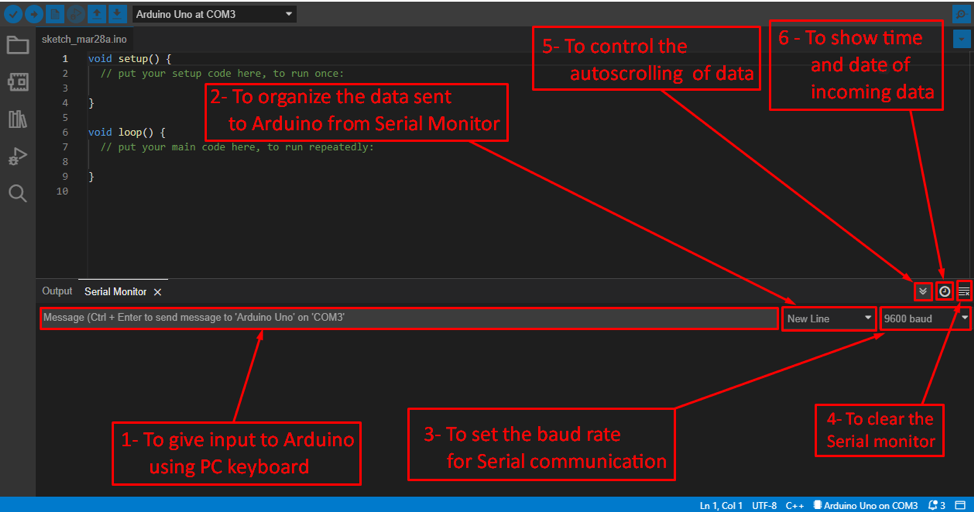
The following are the options that you can use in the Serial monitor are highlighted in the image above and are explained with respect to the number given to each option:
1. To send data to Arduino from the serial monitor you have to type that information in the gray bar that is highlighted in red. Once you have written the command or information, you can send it by pressing ctrl+Enter key simultaneously.
2. To arrange or to organize the data sent to the Arduino we can click on the option next to the gray bar and it has four other options that are.
| No Line ending | No line space after the sent data |
| New line | Next data will be on the next line |
| Carriage return | Tells the position of the cursor at which the next data will be displayed |
| Both NL & CR | Both new line and cursor position |
3. To set the baud rate of the serial monitor you can select it from the option highlighted in red next to the data organizing option.
4. Coming to the next option that is about when you have to clear the serial monitor you can simply click on this icon, and it will clear the serial monitor for you.
5. To stop the auto scroll of the incoming data on the serial monitor you have to un-click the icon that has two downward arrows that we have highlighted in the above image. By turning off the auto scroll option, you can scroll the data by yourself.
7. The next option is important if your sketch is working according to the real time as this option displays the time and date of the data that is displayed on the serial monitor.
After you have got familiar with the serial monitor now it’s time to get to know how you can use it to display the inputs and outputs of the Arduino sketch.
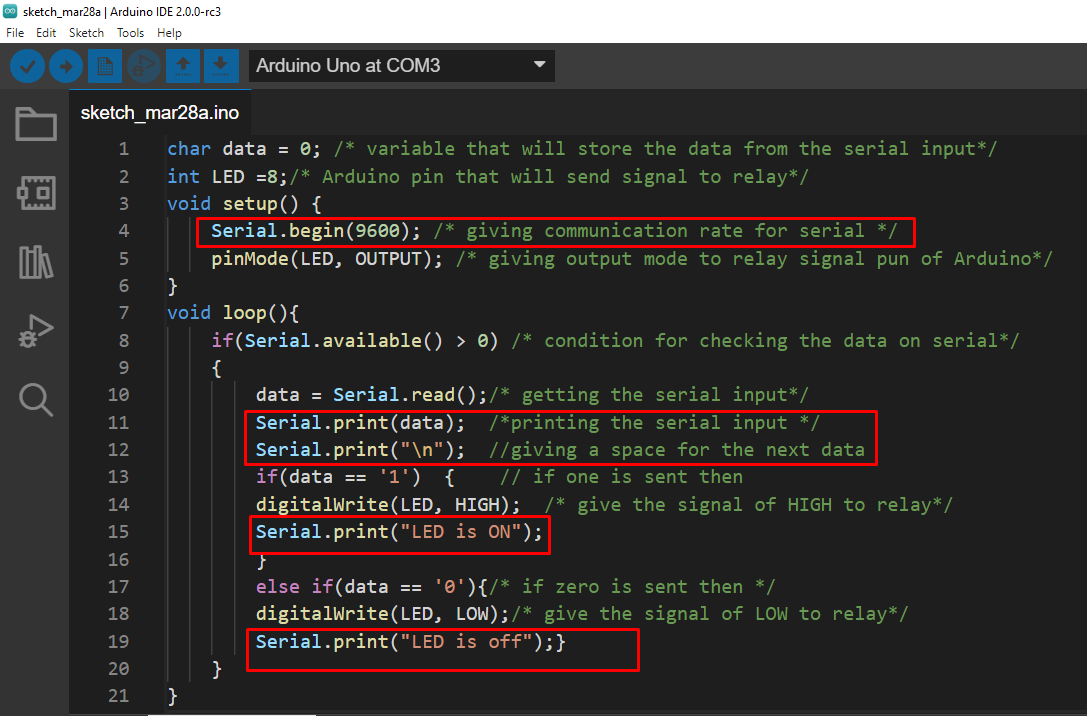
So, to use the serial monitor the first and foremost thing that is to be done is setting the communication rate also known as the baud rate using the Serial.Begin() function. The most common baud rate used is 9600.
Next to display the desired data you have to use the function Serial.print() by giving it that variable name as its Argument. Below we have given the code to illustrate how to use the serial.begin() function for communicating with Arduino and Serial.print() function for displaying the data on the serial monitor.
For your understanding we have turned the LED on and off using the serial monitor and displayed the data sent to the Arduino on the serial monitor as in the image below:
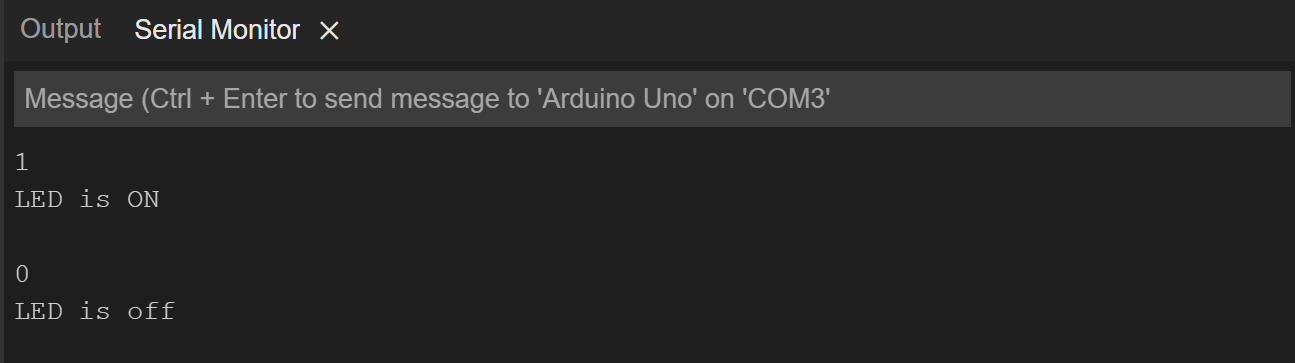
If the serial input would be 1 the LED will turn on otherwise it will be off and the serial monitor will show the output. To give input from the serial monitor see the point 1 in the above section.
Conclusion
The serial monitor is one of the display options provided by the Arduino IDE which can be used for multiple purposes like for debugging the Arduino sketch, interacting with Arduino boards by sending it commands, displaying the inputs and outputs of the Arduino program. We have illustrated how you can use the serial monitor of Arduino IDE in detail with the help of images.