Arduino Nano is a small microcontroller board that uses ATmega328p to process instructions. It is similar to the Arduino Uno, but it is much smaller in size and has a lower price point. Arduino Nano is often used in projects where space is a constraint, such as in wearable electronics or small-scale robotics. The Arduino Nano can be used to control the OLED display and process sensor data. This article will cover interfacing of an OLED display with Arduino Nano.
This lesson includes following topics:
- 1: Introduction to OLED Display
- 2: Wiring OLED Display Module to Arduino Nano
- 3: Installing Required Libraries
- 4: Check OLED Display I2C Address
- 5: OLED Display Arduino IDE Example
- 5.1: Code
- 5.2: Output
- 6: Static Text Printing on OLED Display Using Arduino Nano
- 6.1: Code
- 6.2: Output
1: Introduction to OLED Display
An I2C OLED display is an organic light-emitting diode screen which uses the Inter-Integrated Circuit (I2C) protocol for communication. OLED screens have high contrast ratio and greater viewing angle which makes them well-suited for a variety of display applications.
An I2C OLED display typically consists of a small OLED screen and a driver circuit that converts the I2C signals into the appropriate voltages and currents needed to drive the OLED pixels.
LEDs inside the OLED screen illuminate the pixels that display us different images and text. While on the other side the LCD screen uses a backlight for illuminating its pixels. These pixels brightness can be controlled separately.
Now we will interface Arduino Nano with an OLED display.
2: Wiring OLED Display Module to Arduino Nano
OLED screens mainly work on two communication protocols. These are I2C and SPI. Among these two SPI (Serial peripheral interface) is faster compared to I2C, but most of the time I2C OLED display is preferred because of a smaller number of wires.
I2C is a two-wire serial communication protocol that allows multiple devices to share a single set of data and clock lines, making it a convenient choice for connecting OLED displays to microcontrollers and other devices
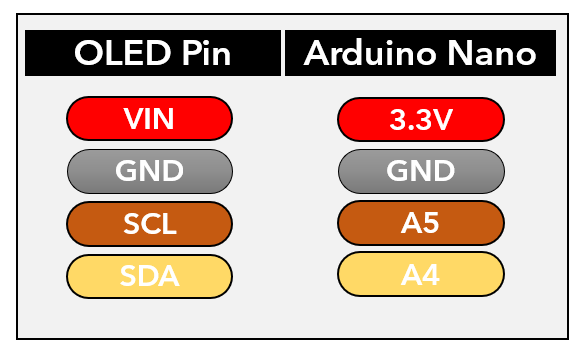
Using I2C OLED two pins SDA and SCL are enough for displaying images and text. The given image shows Arduino Nano with 0.96-inch (128×64 pixels) OLED screen.
Below is the pin connection table:
As we have interfaced Arduino Nano with an OLED display, now we will install the necessary libraries in the Arduino IDE so we can move forward with shapes displaying on the OLED screen.
3: Installing Required Libraries
For displaying images, we need to install the necessary libraries for OLED display in Arduino IDE. Without using these libraries Arduino Nano cannot display graphics on OLED.
Mainly two libraries from Adafruit are used: SSD1306 and GFX library.
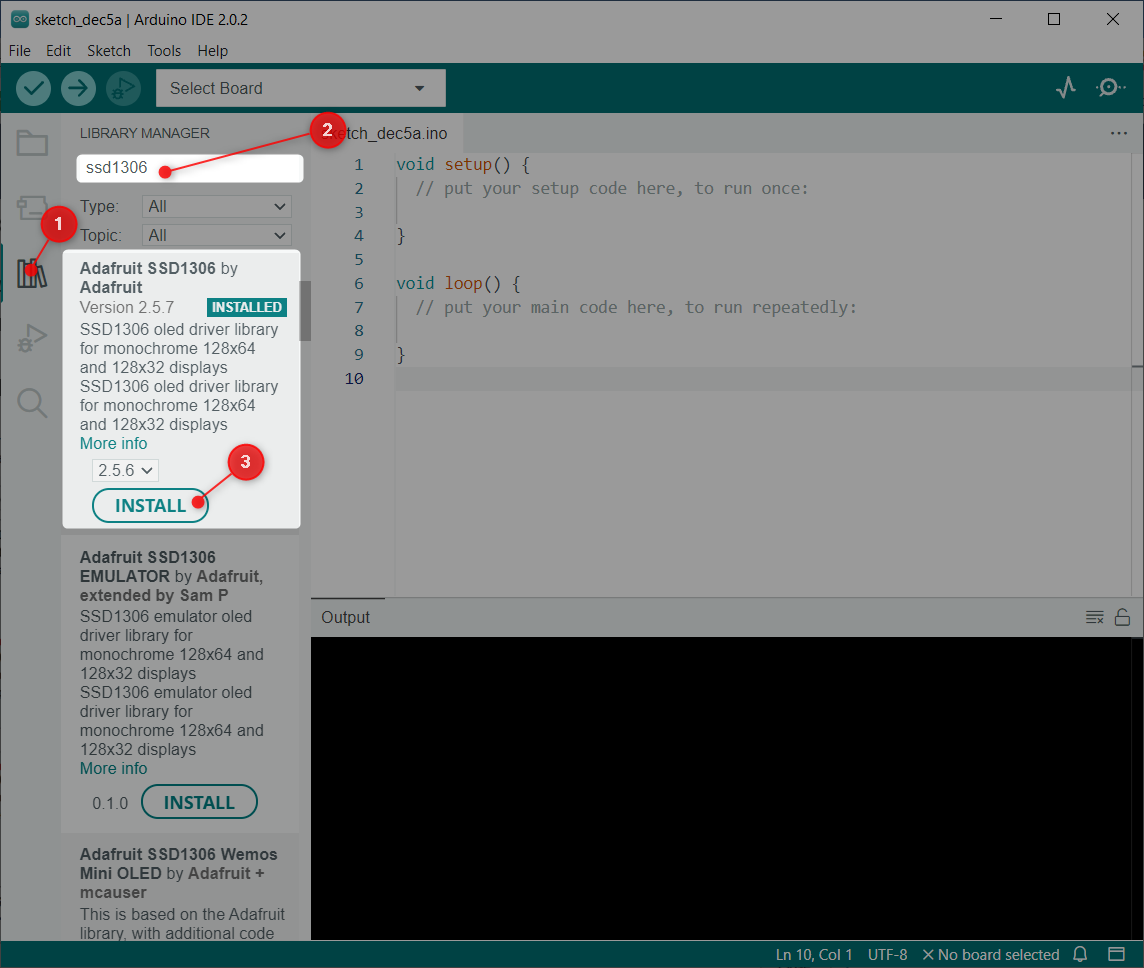
Open Arduino integrated environment (IDE) and search the SSD1306 library. Install Adafruit SSD1306 library.
Other way of installing is going to: Sketch>Include Library>Manage libraries:
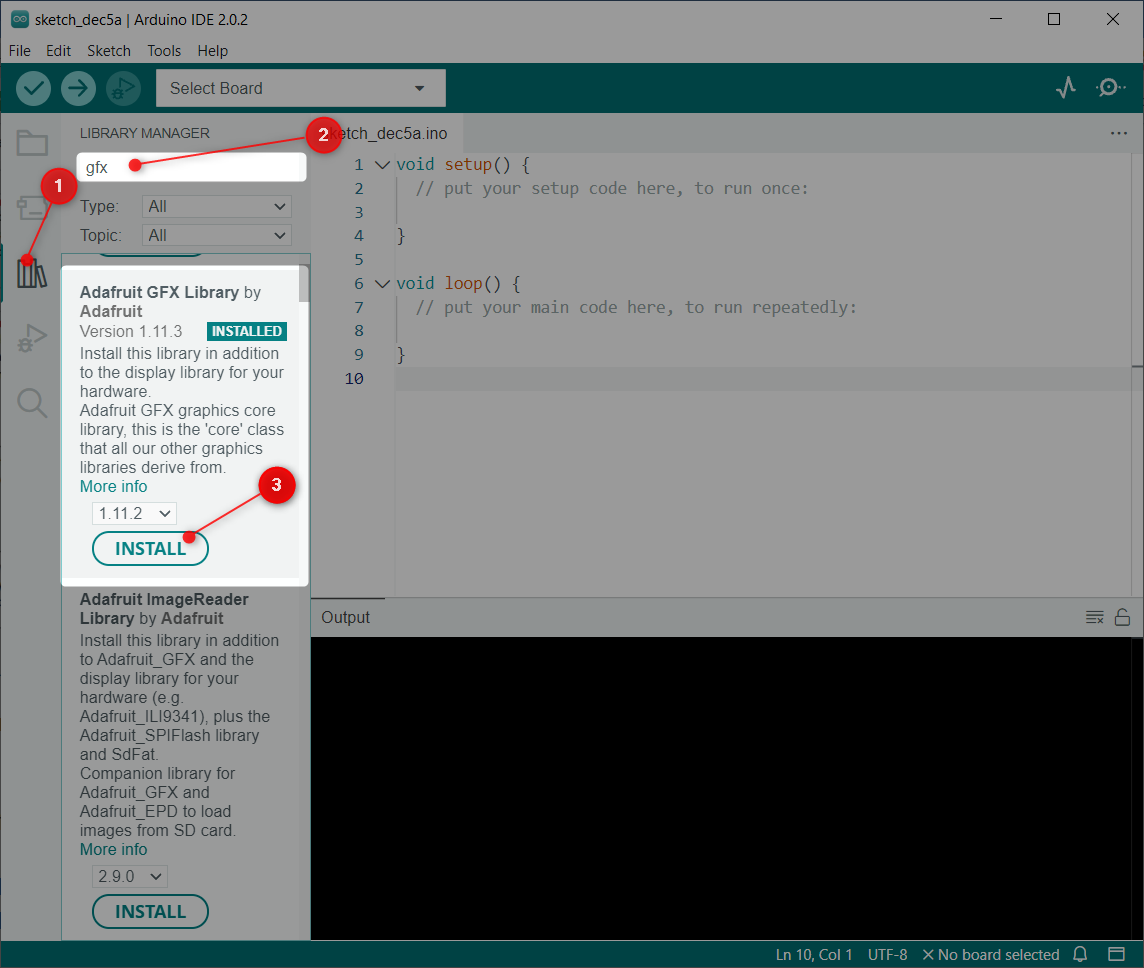
Now install the GFX library by Adafruit:
As we have installed both libraries so now we can easily program Arduino Nano with an OLED display.
4: Check OLED Display I2C Address
I2C, or Inter-Integrated Circuit, is a communication protocol that allows multiple devices to be connected and communicate with each other over a two-wire interface. Each I2C device must have a unique address, ranging from 0 to 127, to ensure that it can be identified and communicated with on the I2C line. Multiple devices having the same I2C address cannot use the same I2C bus.
Connect the OLED display with Arduino Nano and after selecting the board and port in Arduino IDE upload the below given code to Nano board to check the I2C address of the OLED screen.
void setup()
{
Wire.begin(); /*I2C communication with OLED starts*/
Serial.begin(9600); /*baud rate defined for Serial Communication*/
while (!Serial); /*Wait for Serial output*/
Serial.println("\nI2C Scanner");
}
void loop()
{
byte err, adr; /*variable error is defined with address of I2C*/
int number_of_devices;
Serial.println("Scanning.");
number_of_devices = 0;
for (adr = 1; adr < 127; adr++)
{
Wire.beginTransmission(adr);
err = Wire.endTransmission();
if (err == 0)
{
Serial.print("I2C device at address 0x");
if (adr < 16)
Serial.print("0");
Serial.print(adr, HEX);
Serial.println(" !");
number_of_devices++;
}
else if (err == 4)
{
Serial.print("Unknown error at address 0x");
if (adr < 16)
Serial.print("0");
Serial.println(adr, HEX);
}
}
if (number_of_devices == 0)
Serial.println("No I2C devices attached\n");
else
Serial.println("done\n");
delay(5000); /*wait 5 sec for next I2C scan*/
}
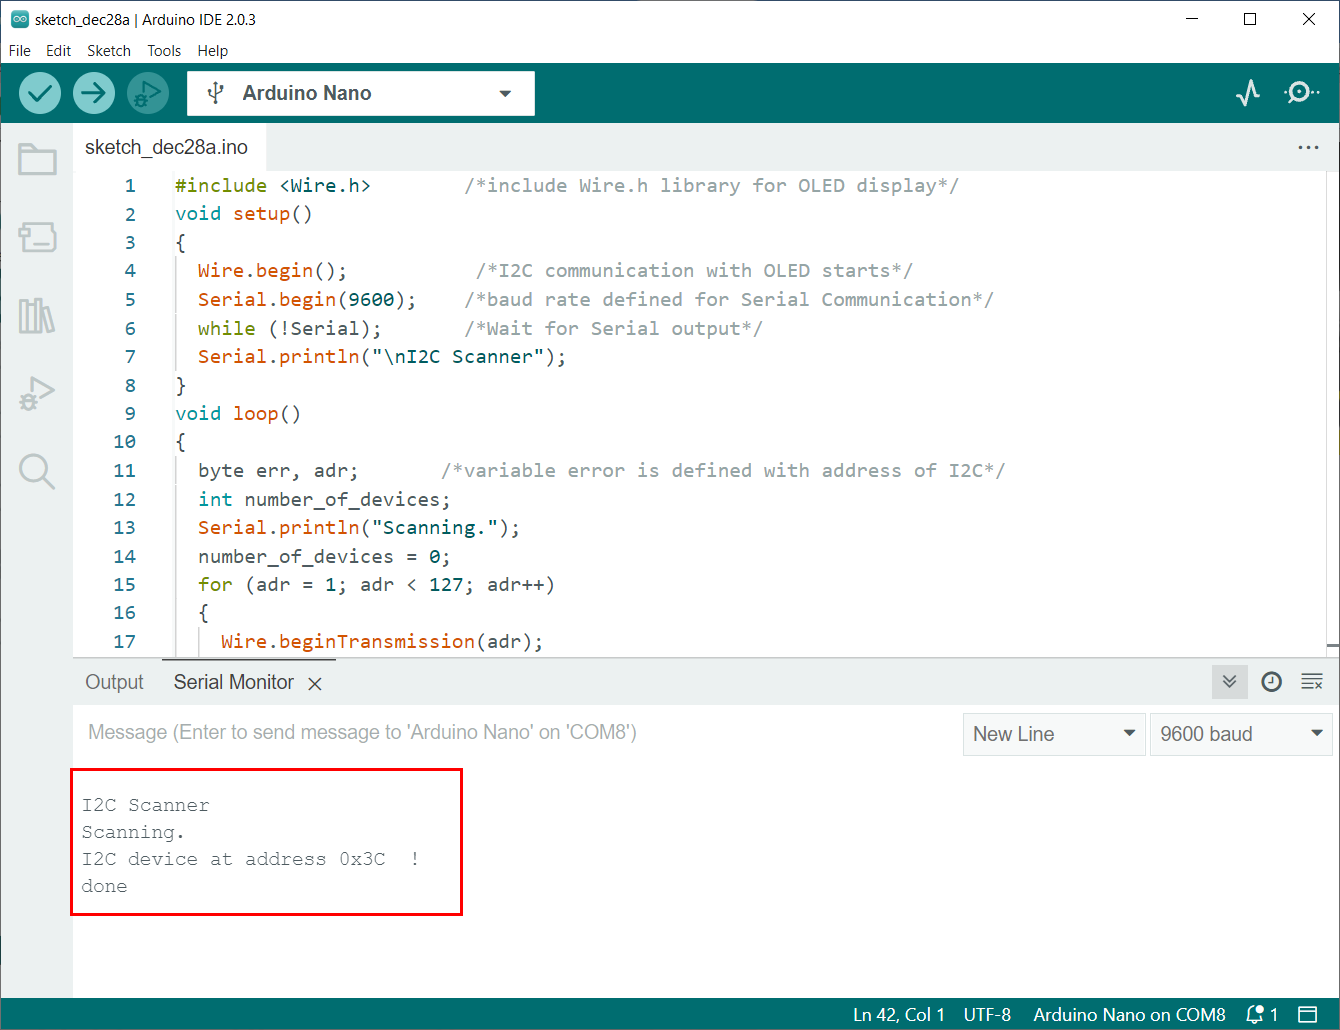
After uploading code to Arduino Nano following mentioned output will appear on serial monitor. Our OLED is connected at 0x3C address.
The 0X3C I2C address will be used in Arduino Nano code for interfacing OLED displays.
5: OLED Display Arduino IDE Example
Once the OLED display libraries are installed in the Arduino IDE, we can see some prewritten example code in the IDE. To test Arduino Nano interfacing, we will upload an SSD1306 example code in Arduino Nano.
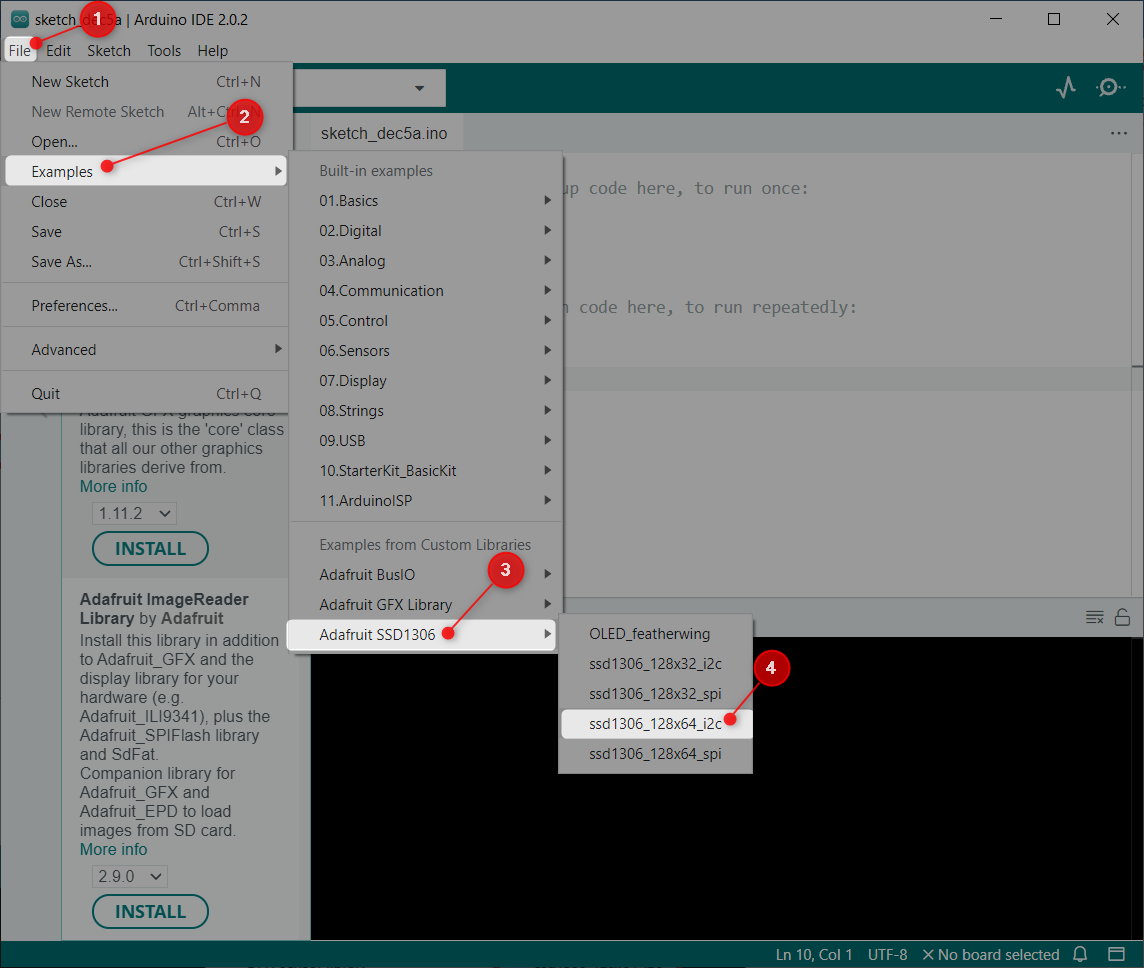
Go to: File>Examples>Adafruit SSD1306>ssd1306_128x64_i2c
Note: Remember to select the correct size and communication protocol while opening example code. Here in our case, we are using I2C OLED with 128X64 size.
5.1: Code
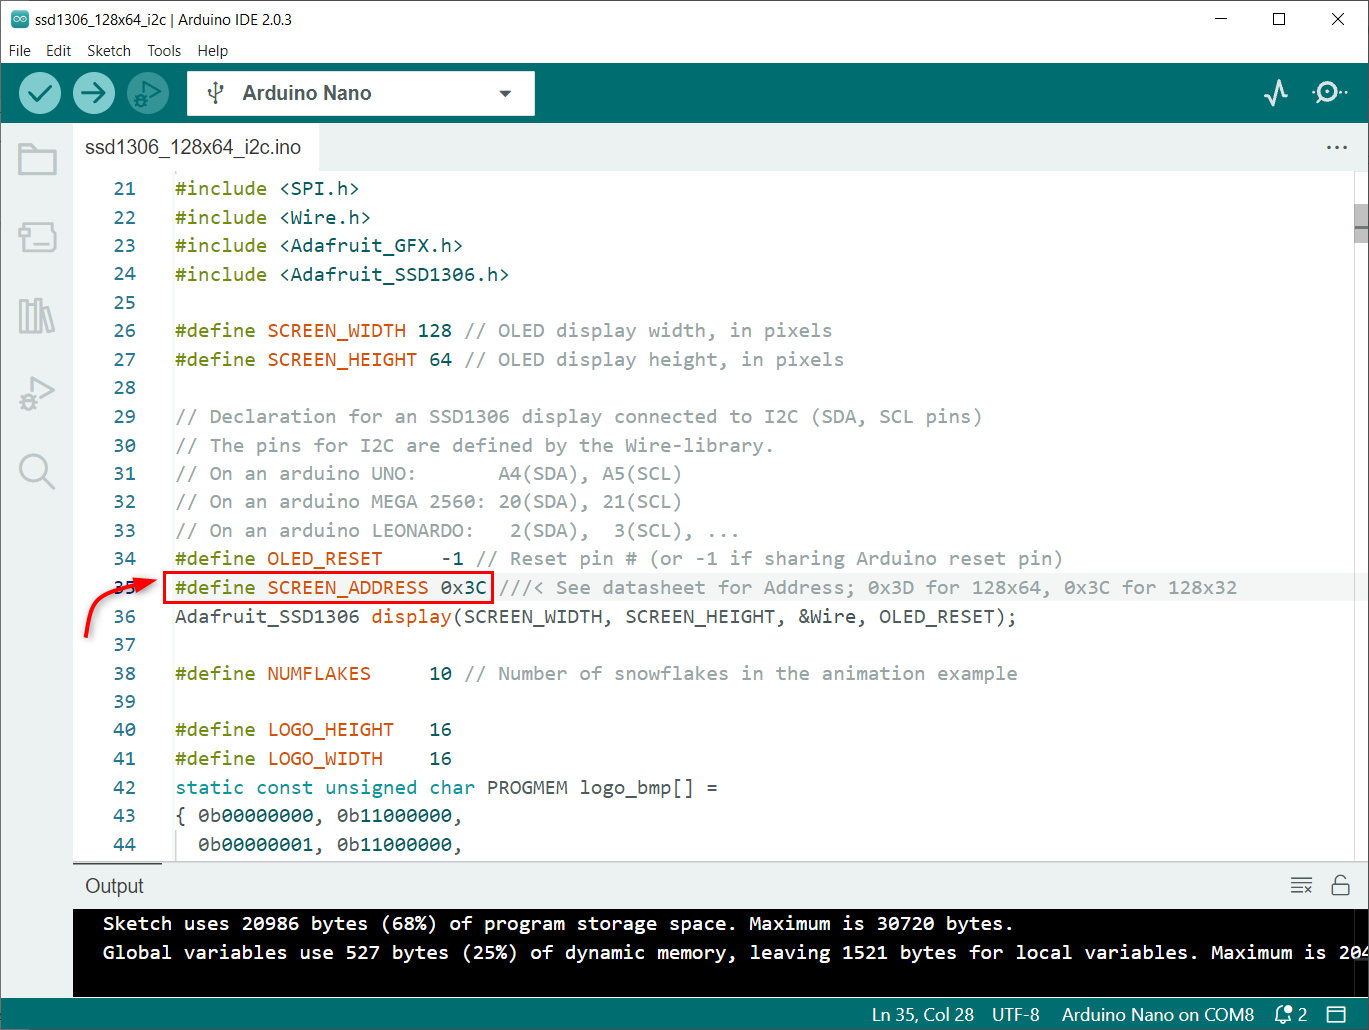
A new IDE window will open where we can see the Adafruit OLED example code. This code will display different patterns on OLED like stars, circles, scrolling text and animated text.
Note: Remember to update I2C address with your own display.
5.2: Output
After uploading code to Arduino Nano, we can see different patterns on the OLED display:
Now we have successfully interfaced the OLED display with Arduino Nano using the prewritten library code. Now we will display some text on an OLED screen using Arduino Nano.
6: Static Text Printing on OLED Display Using Arduino Nano
The Adafruit GFX library allows us to display text on an OLED screen. Now we will write a simple code to display text on OLED.
6.1: Code
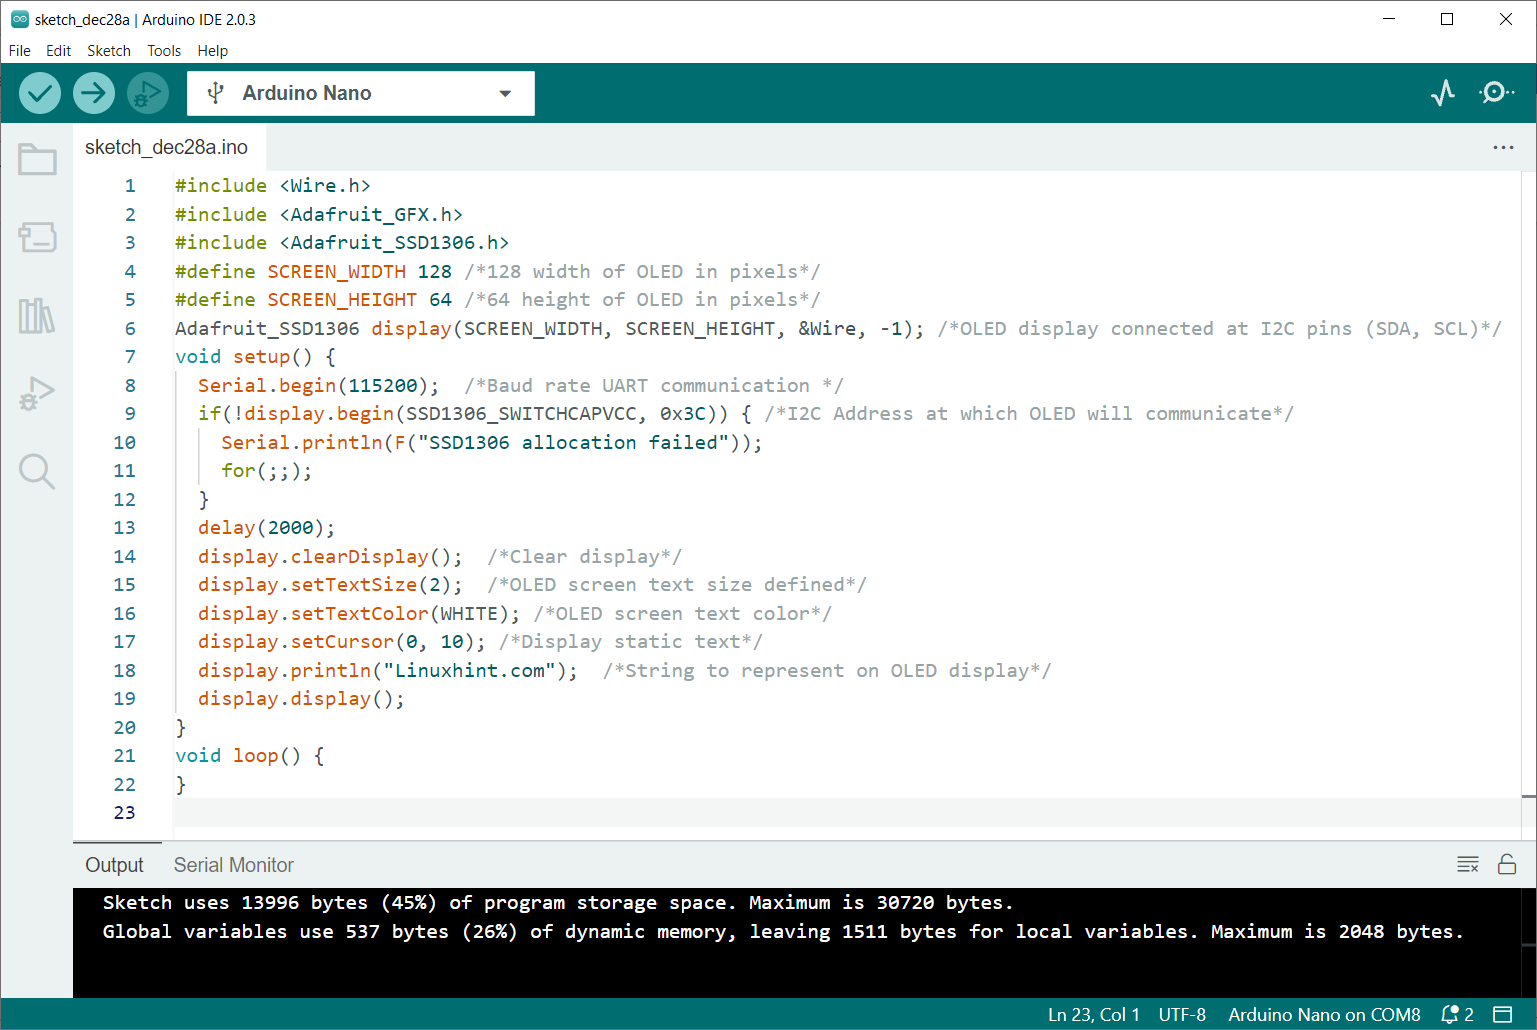
Open Arduino IDE and upload code to Arduino Nano board:
#include <Adafruit_GFX.h>
#include <Adafruit_SSD1306.h>
#define SCREEN_WIDTH 128 /*128 width of OLED in pixels*/
#define SCREEN_HEIGHT 64 /*64 height of OLED in pixels*/
Adafruit_SSD1306 display(SCREEN_WIDTH, SCREEN_HEIGHT, &Wire, -1); /*OLED display connected at I2C pins (SDA, SCL)*/
void setup() {
Serial.begin(115200); /*Baud rate UART communication */
if(!display.begin(SSD1306_SWITCHCAPVCC, 0x3C)) { /*I2C Address at which OLED will communicate*/
Serial.println(F("SSD1306 allocation failed"));
for(;;);
}
delay(2000);
display.clearDisplay(); /*Clear display*/
display.setTextSize(2); /*OLED screen text size defined*/
display.setTextColor(WHITE); /*OLED screen text color*/
display.setCursor(0, 10); /*Display static text*/
display.println("Linuxhint.com"); /*String to represent on OLED display*/
display.display();
}
void loop() {
}
In the start of the code first we imported the two libraries which include wire and Adafruit library. The Wire.h library allows us to use the I2C communication protocol while the second Adafruit library helps to display text on an OLED screen.
Next in code is defined below display function:
The Adafruit display commands take 4 parameters which include the SCREEN_WIDTH and SCREEN_HEIGHT variables. These two variables will take the size of the OLED screen. We are using an OLED with size 128X64. And the third parameter is &Wire.
The last parameter is -1 which indicates that the OLED screen has no external reset button. If we have an OLED screen with a reset button, we will pass this parameter to the GPIO pin. If the reset button is pressed, the OLED will display text.
Next I2C address (0x3C) is defined which we got using the Arduino I2C scanner code.
Lastly, the string which is to be displayed on the OLED screen is defined along with font size and color.
6.2: Output
In the output we can see a string “Linuxhint.com” is displayed on an OLED screen with a font size of 2.
We have completed I2C OLED display interfacing with Arduino Nano board.
Conclusion
I2C OLED (Organic Light-Emitting Diode) is a type of OLED display that communicates with a microcontroller or other device using the I2C protocol. This article covered the code to interface Arduino Nano with I2C OLED display using the Arduino IDE. Using the given method any OLED display can be interfaced with Arduino Nano board.


