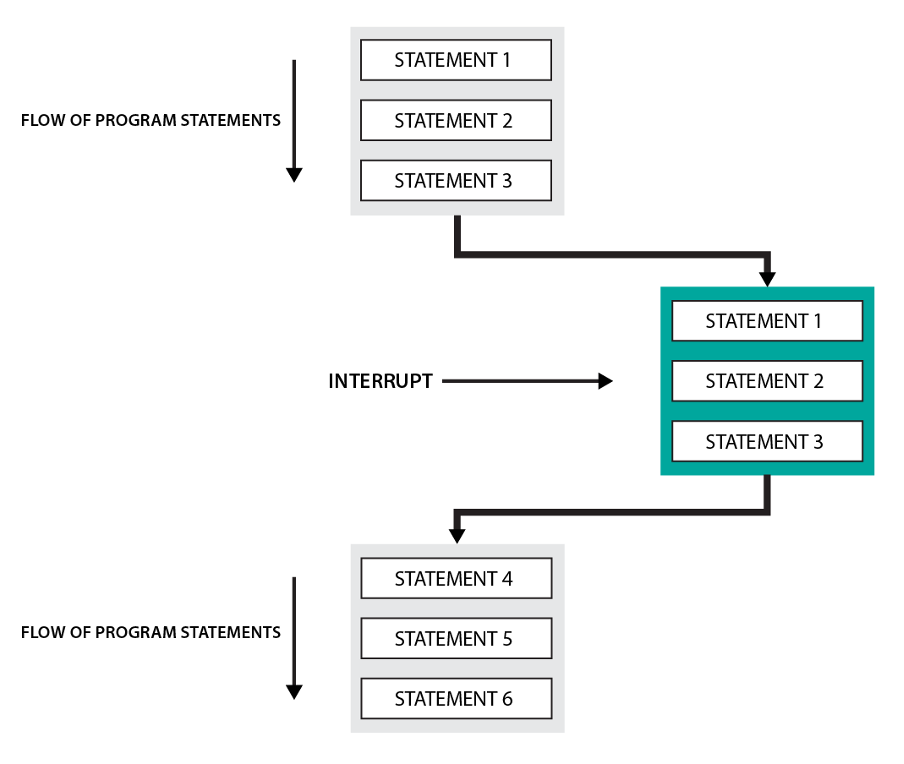
What are interrupts
To understand the concept of interrupts we can take a scenario of a car accident. Suppose the car is moving down the highway and the car electronics are continuously monitored by the microcontroller like measuring the speed of the car and temperature of the cabin and stuff like that. Suddenly the car hits something then the car computer stops everything and executes the opening of air bags. So, here in this example the accident is an interrupt and opening of the airbag is the instruction given if this interrupt occurs. So, after opening the airbags the computer will continue to perform its routine functions.
Interrupts in Arduino
In Arduino programming to handle the interrupt a function called interrupt service routine is used. This function is called when the interrupt is triggered as this function carries the instruction to execute when any interrupt is triggered. Interrupts can be software based or hardware based, mostly interrupts in Arduino are hardware based.
Hardware Interrupts: When a break-in is caused in the flow of an Arduino program by any of the input devices interfaced with Arduno is called the hardware interrupt.
Software Interrupts: When the flow of the Arduino program is disrupted due to the computer or some software, such types of interrupts are called software interrupts.
For hardware-based interrupts two pins for Arduino Uno board are used, that is pin number 2 and 3 and these pins vary for each board.
The function used to declare the interrupt is the attachinterrupt() function. This function has three arguments: first is the interrupt pin, second is the interrupt service routine (ISR) and the last is the state on which the interrupt will occur. Similarly, to declare the interrupt pin for the Arduino digitalPintoInterrupt() function is used. The syntax for the attachinterrupt function is given as:
There are five modes that are used for defining the interrupt state that are as follows:
- When the state changes to LOW from HIGH the mode on which the interrupt will trigger will be LOW.
- If the pin changes its state to HIGH from LOW so the interrupt mode will be HIGH.
- When the interrupt is to be triggered when there is a change in the state of the pin either HIGH or LOW the mode CHANGE will be used.
- When the interrupt is to be triggered as the state goes from LOW to HIGH the RISING mode will be given.
- When the interrupt is to be triggered as the state goes from HIGH to LOW the FALLING mode will be given for the interrupt function.
Example
To give a clear picture of the interrupts in Arduino an example of interrupt is illustrated. In this example the change in the state from HIGH to LOW of LED is taken as a trigger for the interrupt and the code of triggering an interrupt is given:
const int interruptPin = 2;
bool state = HIGH;
void setup() {
pinMode(ledPin, state);
pinMode(interruptPin, INPUT_PULLUP);
attachInterrupt(digitalPinToInterrupt(interruptPin), blink, CHANGE);
}
void loop() {
digitalWrite(ledPin, state);
}
void blink() {
state = !state;
}
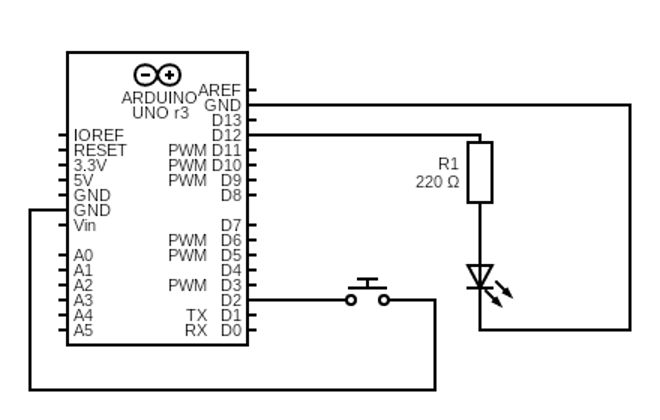
Circuit Diagram

Conclusion
The interrupts in Arduino are used to handle the expected break-ins in the flow of the code. The interrupts can also be used to perform any higher priority task at a specific time by breaking the working flow of the Arduino program. After the interrupt is handled the program will perform the normal tasks that it was performing. In this write-up what are interrupts and how they are used in Arduino are discussed briefly.