Bitwise operators
The bitwise operators are used to apply the Boolean operators on the decimals by converting them into the binary and then these operators applied bit by bit on the binary of that number. For illustration purposes two decimals 12 and 13 are taken if both the numbers are converted in binary the values become (1100) and (1101) respectively.
There are basically six bitwise operators used that are:
- AND
- OR
- NOT
- XOR
- left shift
- right shift
Bitwise AND operator
The first bitwise operator is the AND operator that gives the output one only when both inputs are one or true. The sign for using bitwise is “&”. For further understanding the AND operation is applied on the binary values of 12 and 13 respectively. The operation applies bit by bit to the binaries of the numbers like first bit of 12 that is 1 goes AND with the first bit of 13 that is also one so the result of the operation is one and so on so the result of this AND operation is (1100) that is 12 if we convert it into decimal.
| Decimal | 12 | 13 |
| Binary | 1100 | 1101 |
| Operator | (12&13) | |
| Result | (1100) | |
| Binary to Decimal | 12 |
Bitwise OR operator
The second operator that is OR when applied on the binary numbers gives one as an output when only one of the inputs is 1, so we can say that the output of the OR operation will be zero only when both inputs are zero. The sign used for the OR operator is “|”. To further understand the operation of OR we can apply this OR operator on the binaries of 12 and 13.
The OR operator applies bit by bit on the binaries of 12 and 13 like the first bit of 13 is 1 and the first bit of 12 is also one so the output will be also one the operation on the rest of the bit will be the same. The result is (1101) which is then converted to decimal that is 13
| Decimal | 12 | 13 |
| Binary | 1100 | 1101 |
| Operator | (12 | 13) | |
| Result | (1101) | |
| Binary to Decimal | 13 |
Bitwise NOT operator
The NOT operator, unlike the other operators, has only one input and output and it inverts the input. The sign used to represent the NOT operator is “~”. Here we will use the binary of one decimal. For example, if we take the binary of the 13 that is (1101) after the operation of the operator OR it will come (0010) that is 2 in decimals.
| Decimal | 13 |
| Binary | 1101 |
| Operator | (~13) |
| Result | (0010) |
| Binary to Decimal | 2 |
Bitwise XOR operator
This bitwise operator is called exclusive OR the only difference is that it has with the ordinary OR operation is that its output will be zero when both inputs are one. To represent or to use this operation in Arduino programming the sign used is “^”. If this operation is applied for the numbers 12 and 13 whose binaries are (1100) and (1101) the result of bit wise XOR operation is (0001) and the decimal of this binary is 1.
| Decimal | 12 | 13 |
| Binary | 1100 | 1101 |
| Operator | (12 ^ 13) | |
| Result | (0001) | |
| Binary to Decimal | 1 |
Bitwise Left Shift and right shift
The shifting of the bits of a binary of a number can be done using the shift operator; the shift operator is further divided in two types depending on which side the shift has to be made. To have a shift on the right side the formula used for this is (a/(2^b)).
Similarly, to make a shift on left the formula used is (a*(2^b)). Here a is the number on which the shift is to apply ,2 is the number of bits and b is the number of bit shifts given to the number. The representation of left shift is (<<c) and for right shift is (>>c) here c is the number of bits to which the number is to be shifted For example, If we shift 12 two bits on left and shift two bits on right then the result for left shift will be 48 and for right shift will be 3.
| Decimal | 12 | 12 |
| Binary | 1100 | 1100 |
| Operator | 12 <<2 | 12>>2 |
| Result | 110000 | 11 |
| Binary to decimal | 48 | 3 |
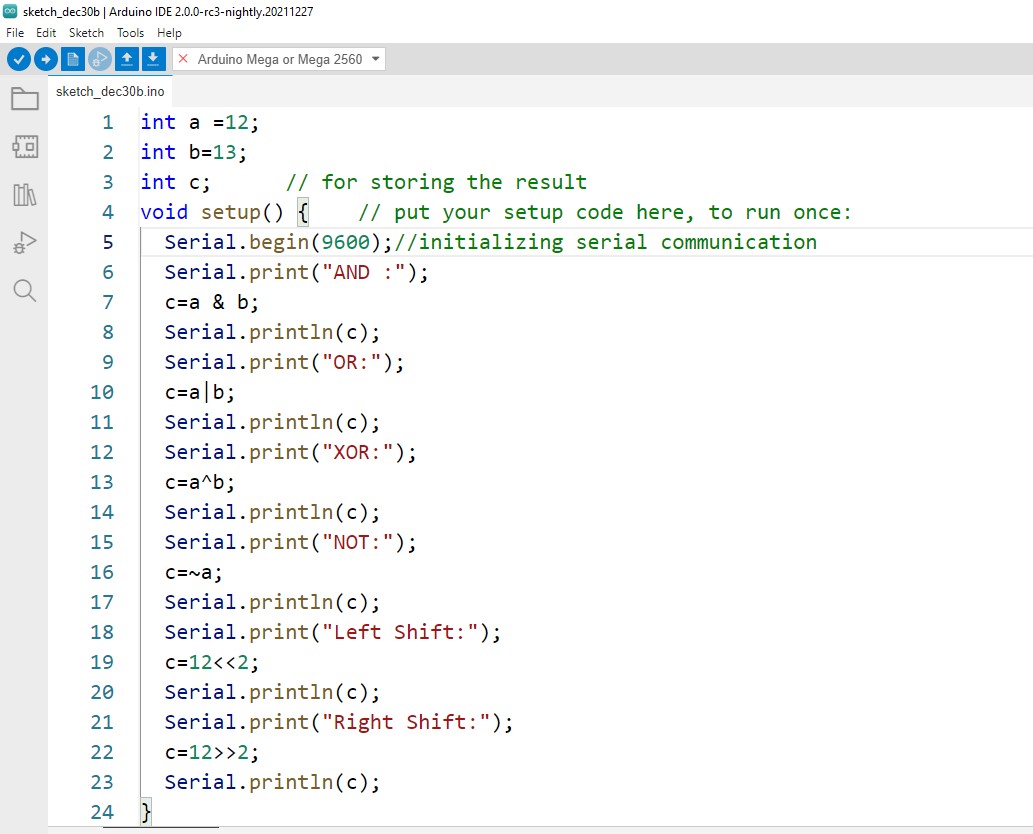
The Arduino Program for all the bit wise operators is compiled to give a clear picture of the functionality of these operators:
int b=13;
int c; // for storing the result
void setup() { // put your setup code here, to run once:
Serial.begin(9600);//initializing serial communication
Serial.print("AND :");
c=a & b;
Serial.println(c);
Serial.print("OR:");
c=a|b;
Serial.println(c);
Serial.print("XOR:");
c=a^b;
Serial.println(c);
Serial.print("NOT:");
c=~a;
Serial.println(c);
Serial.print("Left Shift:");
c=12<<2;
Serial.println(c);
Serial.print("Right Shift:");
c=12>>2;
Serial.println(c);
}
void loop() {
// put your main code here, to run repeatedly:
}
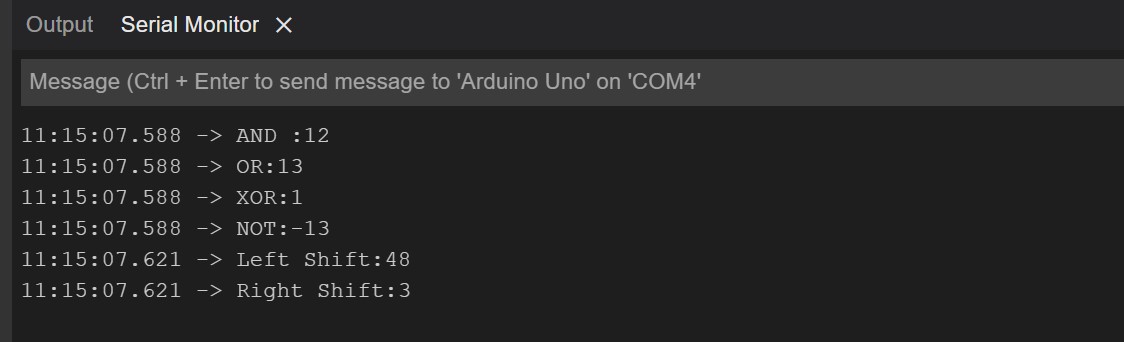
Output
Conclusion
To apply logical operation on two numbers bit by bit the bitwise operators are used, and these operators help in making the condition used to perform a specific task. This write-up briefly explains each type of bitwise operator with examples and to give a clear concept of these operators and a simple Arduino code is also given.