1. Using Graphical Software Remotely: There are many software that needs high-spec computers to run (i.e., Autodesk Maya, AutoCAD, Blender). Your laptop/desktop may not have the required specs to run it. At times, a particular software may run on a specific operating system that you don’t want to install on your laptop/desktop just for that one piece of software. In these cases, you can install the required graphical software on other computers and access them remotely from your laptop/desktop and use the required graphical software from your laptop/desktop.
2. Solving Problems Remotely: If you’re the tech guy of your office, at times, you may need to solve problems on the computers of your colleagues or show them how to do something. You can remotely connect to your colleague’s computer and solve his/her problem. This will save you a lot of your time that you would otherwise spend on walking or in the lift or stairs to go to your colleague’s room.
3. Remote Graphical/Command-Line Administration: You may be a system administrator of a company. The company may have a lot of computers that you need to administer. Going from desk to desk or room to room to administer every single computer of your company will be many hassles for you. Instead, you can sit and relax on your desk and remotely connect to the computers you need to administer from your laptop/desktop. This will save you a lot of time and extra work.
4. Accessing Virtual Machines: You may want to run virtual machines on your server using Type-I hypervisors like Proxmox VE, VMware vSphere, KVM, etc. In that case, to use the virtual machines, you need to remotely connect to the virtual machines from your laptop/computer as these virtual machines won’t have any physical display, keyboard, or mouse.
This article will show you different methods of accessing other computers and virtual machines on the same network with Linux. So, let’s get started.
Connecting to Other Linux Computers via SSH:
You can connect to other Linux computers on your network from the command-line via SSH. The remote computer must have the OpenSSH server program installed for SSH to work.
If you need any assistance on installing the OpenSSH server on your computer, depending on the Linux distribution you’re using, read one of the following articles:
- Debian 9: Read the article Enable SSH Server on Debian.
- Debian 10: Read the article Enable SSH on Debian 10.
- CentOS 8: Read the article How to Enable SSH on CentOS 8.
- Ubuntu 18.04 LTS: Read the article How to Enable SSH Server on Ubuntu 18.04 LTS.
- Ubuntu 20.04 LTS: Read the article How to Install and Enable OpenSSH on Ubuntu 20.04.
- Arch Linux: Read the article Arch Linux SSH Server Setup, Customization, and Optimization.
- Kali Linux 2020: Read the article How to Enable SSH in Kali Linux 2020.
To connect to the remote computer via SSH, you need to know the IP address of that remote computer.
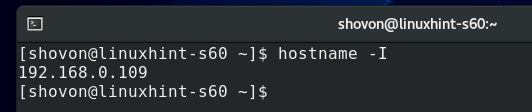
If you don’t know the IP address of the remote computer, ask your colleague to open a Terminal on the remote computer and run the following command:

Once your colleague finds out the IP address of his/her computer, he/she can send it to you. In my case, the IP address is 192.168.0.109. It will be different for you. So, make sure to replace it with yours from now on.
You also need to know the username and the login password of the remote computer. Again, your colleague can send it to you.
Once you know the login username, password, and IP address of the remote computer, you can connect to it via SSH as follows:
NOTE: Replace <username> with the login username and <ip-addr> with the IP address of the remote computer.

As you’re connecting to the remote computer via SSH for the first time, you will see the following prompt.
Type in yes and press <Enter> accept the fingerprint.

Type in the login password of the remote computer and press <Enter>.
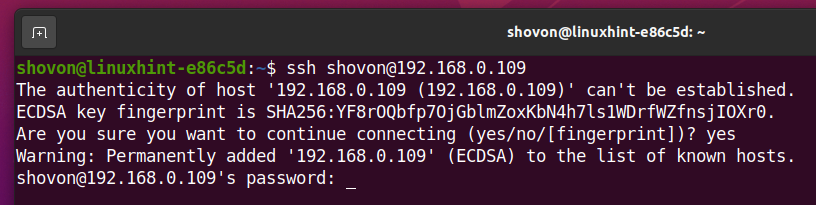
You should be connected to the remote computer via SSH.
Now, you can run any command you want on the remote computer.

Connecting to Windows Computers via RDP:
The most common way to connect to a remote Windows computer is via RDP (Remote Desktop Protocol). The RDP protocol is built-in to the Windows operating system. So, you don’t need to install anything on the remote Windows computer for RDP to work. All you need to do is, enable RDP on the remote computer, and you’re good to go.
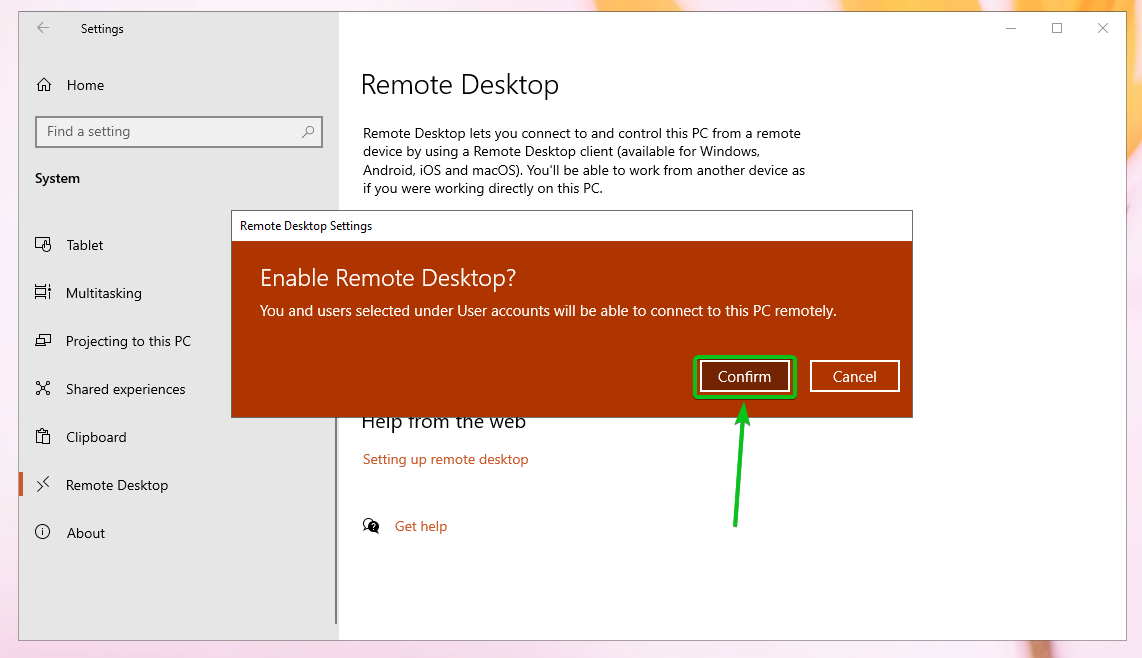
To enable RDP on Windows 10, open the Windows 10 Settings app and click on System as marked in the screenshot below.

Navigate to the Remote Desktop section and click on the Enable Remote Desktop toggle button as marked in the screenshot below.

Click on Confirm as marked in the screenshot below.
RDP should be enabled.

Once RDP is enabled on the remote Windows machine, you need to know the IP address of that remote Windows machine.
To find the IP address of the remote Windows machine, press the <Windows> key and press R. The Run prompt window should be displayed. Now, type in powershell or cmd and press <Enter>.
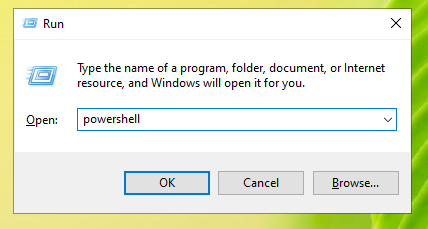
A Terminal (PowerShell or CMD, depending on the command you used to start the terminal) should be opened.

Now, run the following command:

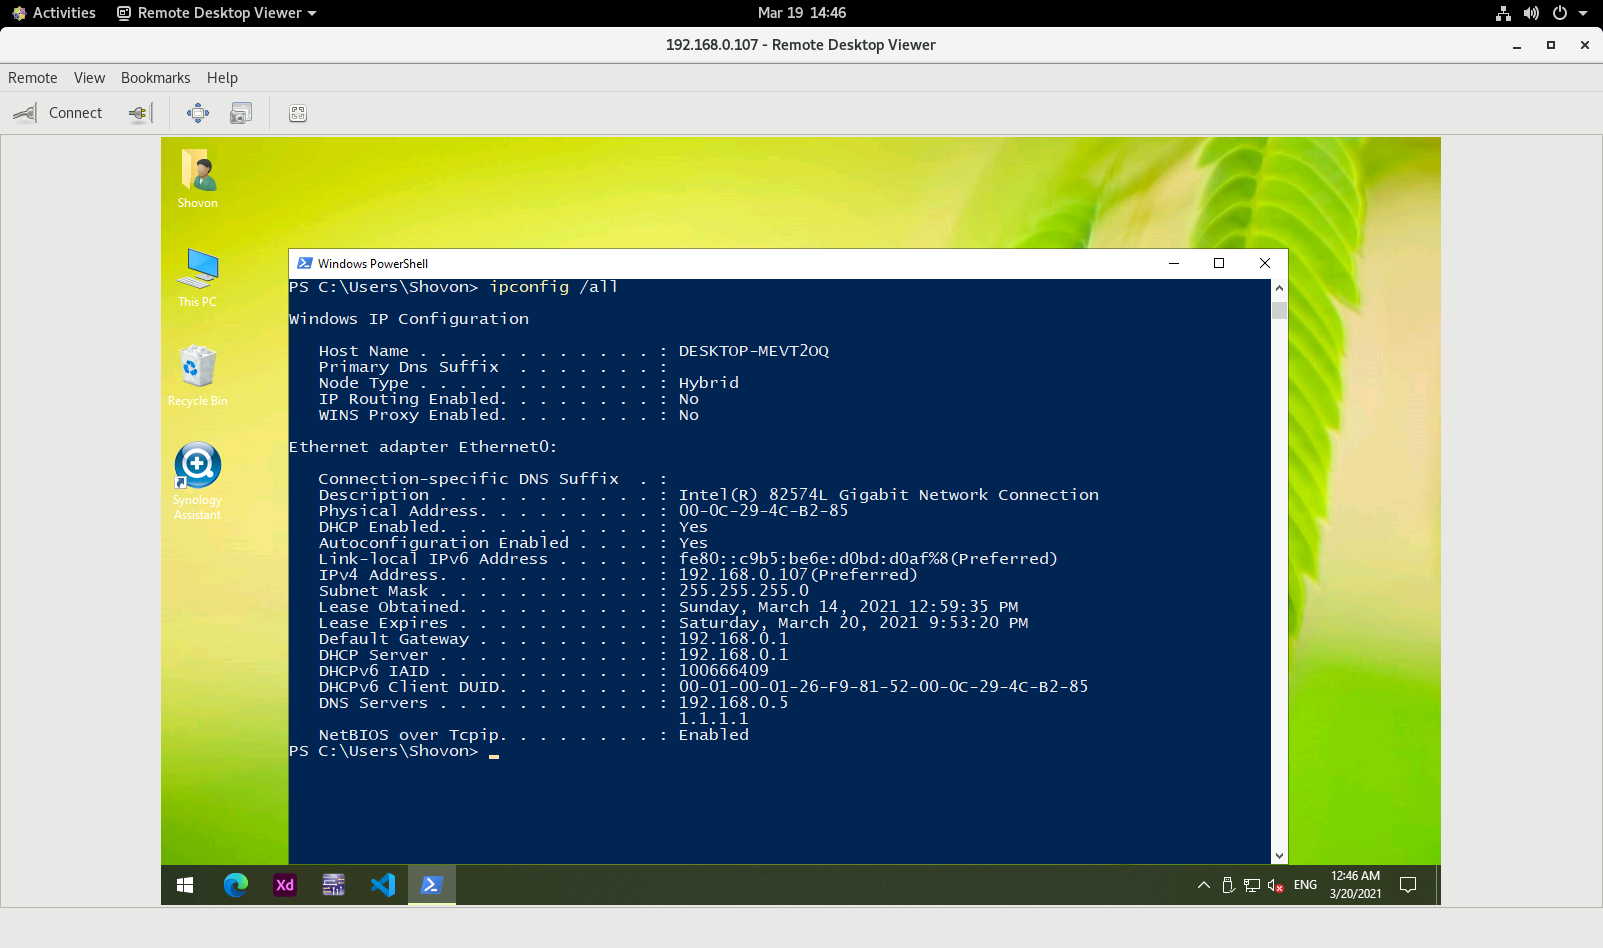
The IP address of the remote Windows computer should be displayed. In my case, the IP address is 192.168.0.107. It will be different for you. So, make sure to replace it with yours from now on.

Once you know the IP address of the Windows computer, you can use an RDP client to connect to the remote Windows computer from Linux. There are many RDP clients available on Linux. But, in this article, I will use the Vinagre remote desktop client to connect to the Windows computer via RDP.
If you don’t have the Vinagre remote desktop client installed on your computer, and if you need any assistance installing the Vinagre remote desktop client on your desired Linux distribution, you can check the article How to Install Vinagre Remote Desktop Client on Linux.
Once you have Vinagre installed, you can start it from the Application Menu of your computer.
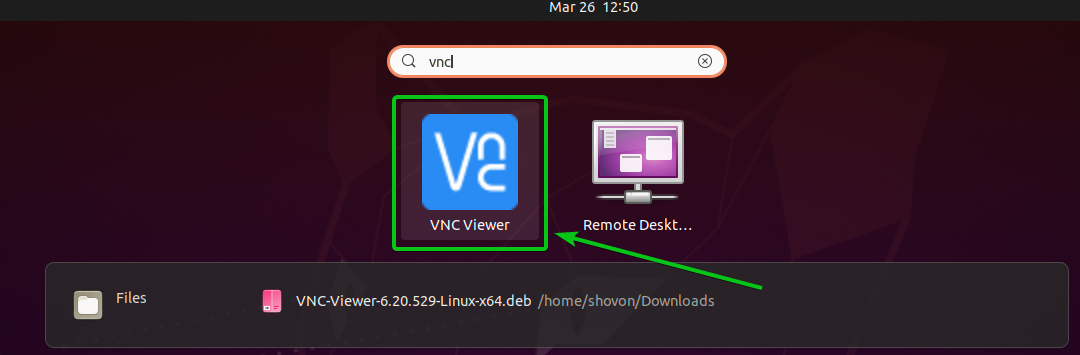
To start Vinagre, open the Application Menu and search for vinagre and click on the Remote Desktop Viewer icon as marked in the screenshot below.

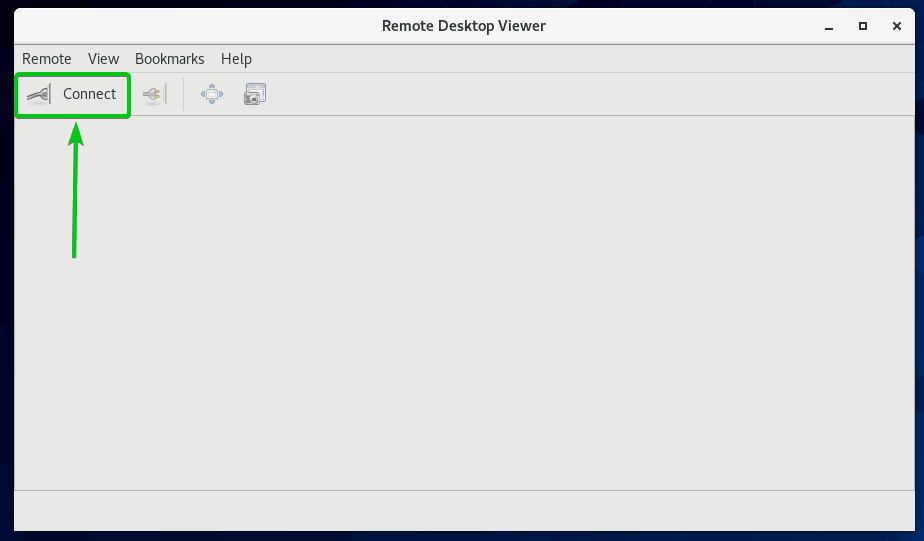
The Vinagre remote desktop client should be opened.

Now, click on Connect.
Select RDP from the Protocol drop-down menu, type in the IP address of your Windows computer in the Host section, and type in the display Width and Height in pixels in the RDP Options section as marked in the screenshot below.

Then, click on Connect.

You will be asked to type in the login username and password of the Windows computer you’re connecting to.
Type in the login username and password and click on Authenticate.

You should be connected to the Windows computer, as you can see in the screenshot below.
Connecting to Remote Computers via VNC:
VNC (Virtual Network Computing) is a protocol for accessing and controlling the graphical desktop environment of a computer remotely from another computer.
To connect to a computer remotely via the VNC protocol, you must have the VNC server program installed and configured on the computer you want to access remotely.
If you need any assistance on installing the VNC server on your computer, depending on the Linux distribution you’re using, read one of the following articles:
- CentOS 8: Read the article Configuring VNC Server on CentOS 8.
- Ubuntu 20.04 LTS: Read the article How to Enable Screen Sharing on Ubuntu 20.04 LTS.
- Debian 10: Read the article How to Enable Screen Sharing on Debian 10.
- Linux Mint 20: Read the article Install VNC Server on Linux Mint 20.
- Fedora 32: Read the article How to Configure VNC Server in Fedora Linux?.
Once you have the VNC server installed on your remote computer, you need a VNC client to connect to your remote computer from another computer.
There are many VNC clients available on Linux. i.e., Vinagre, Remmina, RealVNC VNC Viewer, etc.
If you need any assistance installing a VNC client on your desired Linux distribution, you can read one of the following articles depending on the VNC client you want to install.
Vinagre: Read the article How to Install Vinagre Remote Desktop Client on Linux.
RealVNC VNC Viewer: Read the article How to Install RealVNC VNC Viewer on Linux.
This article will use the RealVNC VNC Viewer VNC client to show you how to connect to a remote computer using the VNC protocol.
Once RealVNC VNC Viewer is installed, you can start VNC Viewer from your desired Linux distribution from the Application Menu.
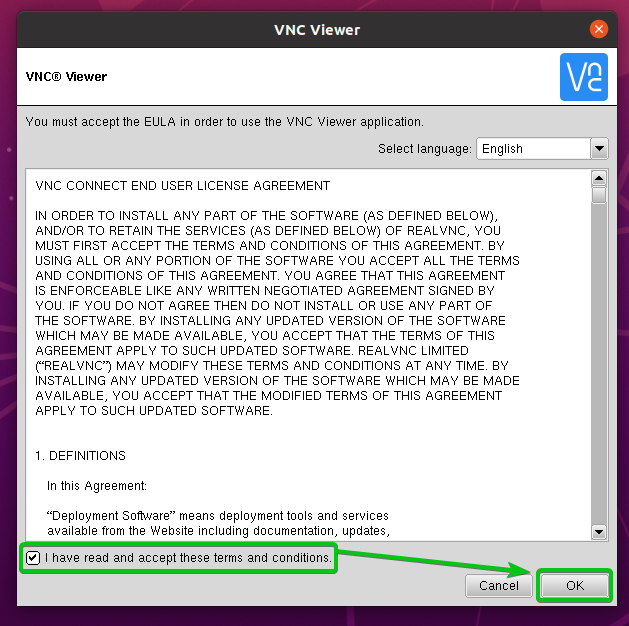
Check the I have read and accept these terms and conditions checkbox and click on OK as marked in the screenshot below.
Click on GOT IT as marked in the screenshot below.
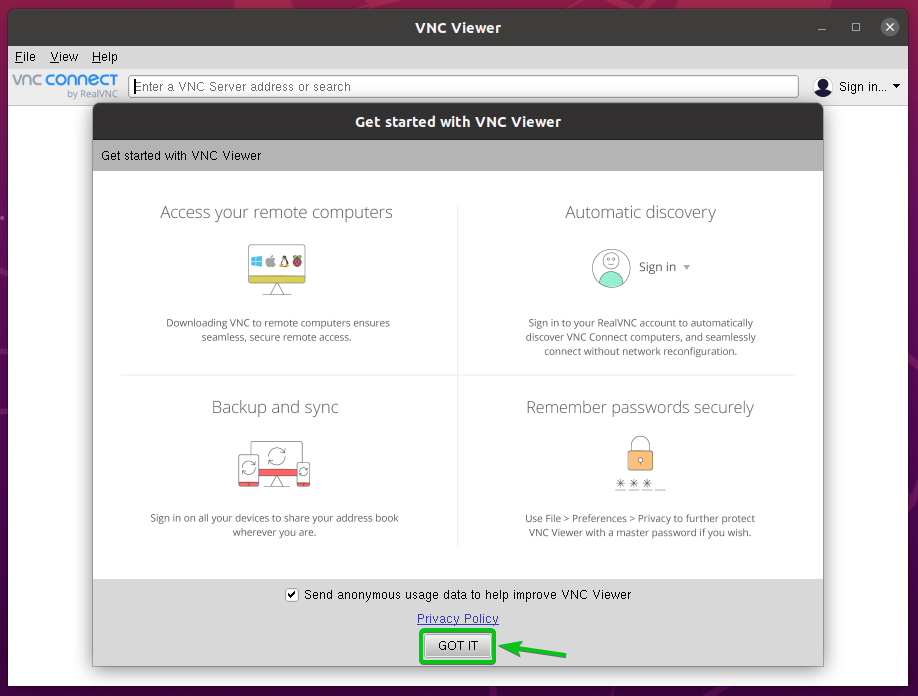
VNC Viewer should be ready to connect to remote computers.

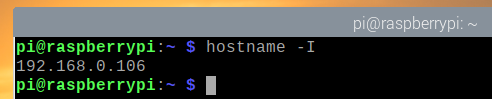
To connect to your remote computer via VNC, you need to know the IP address of that remote computer.
Please run the following command on the remote computer to find its IP address.

The IP address of the remote computer should be printed on the terminal.
As you can see, the IP address of the remote computer I want to connect to is 192.168.0.106. It will be different for you. So, make sure to replace it with yours from now on.
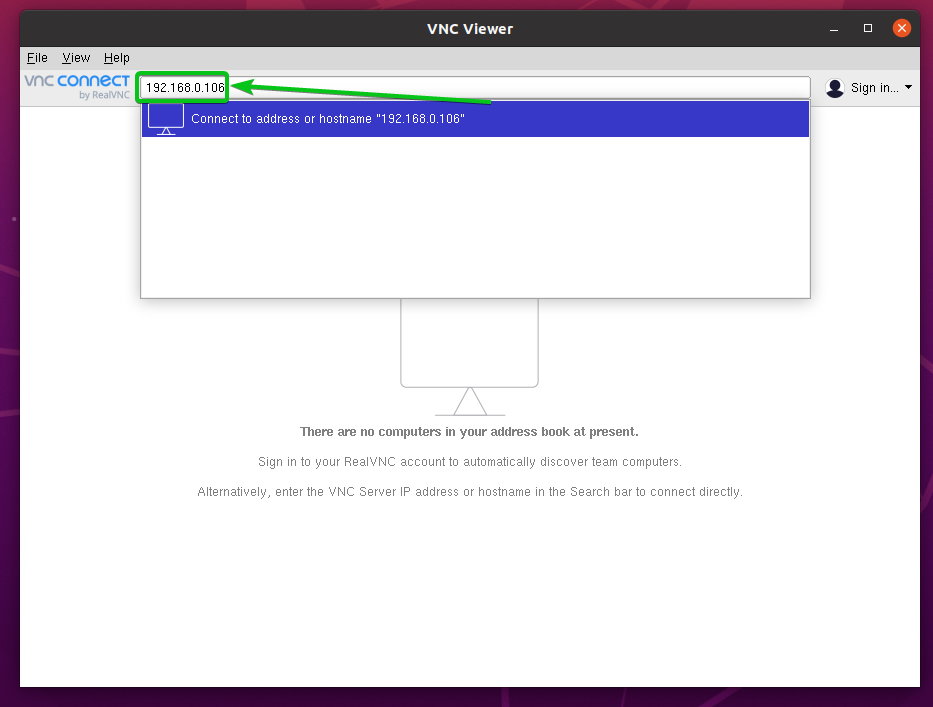
Now, to connect to a remote computer, type in the hostname or IP address of the remote computer you want to connect to and press <Enter>.
Click on Continue.

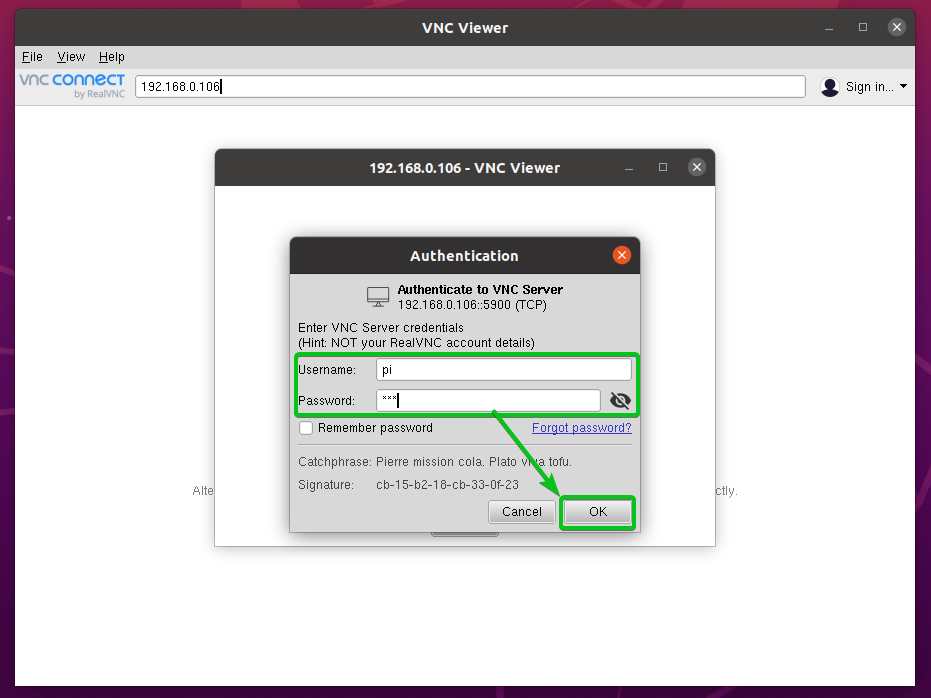
You will be asked to type in the login username and password of the remote computer.

Type in the login username and password of the remote computer you want to connect to and click on OK as marked in the screenshot below.
You should be connected to the remote computer.

Connecting to VMware Virtual Machines via VMRC:
To connect to VMware vSphere or VMware ESXi virtual machines remotely, you can use the official VMware program VMware Remote Console (VMRC).
To learn more about VMware Remote Console (VMRC) and how to install it on your favorite Linux distribution, check the article How to Install VMRC (VMware Remote Console) on Linux.
To show you how to connect to a VMware ESXi virtual machine with VMware Remote Console (VMRC), I have prepared a VMware ESXi virtual machine s01, as you can see in the screenshot below.

To connect to the VMware ESXi virtual machine s01 with VMware Remote Console (VMRC), click on Console as marked in the screenshot below.

Then, click on Launch remote console as marked in the screenshot below.
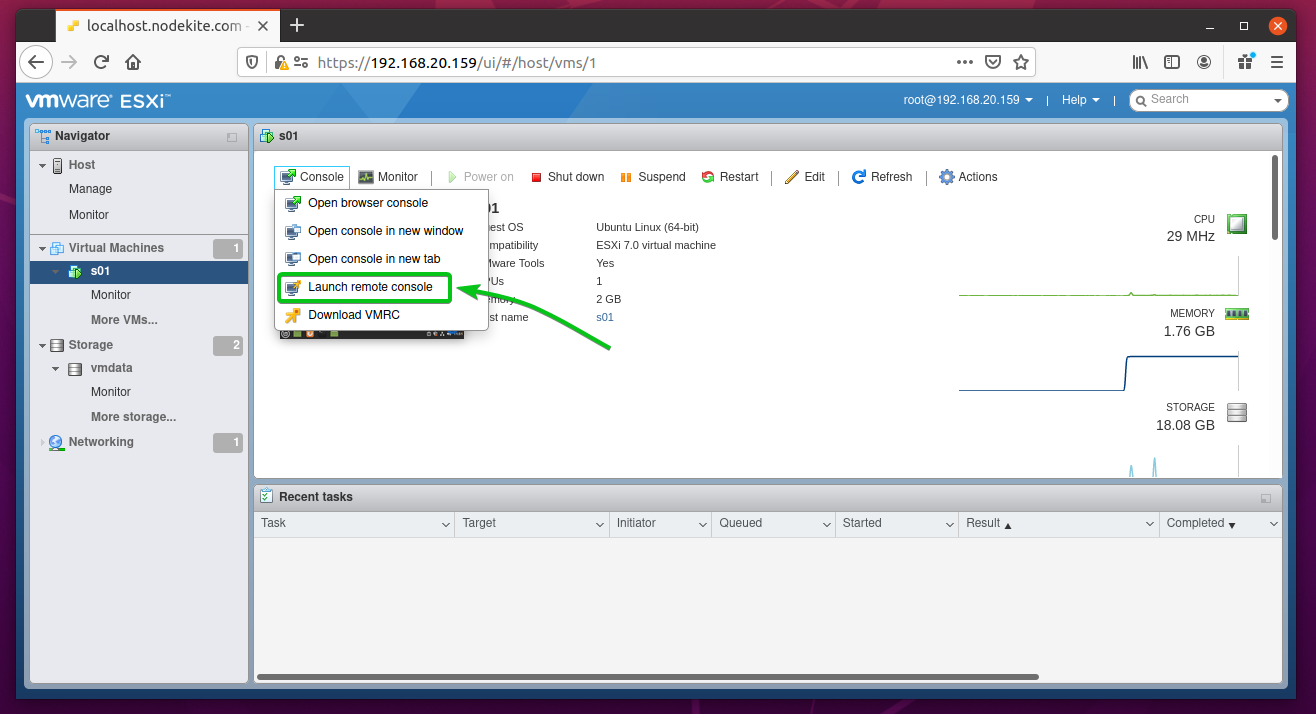
The VMware ESXi virtual machine s01 should be opened with VMware Remote Console (VMRC), as you can see in the screenshot below.

Connecting to Proxmox Virtual Machines via SPICE:
To connect to Proxmox VE virtual machines remotely, you can use the official KVM Virt Viewer. Virt Viewer uses the SPICE protocol to connect to KVM virtual machines remotely.
To learn more about KVM Virt Viewer and how to install it on your favorite Linux distribution, check the article How to Install Virt Viewer on Linux.
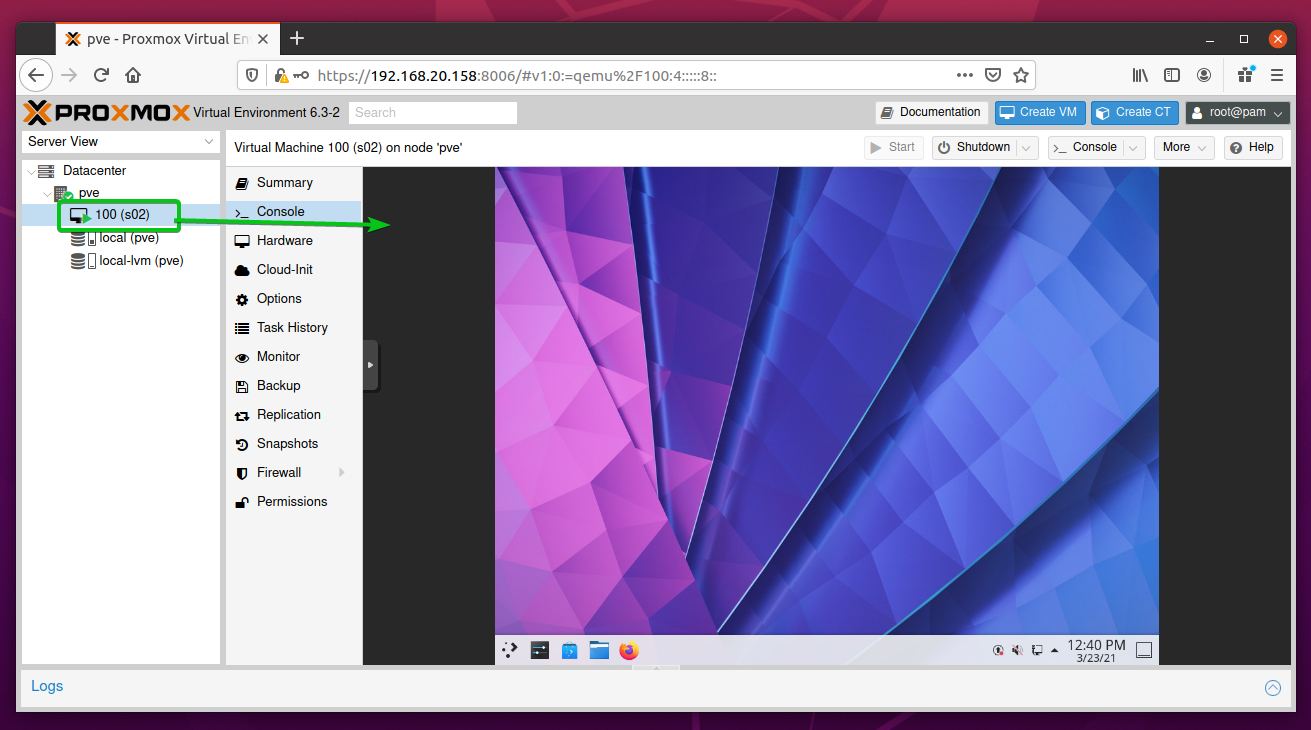
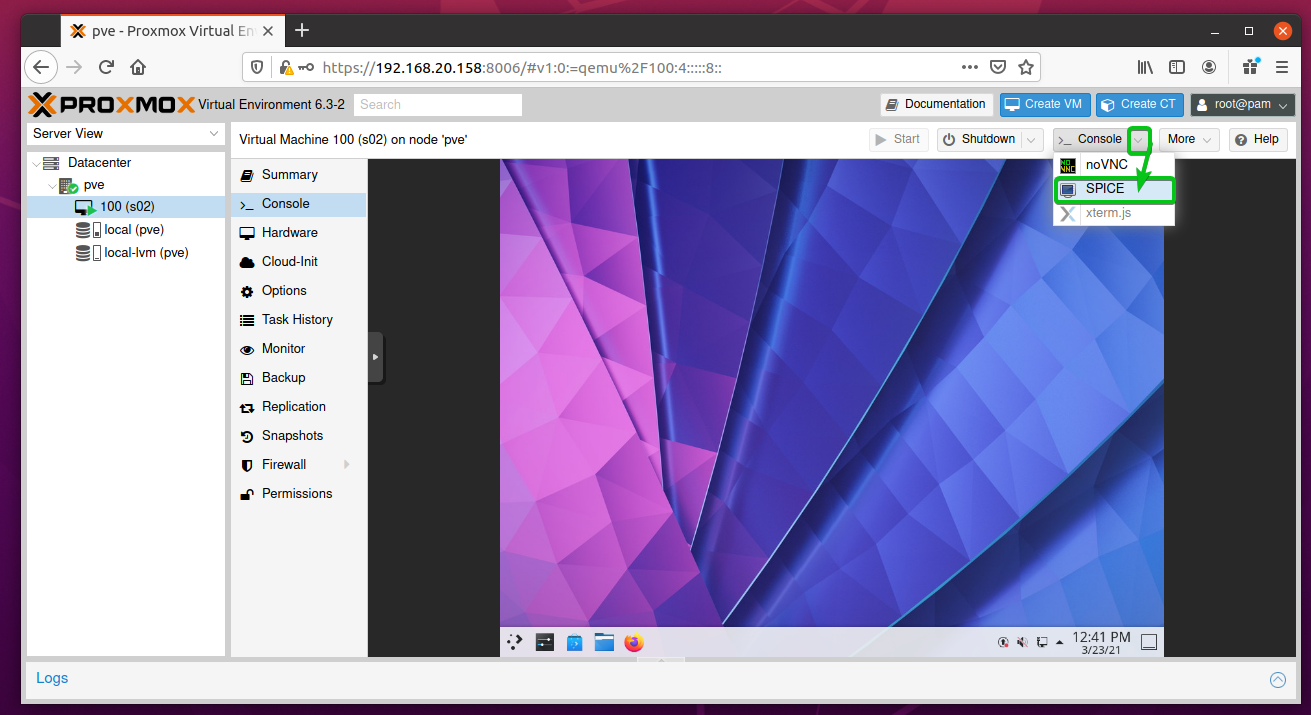
To show you how to connect to a Proxmox virtual machine via the SPICE protocol using Virt Viewer, I have prepared a Proxmox virtual machine s02, as you can see in the screenshot below.
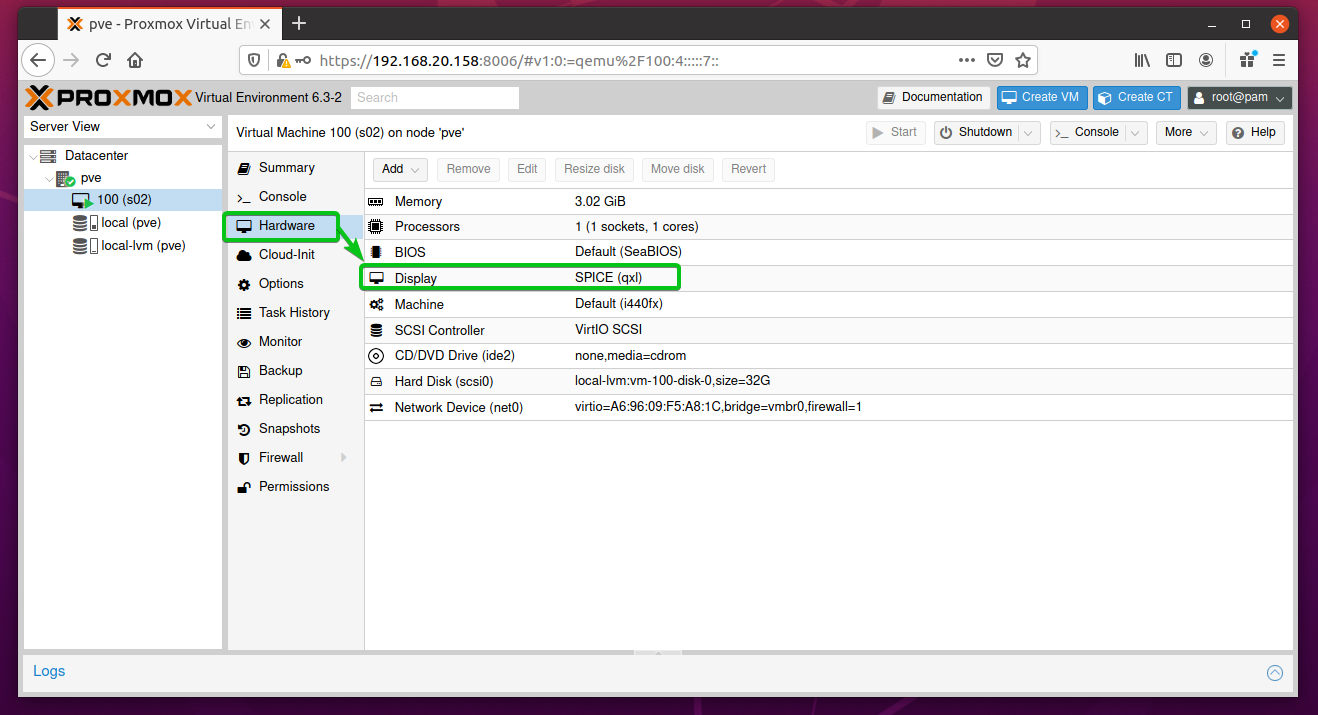
To connects to a Proxmox virtual machine with Virt Viewer, you must set the Display Hardware of the virtual machine to SPICE (qxl), as shown in the screenshot below.
Once you’ve set the Display hardware of the virtual machine to SPICE (qxl), navigate to the Console section of the virtual machine and click on Console > SPICE as marked in the screenshot below.
Your browser should prompt you to open or save the Virt Viewer connection configuration file.
Select Open with, select Remote Viewer from the dropdown menu, and click on OK as marked in the screenshot below.

You should be connected to the Proxmox virtual machine, as you can see in the screenshot below.

Conclusion:
This article shows you how to access a remote computer on the same network from Linux. I have shown you different methods, protocols, and tools to connect to remote computers from another computer on the same network. I have covered text-based remote access protocol SSH, graphical remote access protocols RDP and VNC, Proxmox virtual machine’s remote access protocol SPICE, and VMware ESXi or VMware vSphere virtual machine’s remote access tool VMRC. I have shown you how to use the remote access client programs Vinagre, RealVNC VNC Viewer, Virt Viewer, and VMRC to connect to remote computers via their supported remote desktop protocols as well.