ESP32 WiFi Modes
ESP32 WiFi can be used in three different modes. Following modes can be called using the WiFi.mode() function by defining the desired mode inside the argument of this function.
| WiFi Mode | Function |
| Station | WiFi.mode(WIFI_STA) |
| Access Point | WiFi.mode(WIFI_AP) |
| Station + Access Point | WiFi.mode(WIFI_STA_AP) |
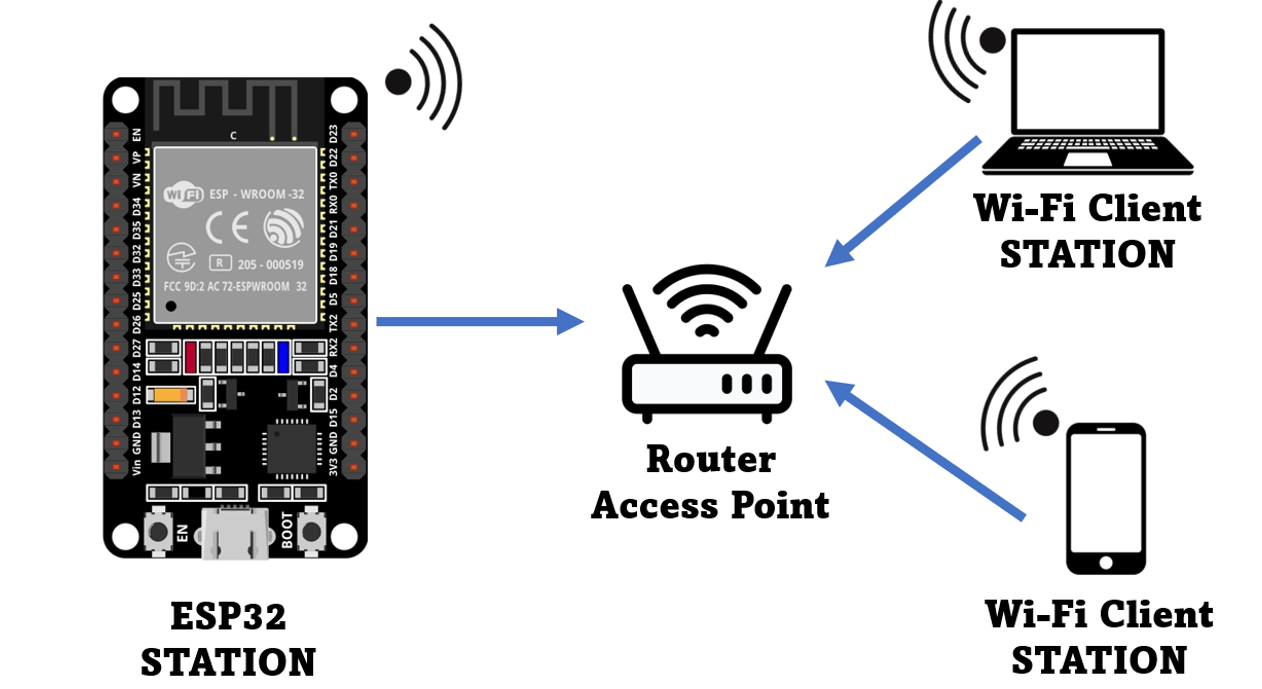
WiFi Station
Using ESP32 as a WiFi station allows you to use it like a WiFi router at home. When ESP32 is connected to a network using a WiFi router the router assigns a unique IP address to ESP32 board. To exchange information with other hardware connected to the same router we have to call their unique IP address in ESP32 code.
Once the router is connected to the ESP32 board it has the same internet connection as other devices. Using the internet, we can upload data to the server or control other devices connected to the same WiFi router. We can also read data from APIs such as weather data and can also publish data images or icons to web servers.
Connect ESP32 as WiFi Station
To connect the ESP32 board as a Wi-Fi station first thing we have to do is to set the WiFi mode using the mentioned command:
If ESP32 is connected to any other network so that network should be in station mode to use it with ESP32.
Next using WiFi.begin() function and by passing the network SSID and password as its argument we can connect to any network. Following is the syntax for the ESP32 board for connecting to a Wi-Fi network in station mode:
When the connection is established, following output will appear:
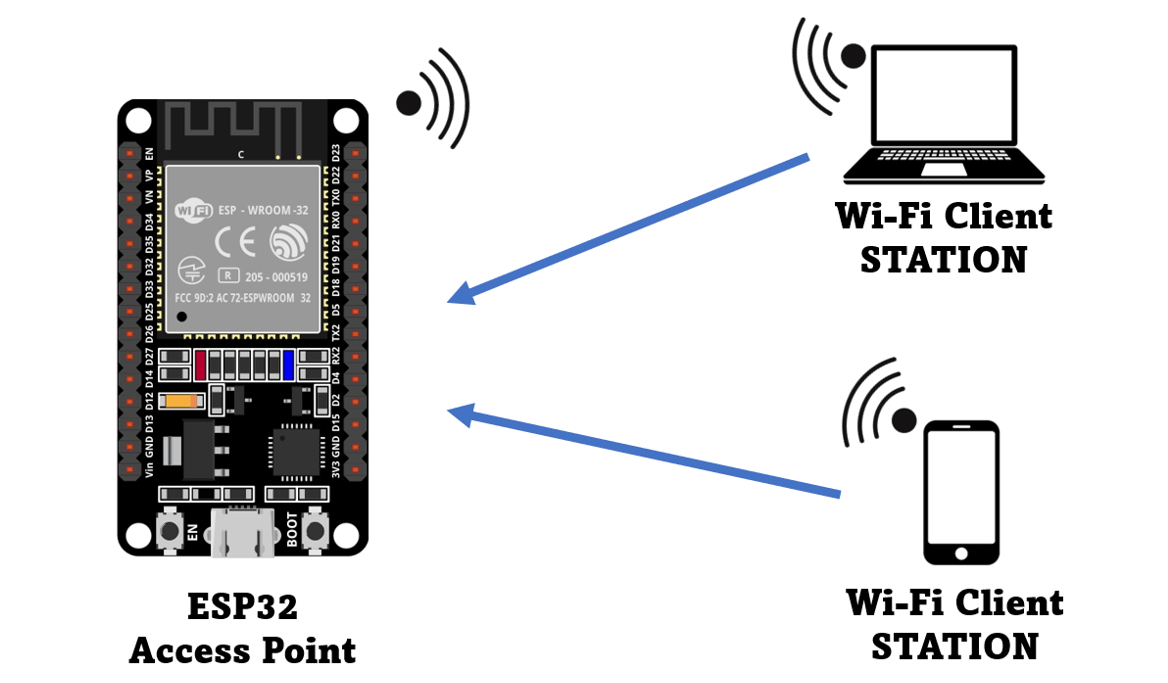
Access Point
When ESP32 is in access point mode any device having WiFi can be connected to it just like a conventional router. It can also provide devices with an internet connection, and we can build our own Wi-Fi network around it. In access point mode we can control devices independently of having a separate Wi-Fi router.
The ESP32 access point is not like the normal Wi-Fi router because it’s only connectivity option is wireless. ESP32 does not support wire connection for the internet like a normal router so it is called a soft AP (Soft Access Point).
Connect ESP32 as Access Point
First define the WiFi mode as access point using the command given:
Then using the softAP() function gives a SSID a name to your ESP32 network and Password which other devices needed to connect to ESP32. Both these are passed as arguments to the softAP() function. In case if no password is needed, set it to NILL.
There are some optional parameters that we can also pass to the softAP() function.
- ssid: Define Access point (max 63 characters)
- password: Password of Access point (min 8 characters)
- channel: Wi-Fi channels (1-13)
- ssid_hidden: 0 for broadcasting SSID and 1 for hiding SSID
- max_connection: maximum client can be connected (1-4)
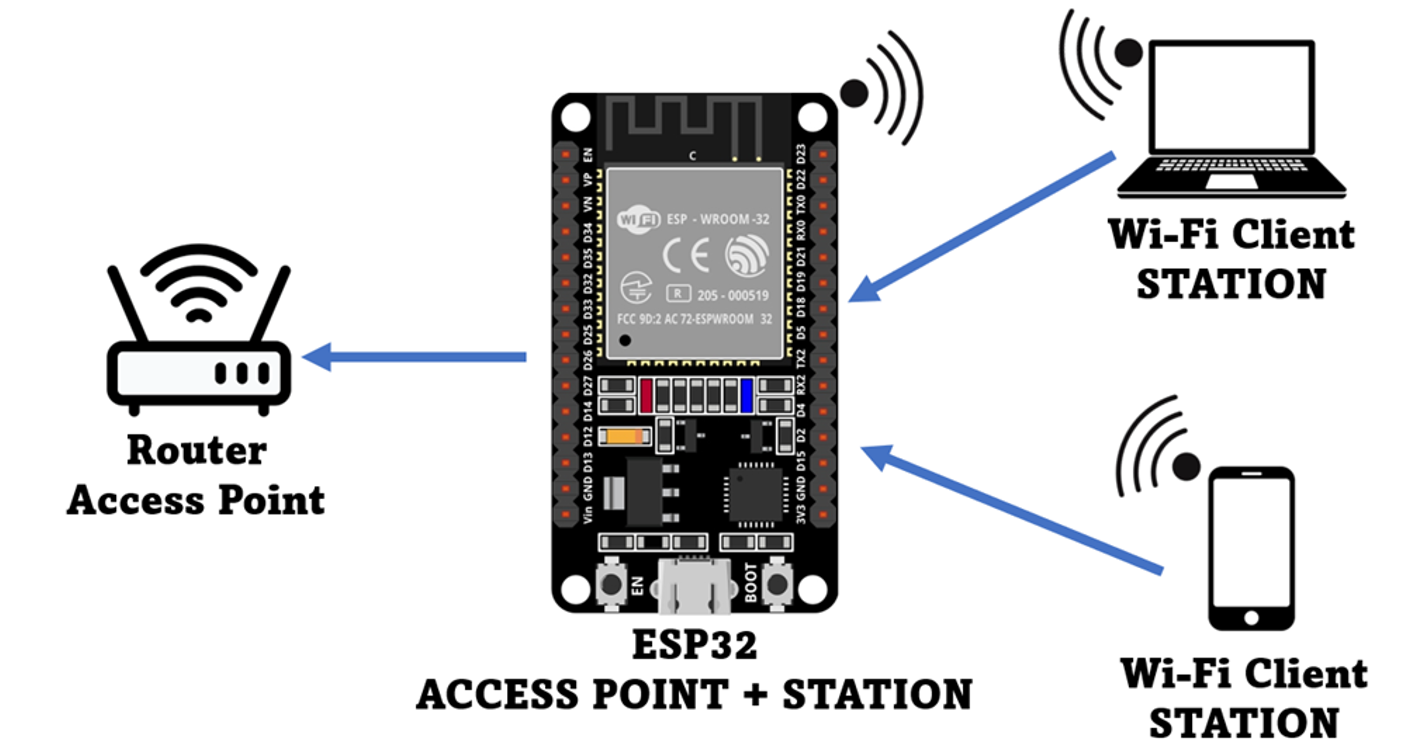
Station + Access Point
To set ESP32 as Wi-Fi station and access point follow the given command below:
Scan a WiFi Network
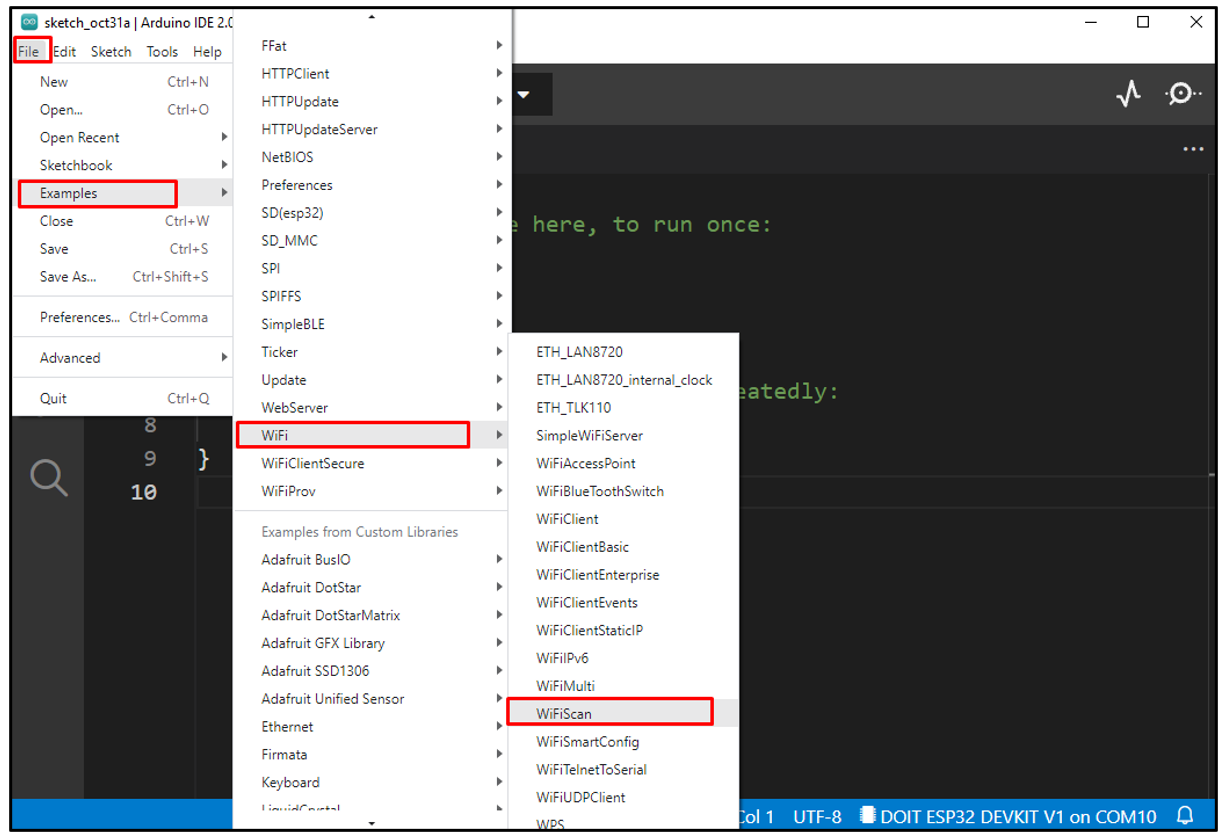
To scan for nearby Wi-Fi connections, we will be using an ESP32 Wi-Fi scan example to make sure the ESP32 board is installed in Arduino IDE. To read about the installation of ESP32 in Arduino IDE click here.
Go to: Files>Examples>WiFi>WiFi Scan:
Following code will open in a new window. Select the COM port of ESP32 and upload the code:
void setup()
{
Serial.begin(115200);
// Set ESP32 wifi to station mode
WiFi.mode(WIFI_STA);
WiFi.disconnect();
delay(100);
Serial.println("Setup done");
}
void loop()
{
Serial.println("scan start");
// WiFi.scanNetworks will give total found wifi networks
int n = WiFi.scanNetworks();
Serial.println("scan done");
if (n == 0) {
Serial.println("no networks found");
} else {
Serial.print(n);
Serial.println(" networks found");
for (int i = 0; i < n; ++i) {
// Print SSID name and Signal strength
Serial.print(i + 1);
Serial.print(": ");
Serial.print(WiFi.SSID(i));
Serial.print(" (");
Serial.print(WiFi.RSSI(i));
Serial.print(")");
Serial.println((WiFi.encryptionType(i) == WIFI_AUTH_OPEN)?" ":"*");
delay(10);
}
}
Serial.println("");
// delay for 5 sec
delay(5000);
}
Here in above code WiFi.scanNetworks() will return the total available network inside the range of ESP32 boards.
Once all the networks are scanned, we can access their SSID using the below command:
The WiFi.RSSI() function will give us the RSSI (Received Signal Strength Indicator) of a network. It is an estimated power level or signal strength which an ESP32 is receiving from an access point.
Output
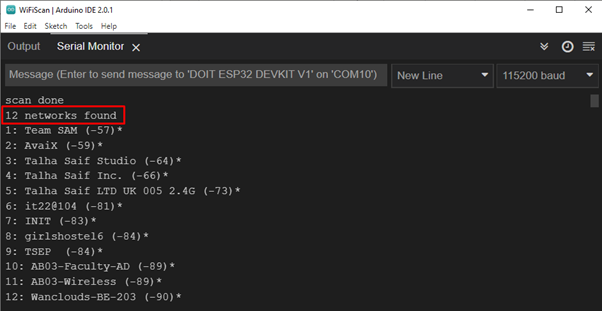
Following output is printed on the serial monitor displaying us all available networks that the ESP32 board scanned:
Connect to a Wi-Fi Network
To connect ESP32 with a Wi-Fi network we must know the SSID and its password. Additionally, the network which needs to be connected must come inside the range of ESP32. To see if a certain Wi-Fi comes under ESP32 range or not run the example scan given above.
Upload the below code to connect the ESP32 board to the Wi-Fi network:
const char* ssid = "Your SSID NAME";
const char* password = "SSID PASSWORD";
void setup(){
Serial.begin(115200);
delay(1000);
WiFi.mode(WIFI_STA);
WiFi.begin(ssid, password);
Serial.println("\nConnecting");
while(WiFi.status() != WL_CONNECTED){
Serial.print(".");
delay(100);
}
Serial.println("\nConnected to the WiFi network");
Serial.print("Local ESP32 IP: ");
Serial.println(WiFi.localIP());
}
void loop(){}
The code starts by including the WiFi.h library. Then we enter the network SSID and password to which we want to connect. Next ESP32 is put in station mode which is optional one can ignore because ESP32 by default comes in station mode.
Next using the WiFi.begin(ssid, password); function ESP32 will search for the defined network and try to connect. Once the ESP32 is connected, the IP address of the network will be displayed on the serial monitor:
Get Wi-Fi Network Information
To check details of the Wi-Fi network to which ESP32 board is connected following code will be used:
const char* ssid = "Your SSID NAME";
const char* password = "SSID PASSWORD";
void get_network_info(){
if(WiFi.status() == WL_CONNECTED) {
Serial.print("ESP32 Connected To ");
Serial.println(ssid);
Serial.println("BSSID : " + WiFi.BSSIDstr());
Serial.print("Gateway IP : ");
Serial.println(WiFi.gatewayIP());
Serial.print("Subnet Mask : ");
Serial.println(WiFi.subnetMask());
Serial.println((String)"RSSI : " + WiFi.RSSI() + " dB");
Serial.print("ESP32 IP : ");
Serial.println(WiFi.localIP());
}
}
void setup(){
Serial.begin(115200);
delay(1000);
WiFi.begin(ssid, password);
Serial.println("\nConnecting");
while(WiFi.status() != WL_CONNECTED){
Serial.print(".");
delay(100);
}
Serial.println("\nConnected to the WiFi network");
get_network_info();
}
void loop(){}
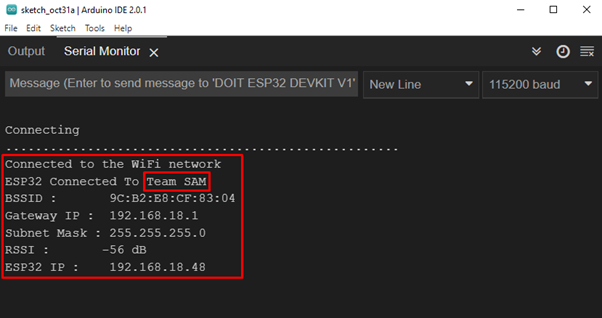
Output will give us the following information related to ESP32 connected Wi-Fi network:
- SSID of the connected network.
- Wi-Fi signal strength using RSSI() function.
- MAC address of Wi-Fi network using BSSIDstr().
- Local IP address using localIP() function.
- The subnet mask using the subnetMask() function.
All these results can be seen on the serial monitor:
Conclusion
ESP32 is a microcontroller board that comes with Wi-Fi and dual Bluetooth support. This article highlights the major functions used to control Wi-Fi of ESP32. The ESP32 board can work in three modes of Wi-Fi and can be connected with any network while knowing the SSID and password of the network. This write-up will assist in controlling ESP32 Wi-Fi using Arduino IDE.

