Arduino with Servo Motor
Using Arduino with servo motors we can precisely control its shaft position because servo motors work on a feedback mechanism to determine its shaft position. Shaft position is constantly measured with a built-in potentiometer inside servo motor which compares it with target position set by microcontroller (e.g., the Arduino). By calculating the error between the target position and actual position, the microcontroller adjusts its output shaft to match it with the target position. This whole system can be described as a closed loop system.
Arduino control servo motors using a PWM signal. This control signal is given to the control pin of the servo motor. Width of the PWM signal determines shaft position. Below table give an illustration of servo motor position control using PWM signal
| PWM Width (ms) | Shaft Position (Angle) |
|---|---|
| 1ms | 0˚ degree Min |
| 1.5ms | 90˚ degrees Neutral |
| 2ms | 180˚ degrees Max |
Servo motors generally need a PWM pulse every 20ms or 50Hz. Most RC servo motors can work fine in a range of 40 to 200Hz.
Servo Motor Pins
Most servo motors used with Arduino have three pins.
- Ground Servo motors have a GND pin which normally comes in black color.
- Power pin A 5v pin is needed to give power to the servo motor. Power pin is usually in red color.
- Control pin Shaft movement of servo motor is controlled using control pin. This pin is connected to an Arduino digital pin.
Servo motors have different color schemes available, but the good news is all servo motors have pins usually in the same order, just color coding is different.
Wire Servo with Arduino
Most of the servo motors run on 5V. To power the servo with Arduino, we need to connect a 5V pin of Arduino to the servo power pin. Arduino has a limited range for drawing current. Usually, one or two motors can be connected to Arduino. To control multiple servo motors using Arduino we must power them using external supply.
Following pin configuration should be kept in mind while powering servo:
| Servo Motor Pin | Arduino Pin |
|---|---|
| Power (red) | 5V Pin or external power supply |
| Ground (black or brown) | Power supply and Arduino GND |
| Control Pin (Yellow, orange or white) | Digital Pin of Arduino |
To connect servo motors with Arduino following two configurations are possible:
- Wire using Arduino 5V Pin
- Wire using external supply with Arduino
Wire Using Arduino 5V Pin
Servo motor can be powered up using an Arduino 5V pin but one thing to keep an eye on is that the Arduino can give a maximum of 500mA current to the servo. If motors draw current beyond this limit it will reset the Arduino automatically and it might lose power also.
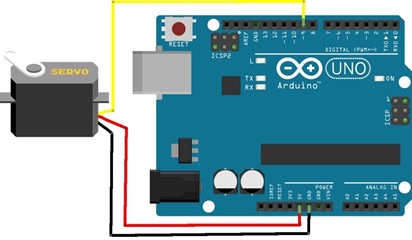
Following is the pictorial representation of Arduino connection with servo motor:
Here Arduino digital pin 9 is connected to servo motor control pin while power and GND pin of servo is connected to 5V and GND pin of Arduino respectively.
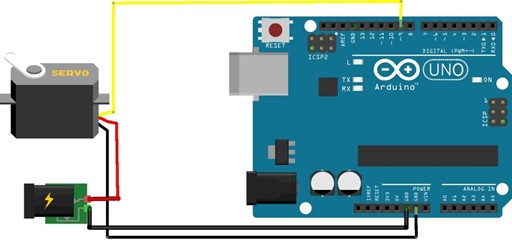
Wire Using External Supply with Arduino
Arduino can supply limited current to servo motors that’s why we need to connect an external power supply. Using a separate power source for servo motors we can connect as many motors as we want with Arduino but keep in mind the digital pins available on Arduino boards. If you want to connect multiple servo motors, then it’s recommended to use Arduino Mega or Arduino shields that can provide more pins to handle all motors.
Here servo motor power and ground pin is connected across external power supply pins while control pin is connected to digital pin of Arduino like in above configuration.
Conclusion
Servo motors are a great way of designing robotics projects. Due to their flexibility regarding control mechanisms, Arduino users get an opportunity to design projects of their choice. A servo motor can be connected with an Arduino using its power and digital pins. Whereas always look for energy requirements of the motor before connecting it to Arduino. To connect the multiple motors with Arduino you need to use an external power supply.


