What is fsck in Raspberry Pi
The acronym fsck stands for the “File System Consistency Check” which is a Linux based tool that is mainly used to check the files in the SD card of Raspberry Pi. So, now we can say that if there is a problem with the SD card of the Raspberry Pi then you might encounter fsck errors.
These fsck errors are mostly encountered on the startup of the Raspberry Pi when this fsck tool checks the files of the system on startup. If there is some issue with the files, then it stops the Raspberry Pi from booting and to fix such issues there are some fixes discussed in subsequent sections.
Fixing the fsck related errors in Raspberry Pi
There are primarily two ways for fixing the errors related to fsck which are:
- Using the terminal of Linux
- Using Windows computer
Using the terminal of Linux
One way to repair the SD card is by using the dosfsck command in the terminal of the Linux operating system by connecting the SD card to it. To try this method, follow the given steps:
Step1: Open the terminal by pressing ctrl+alt+t from the keyboard after plugging the SD card and mount it using the following command:
Step2: Once the SD card is mounted check its name by using the following command:
From here look for the second drive name as in the image above the SD card has a name sda3.
Step3: Now to fix the SD execute the following command:
If it states, the logical size is zero then it means it has rectified the issue and you are good to go
To further elaborate the command executed above I have explained below is the explanation of the command:
- -t is used to test all the bad clusters in the file system ‘
- -v is the verbose mode that checks what drivers and softwares are used by the computer on startup.
- -a is used to ask the fsck tool to fix the errors if any
- -l is used is to get the list of all the files that is processed
- -r is used to check the disk for any errors
- -w is used to write the disk
- dev/sda3 is the name of the SD card mounted
- dosfsck is the main command for checking the SD card
Using the Windows computer
The easy way to fix the SD card of Raspberry Pi is by plugging it into Windows PC and once the SD is plugged in do the fowling steps to repair it:
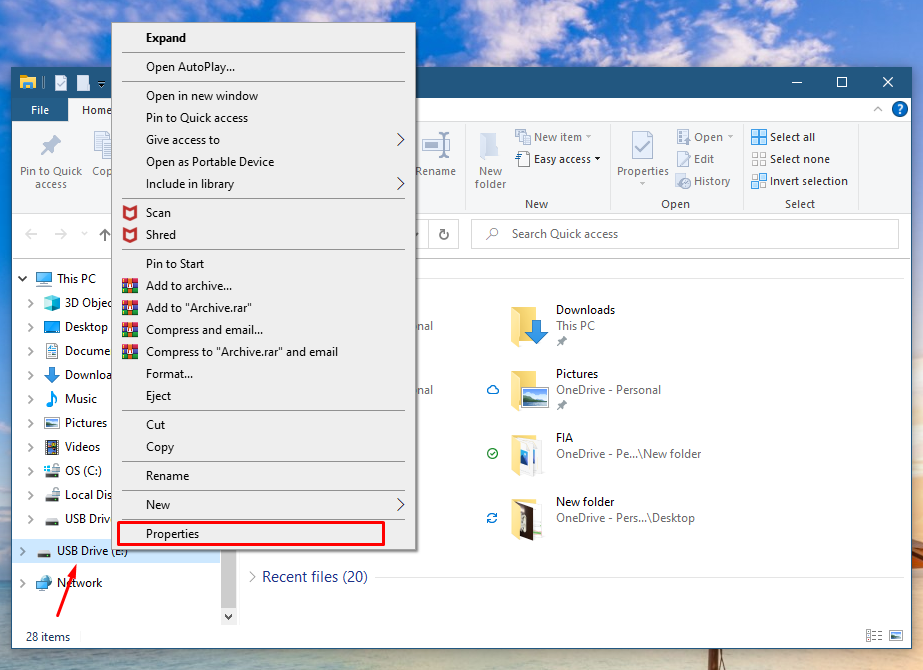
Step1: Press Windows+E key to open the windows explorer and go to the properties of the SD card by right clicking in it:
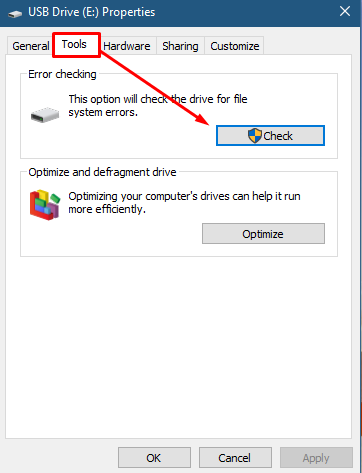
Step2: Next go to the tools tab and click on the “Check” icon:
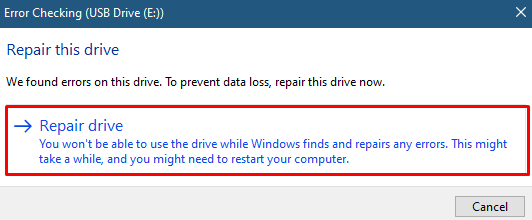
Next click on Repair drive to set your SD card:
Once the SD card is repaired plug it into the Raspberry Pi and see if the issue is resolved.
Conclusion
Raspberry Pi is one of the most popular card sized computers among the students and engineers as it proves to be the best platform for learning. Like other operating system errors can be expected while working on Raspberry Pi and one of the most common errors is fsck errors. This error mainly arises due to corrupt files in the SD card, so this guide explains the two ways for removing the fsck errors.


