Creating a temperature-controlled fan
Normally to change the fan speed there is a designated knob for controlling the speed of the fan and it can be adjusted manually. However, we can make the speed of the fan dependent on the temperature of an area. So, the speed of the fan will automatically adjust itself as the temperature of that area changes. The components we have used for creating a temperature-controlled fan are:
- Arduino Uno
- Connecting wires
- Breadboard
- Temperature sensor (LM35)
- DC fan
- Liquid Crystal Display (LCD)
- Potentiometer
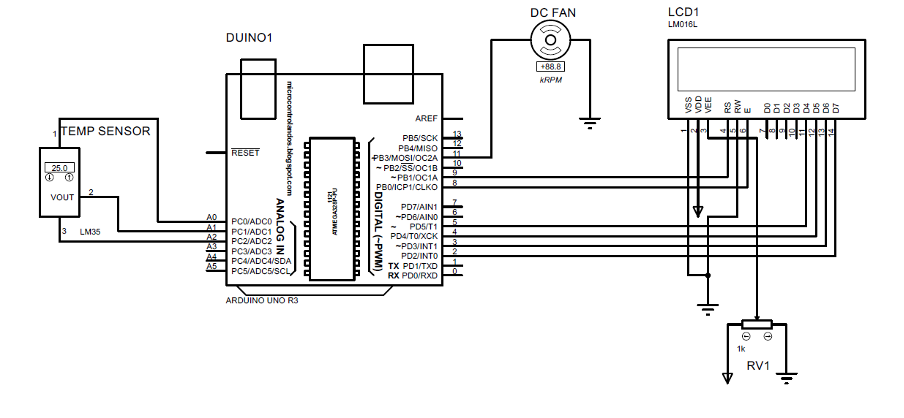
So, the schematic for the circuit of controlling the fan speed with respect to the temperature is given as:
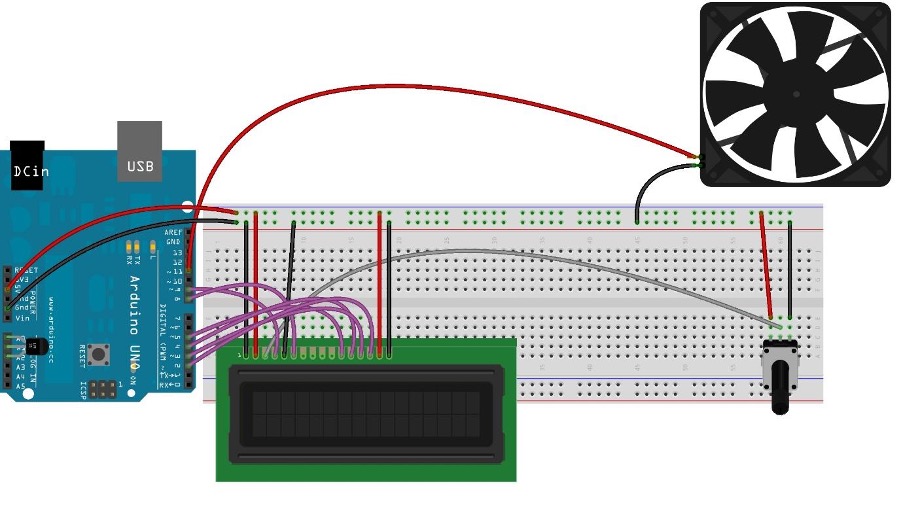
Hardware assembly for creating a temperature controlled fan using Arduino Uno
The image posted below shows the connections of each component interfaced with Arduino Uno.
The pink wires connect the LCD with Arduino Uno and the gray wire connects potentiometer with LCD to control the brightness of the LCD.
Furthermore, we have connected the temperature sensor directly on the pins of Arduino to avoid any distortion in the output of the sensor. To connect the components with the power supply we have used the 5 volts and ground of the Arduino.
Arduino code for the temperature-controlled fan
The Arduino code compiled for controlling fan based on temperature values is given below:
LiquidCrystal lcd(9,8,5,4,3,2);// Arduino pins for the LCD
int vcc=A0; // A0 pin supply of LM35
int vout=A1; // A1 pin for the output of the LM35
int gnd=A2; //A2 pin for the output of the LM35
int value; // variable used for storing the values coming from the sensor
int fan = 11; // the pin where fan is connected on Arduino
int tempMin = 86; // the temperature to start the fan
int tempMax = 127; // the maximum temperature
int fanSpeed;// variable for strong the speed of fan
int fanLCD;// variable for displaying the percentage fan speed on LCD
int tempc;// temperature in degree Celsius
int tempf;// temperature in Fahrenheit
void setup() {
// assigning modes to the assigned Arduino pins
pinMode(fan, OUTPUT);
pinMode(vcc,OUTPUT);
pinMode(vout,INPUT);
pinMode(gnd,OUTPUT);
//assigning states to the VCC and ground pins used for LM35
digitalWrite(vcc,HIGH);
digitalWrite(gnd,LOW);
lcd.begin(16,2);// initializing the dimensions of LCD
Serial.begin(9600);// initializing the serial communication
lcd.setCursor(0, 0);// setting the place for the data on LCD
lcd.print(" Arduino Fan ");// data to be displayed
lcd.setCursor(0, 1);//setting the place for the data on LCD
lcd.print("speed control");// data to be displayed
delay(3000);// time for which the data will be displayed
}
void loop()
{
lcd.clear();// clearing the LCD
tempf = Temperature (); /*calling the temperature function to get the value of temperature in Fahrenheit*/
Serial.print( tempf );// displaying the temperature in Fahrenheit
if(tempf = tempMin) && (tempf <= tempMax)) /* if temperature is higher than minimum temp and less than the maximum temperature then */
{
fanSpeed = tempf; // give the fan speed the value of tempf
fanLCD = map(tempf, tempMin, tempMax, 0, 100); /*scaling the fan speed to display it on LCD using map function from 0 to 100*/
analogWrite(fan, fanSpeed); // assigning the value to the pin of the fan
}
lcd.print("Temperature: ");// displaying the data
lcd.print(tempf); // display the temperature in Fahrenheit
lcd.print("F ");
lcd.setCursor(0,1); // defining the place of the next data to be displayed
lcd.print("FAN Speed: ");// displaying the data
lcd.print(fanLCD); // display the fan speed
lcd.print("%");// displaying the data
delay(200);// time for which the data will be displayed on LCD
lcd.clear();// clearing the LCD
}
int Temperature () { // function name
value = analogRead(vout);// reading the value of sensor
tempc=value*0.48828125;// converting the values of sensor to degree Celsius
return tempf=tempc*9/5+32; // converting the values in Fahrenheit
}
To design a temperature-controlled fan, we have compiled the Arduino code in such a way that first we have defined the library of LCD and assigned Arduino pins for the LCD. Next, we have defined variables and the respective Arduino pins for temperature sensor and fan to interface them with Arduino Uno.
Since we are taking the temperature in Fahrenheit, we have also defined the minimum and maximum limits for the temperature that is from 86 Fahrenheit to 127 Fahrenheit.
In the setup function first, we have assigned pin modes to the Arduino pins defined previously and then to the Vcc and ground pin of the temperature sensor. After that, the dimensions of the LCD are initialized and the project name is displayed on the LCD.
In the loop function first the temperature function is called to get the value of the temperature and then if condition is used to check if the temperature is less than minimum temperature. In this case the fan will not turn then there is another if condition which uses AND operation and checks if the temperature is between the given range of the temperature.
We have used the map function to scale the speed of the fan with the temperature values in the range from 0 to 100 and then that value is given to the Arduino pin of the fan using analogWrite() function, and it makes the fan rotate at a respective speed.
Then the data for the temperature and the fan speed is displayed on the LCD using the lcd.print() function. Furthermore, to convert the values of the sensor to the degree Celsius we have used the scale of 0.01V increase in the voltage per degree centigrade.
So, if the voltage is 1 volt, then the temperature will be 100 degrees so here for the sensor, we have maximum 5 volts so the temperature will be 500 on 5 volts. However the maximum analog value for the sensor is 1023 which means 5 volts and for that we have divided maximum temperature by maximum analog value. We have also converted the temperature in Fahrenheit and the concept for conversion can further be clear form the table below:
0.488= (500/1023);
Temperature in Degrees = analog value*0.488;
Temperature in Fahrenheit = Temperature in degrees*9/5+32;
Simulation
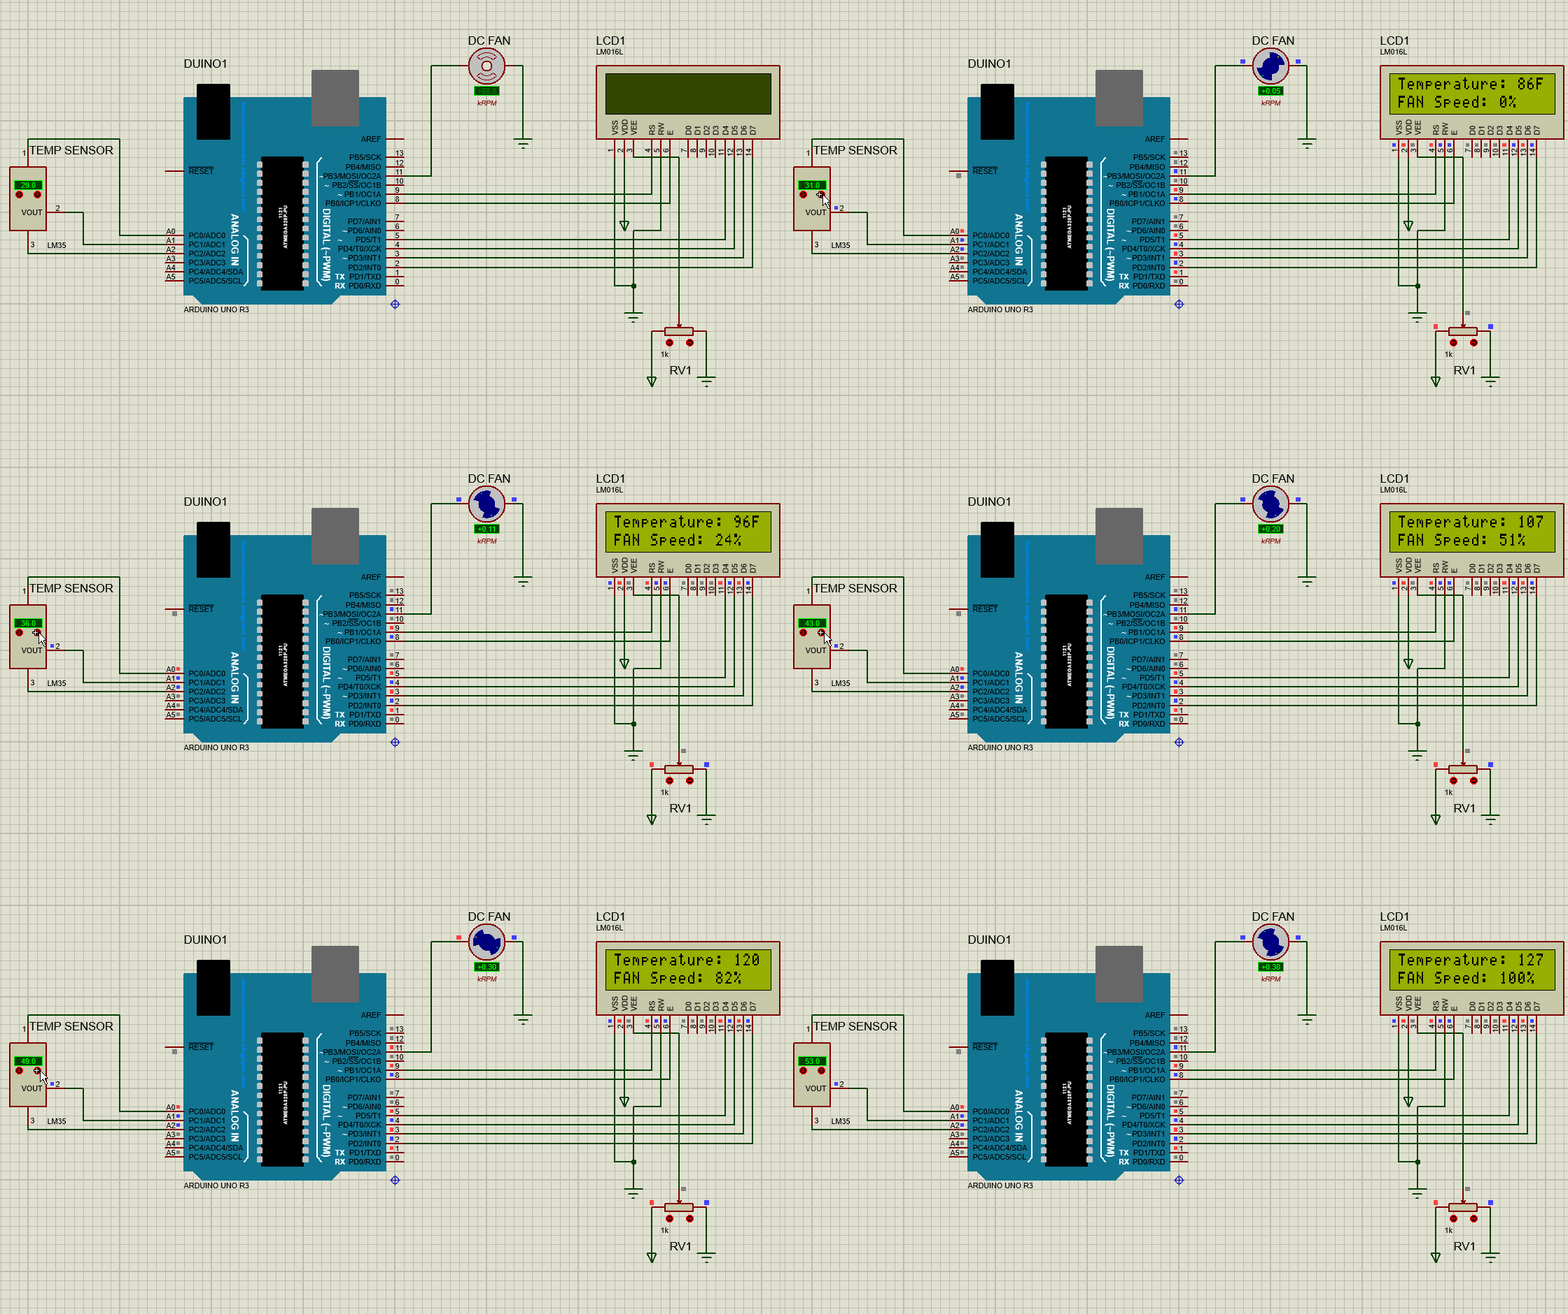
Here in this project, we have created a simulation in Porteous software. In the simulation posted below we see that we are increasing temperature manually. So, the fan speed keep on increasing as we increase the temperature:
Conclusion
The Arduino boards can be used to make a variety of do-it-yourself projects and that gives the beginners a better understanding of the working of the circuits. Similarly, to understand the working of the devices we can also create their circuits in a very easy way. In this guide we have made an automatic fan that depends on the values of the temperature sensor. The temperature-controlled fans are mostly used in the devices which need adequate cooling at high temperatures and the most common example is the desktop PCs or laptops.


