Creating digital dice using Arduino Uno
A small cubical shaped object having printed numbers in the form of dots is called dice. Dice is mainly used in different table games where random numbers are generated by throwing the dice a surface. The dice has numbers from zero to 6 and these numbers are in the form of dots engraved on each side of the dice.
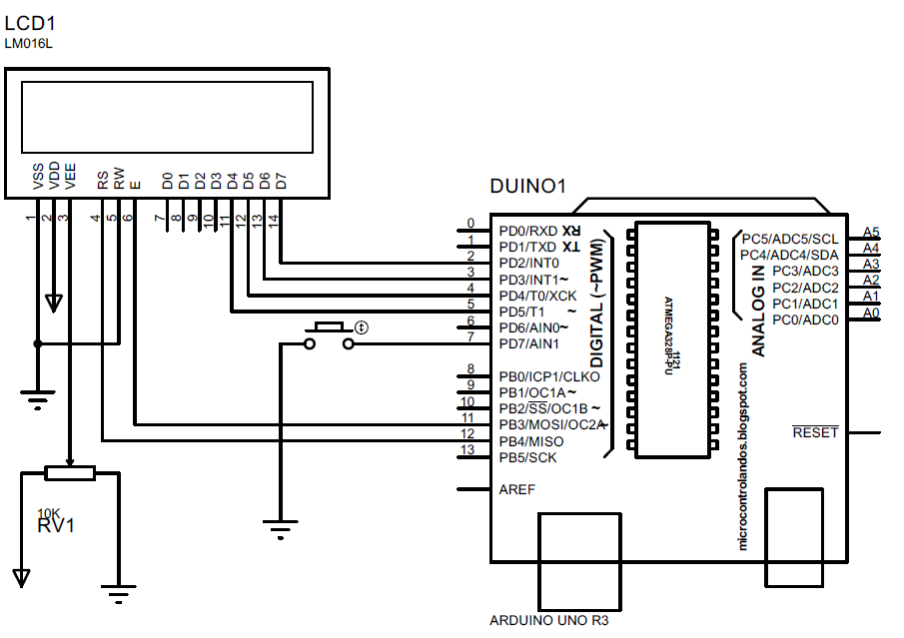
The Arduino code for the digital dice is given followed by the schematic of the circuit designed for the dice created using Arduino Uno:
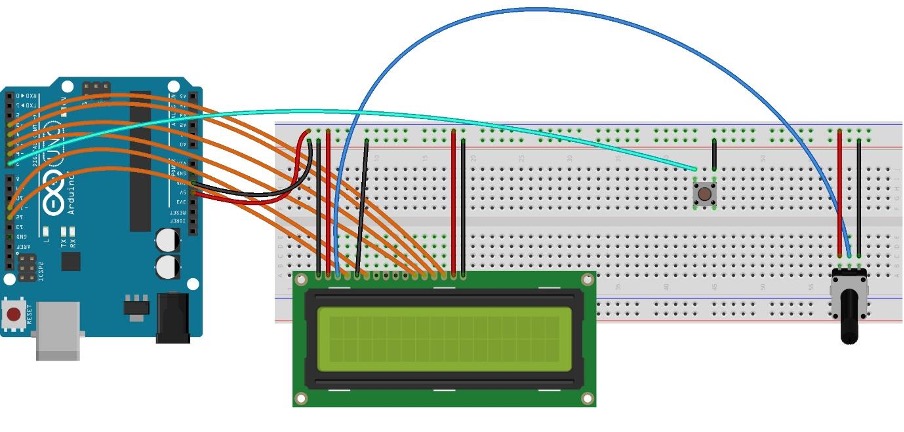
Hardware assembly on breadboard
We have used the following list of components for creating the dice:
- Arduino Uno
- Connecting wires
- Push button
- Potentiometer
- Liquid Crystal Display
- Breadboard
we have first placed each component on the breadboard and they are connected with Arduino and can be seen from the image posted below:
Arduino sketch for making a digital dice
To create a digital dice the compiled arduino code is given:
long rn1;// variable for storing the first dice value
long rn2; // variable for storing the first dice value
int button = 7; //defining button port
int state;//defining the variable for the storing the state of the button
LiquidCrystal lcd(12, 11, 5, 4, 3, 2);// Arduino pins assigned for the LCD
void setup()
{
lcd.begin(16, 2);// initializing the dimensions of LCD
randomSeed(analogRead(0));/*To shuffle the sequence every time the dice is rolled */
pinMode(button, INPUT_PULLUP); // defining the working mode of the button
lcd.setCursor(0,0);// setting the place for the data to be displayed
lcd.print("Arduino Uno Dice");// data to be displayed
delay(1000);// time for which the data will be displayed
}
void loop()
{
state = digitalRead(button);// to read the state of the button
if (state == LOW) //when the button is pressed then roll the two dices
{
lcd.clear();// clear the LCD if any data is being displayed previously
lcd.print("Rolling dice...");// data to be displayed
delay(7000);// display until the both dices are rolled
lcd.clear();/*clear the lcd so that the values for the dices can be displayed*/
lcd.setCursor(0, 0);/* setting the place for displaying the value for first dice*/
rn1= random(1,6);// generating the value for first dice
lcd.print("Dice 1 = ");
lcd.print(rn1);// displaying the value for first dice
lcd.setCursor(0, 1);/* setting the place for displaying the value for first dice*/
rn2 = random(1,6); //generating the value for second dice
lcd.print("Dice 2 = ");
lcd.print(rn2); //displaying the value for second dice
}
}
The Arduino code for creating a dice is compiled in such a way that first we have defined the library <LiquidCrytsal.h> for the LCD then we have declared the variables rn1, rn2 for storing the values for the dices.
To roll the dice we have a button as the input to the Arduino code by assigning it the pin 7 of Arduino and giving it INPUT_PULLUP mode. The INPUT_PULLUP mode is mainly used for the push button to stabilize the output of the button.
Similarly, in the setup function after initializing the dimensions of the LCD we have used the randomSeed() function to shuffle the random generating sequence every time the random values are generated.
In the loop function we have read the state of the button using the digitalRead() function and we have used an if statement that if the button is pressed the dice will roll. In this program we have created two dice that will roll simultaneously. The value of both dice are printed on the LCD using the lcd.print() function.
One thing that is to be remembered is that when the INPUT_PULLUP mode is given to the button, its states are inverted and it provides a stable input to the Arduino board. Similarly, when the button is in the un-pressed state its value will be HIGH and the state of the button will be changed to LOW when the button is pressed.
Hardware demonstration of digital dice using Arduino Uno
To demonstrate the working of the Arduino code compiled for creating a digital dice we have posted the images in the sequence of how the code runs.
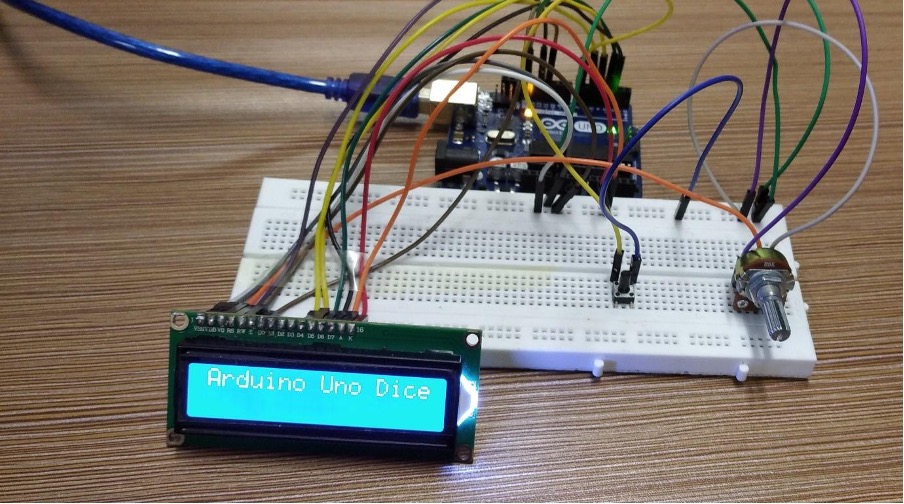
Following output will display on LCD when you first run the Arduino program:
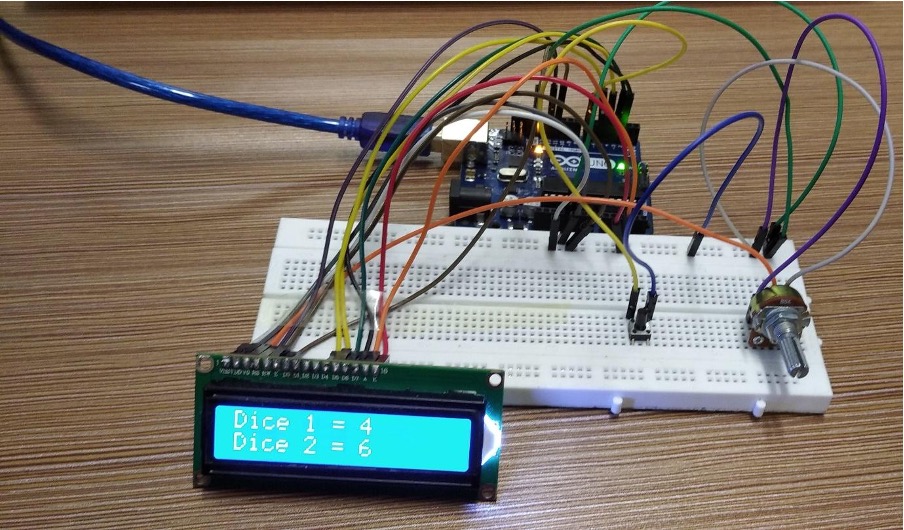
When we press the button both the dice are rolled and the values are displayed on the LCD as given in the image below:
Conclusion
To interface a number of devices or peripherals with microcontrollers the Arduino boards are a viable option as they are easy to configure and easy to work with. By interfacing different peripherals we can create some cool projects that can help in better understanding of designing circuits for making various devices. In this write we have created a dice using Arduino programming with the help of Arduino IDE and Arduino Uno.


