Using a USB device to expand your Raspberry Pi storage issue is a better choice but is that really straightforward to just plug in the USB and it will work for you. No, when you plug in your USB storage into your Raspberry Pi device, it won’t show the USB option until you configured it. In order to connect USB, you will need to make some changes so that it will extend your Raspberry Pi storage and, in this article, you will get to know how you can do it.
Expanding Raspberry Pi device by mounting the USB
Here, you will see some guidelines through which you can expand your Raspberry Pi Storage issue immediately. You will just need to complete the below steps to successfully extend Raspberry Pi device storage with USB.
Step 1: Buy a quality USB from the market better to go for SanDisk or Kingston USB. You can purchase a good quality USB from the amazon website by visiting the link below.
Step 2: After buying a decent USB, you will now need to plug it into the USB port of your Raspberry Pi device.
Step 3: Next, you will need to find the unique ID of your device and to do that you will have to enter the below mentioned command line in the terminal.
In the above image of the command used in the terminal, you will see that your device “\sda1” has a unique ID.
Step 4: In the next step, you will need to create a mount point and the mount point refers to a directory where a new file system is easily accessible. You will first need to create a suitable directory using the below mentioned command in the terminal.
“\Myusb” refers to the name of your usb and it’s entirely up to you to name your USB according to your choice.
After making a directory, you will need to ensure that the Pi user should get the ownership of this directory and to do that use the below mentioned command in the terminal.
Step 5: Now, you will need to make sure that your USB device is accessible on your Raspberry Pi device and for that you will need to mount it using the below mentioned command in the terminal.
When you press enter, your MyUsb drive will appear on your desktop screen as shown in the image below.
Step 6: You can also unmount your Usb device using the command given below.
As soon as you press enter by typing the above command, your usb drive will be unmounted as shown below.
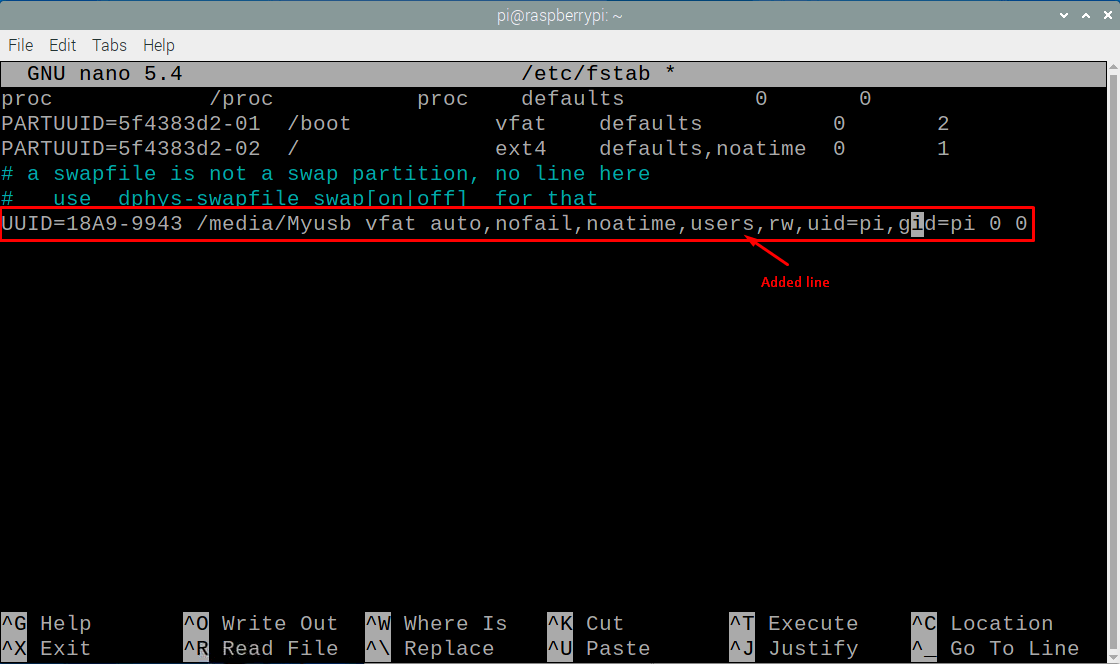
Step 7: The only issue you will face during the mount process is that when you restart your device, you will need to perform the above steps again because your mount will be lost when the system shuts down. In order to avoid that, you will need to perform the auto mount using the below mentioned command.
When you press enter an editable file will open and you will add the below line at the bottom of the file.
Press “Ctrl+X” and choose “Y” to save the changes, and press enter to go back to the previous location.
Now reboot the device, and when it restarts your USB device is auto-mounted as is available on your Raspberry Pi device. That’s it now your device is mounted on your Raspberry Pi device even if your device reboots and through the above step your Raspberry Pi device storage is successfully expanded.
Conclusion
Storage management on Raspberry Pi becomes very crucial as updates and different application dependencies fill the space quickly. The reason is that Raspberry Pi does not include all applications repositories and you will have to install the required files in order to install these applications. Now that you’ve discovered how to expand your Raspberry Pi storage with USB via a simple configuration that will only take a few seconds to set up your USB storage within the device. In case your Raspberry Pi runs out of storage space, you can then copy the files or installed software to your USB storage device.


