The title itself explains its meaning; the word “serial” means in series and “communication” means to communicate. In Arduino, “Serial Communication” means to transfer data in series to another device. In Arduino, we can do serial communication either with a computer or some other devices via USB plug and TX/RX pins of Arduino. The serial communication in Arduino is done through the pins which are dedicated for this purpose.
The serial communication makes sure every byte of the data is transferred to the other device or computer. In this write-up, serial communication in Arduino is explained in detail with the help of a simple example.
What is serial communication in Arduino
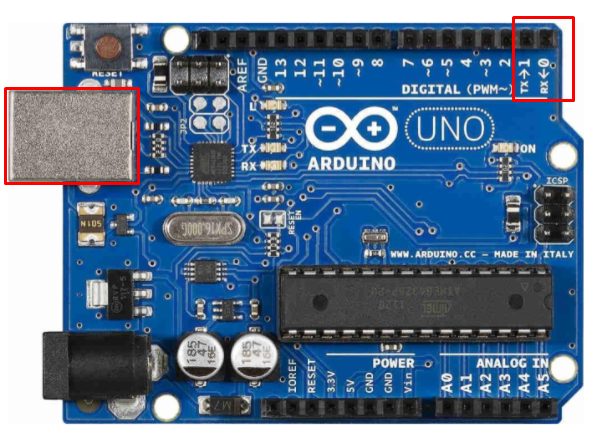
In Arduino Uno, two pins; pin 0 and pin 1 are assigned for the serial communication known as UART (Universal Asynchronous Receiver Transmitter) and USART (Universal Synchronous Asynchronous Receiver Transmitter) and they are also known as Tx/Rx pins. These pins are operated at 3.3 volts or 5 volts so it is not recommended to connect them with the RS232 serial port because it is operated at 12 volts which can harm the Arduino board, moreover, the serial communication can also be done with a computer through the USB plug.
In the above figure of Arduino Uno, we can see the pin 0 and pin 1 are specified with TX/RX used for serial communication, also a USB plug is present for the serial communication with the computer. There are different types of boards but every board has at least one UART or USART port:
| BOARD | USB CDC NAME | SERIAL PINS | SERIAL1 PINS | SERIAL2 PINS | SERIAL3 PINS |
|---|---|---|---|---|---|
| Uno | 0(RX), 1(TX) | ||||
| Mega | 0(RX), 1(TX) | 19(RX), 18(TX) | 17(RX), 16(TX) | 15(RX), 14(TX) | |
| Zero | SerialUSB (Native USB Port only) | Connected to Programming Port | 0(RX), 1(TX) |
In the above table, we can see that Arduino Mega has three additional ports for serial communication.
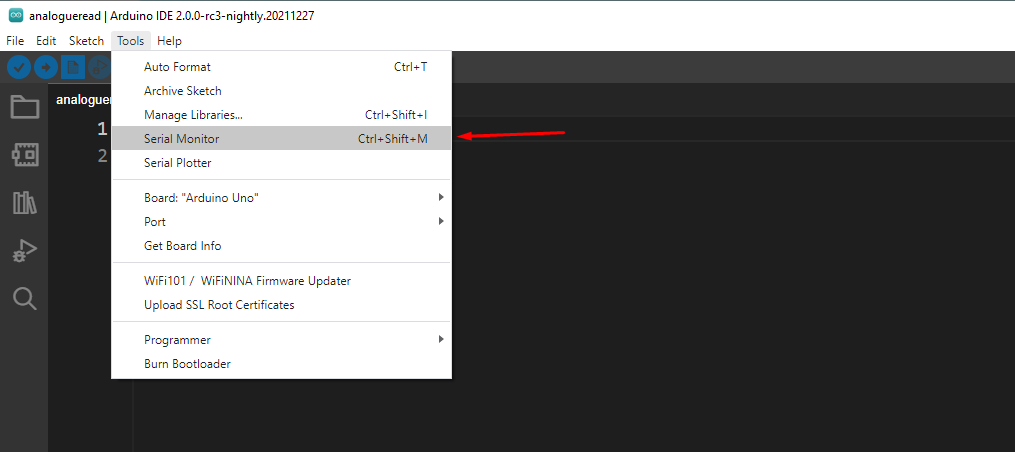
The output of the serial communication can be seen on the serial monitor, which can be accessed in the “Arduino IDE” by clicking the “Serial Monitor” in the drop-down menu of tools:
For the serial communication with the computer, connect Arduino with the computer via USB cable.
There are different built-in functions of Arduino but the most commonly used for serial communication are:
| Functions | Description |
|---|---|
| begin(speed) | This function is used to set the speed of transferring data at a specific baud rate |
| read() | This function is used to receive the data from other connected machine |
| print() | This function converts the data in the ASCII text which is easily readable by human beings and prints it on the serial monitor |
| println() | This function works similarly to print() but in addition, it adds a new line |
| flush() | This function makes sure the completion of transmission of outgoing serial data |
Example: Arduino Serial communication
We will use the begin() function for the serial communication with the computer through the USB plug of Arduino, and set the speed of transferring data at a 9600 baud rate. Then we will use the simple print() function to print the text “Welcome to LinuxHint” on a serial monitor, for this purpose consider the following code:
Serial.begin(9600);
Serial.print(“Welcome to LinuxHint”);
}
void loop(){
}
Compile the code, upload it on Arduino, and then visualize the output on the serial monitor:
In the output of a serial monitor, it can be seen the output is displayed.
Conclusion
Serial communication in Arduino is used to transfer the data to the connected device. Every Arduino board contains at least one UART or USART port through which serial communication can be done. In this write-up, serial communication in Arduino is explained with an example of serial communication from Arduino to a computer.


