Virtualization involves running a virtual computer system in a separated layer from the actual computer hardware. It allows users to run more than one operating system without installing them on the actual hardware.
Operating systems that run using a hypervisor will operate as they would in the actual hardware. That allows you to install tools, test systems, and other tools on your virtual machine without affecting the main host.
This tutorial will show you how to use Virtual-Box as the Hypervisor to run Kali-Linux as a virtual machine.
Before we begin, allow me to give a few theory concepts about virtualization before getting to the practical part. Feel free to skip if you are familiar with the concepts.
What is a Hypervisor?
A hypervisor is a program that allows users to create, run and manage virtual machines.
The most common types of hypervisors are hosted hypervisors installed on the host system as normal applications.
The most popular hypervisors include:
- VirtualBox – https://www.virtualbox.org/
- VMware – https://www.vmware.com/products/workstation-pro.html
- Microsoft Hyper-V – https://docs.microsoft.com/en-us/virtualization/hyper-v-on-windows/about/
- QeMU – https://www.qemu.org/
Once a hypervisor is installed on the host system, it can be started and stopped, similar to a normal program without the need for rebooting the main system.
What Is A Virtual Machine?
On the other hand, a virtual machine is an emulated version of a computer system running on another system. Virtual machines can access hardware components, networking interfaces, storage devices, video cards, etc. In some instances, certain hardware resources such as USB drives will need to get disconnected from the main system to get connected to the virtual machine.
Now that we have briefly mentioned what a hypervisor and a virtual machine are, we can create one.
How to Install Kali Linux on VirtualBox
Kali Linux is a Debian-based Linux distribution that has been the best penetration testing distribution for over five years.
It comes pre-installed with a collection of pen-testing tools that make the process of setting up a hacking environment very easy.
Although installing Kali Linux on physical hardware is possible, it is better to run it as a virtual machine on various hypervisors because it’s a security testing system.
For this setup, we will be using VirtualBox as the Hypervisor.
Requirements
Before we begin, ensure you have the following requirements
- At least 20GB of storage space
- Minimum of 4GB RAM
- VT-x Enabled Motherboard.
How to Enable Virtualization Technology
To run a Virtual machine, you need to enable Intel VT-X/AMD-V or Virtualization technology on your system. You can do this from the system BIOS settings. Since system settings vary from one computer model to another, it is nearly impossible to provide a standard guide for getting into a system BIOS. However, I have provided a cheat sheet for BIOS keys by manufacturers.
https://linkfy.to/Bios-Cheat-Sheet
Ensure that you have VirtualBox installed on your system. If not, check out how to install VirtualBox.
Step 1: Get Kali Linux Image
Launch your browser and navigate to http://kali.org and download the latest iso image of Kali Linux. The images are updated regularly and always include the latest version.
Once on the download page, select the image version you wish to install, 64bit or 32bit, as shown in the image below:
Once you have the ISO downloaded to your system, we can proceed to create the virtual system in VirtualBox.
Step 2: Create a Virtual Machine
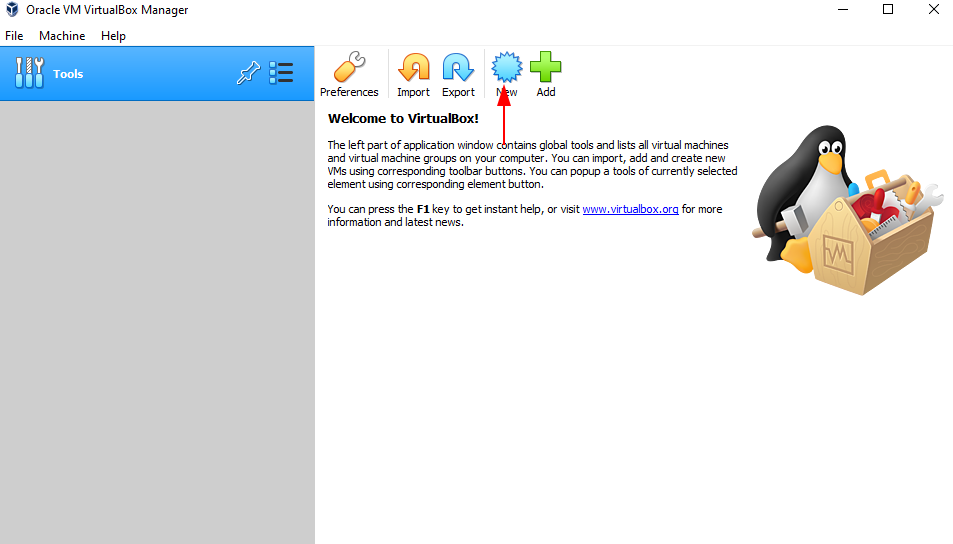
Start by launching VirtualBox and creating a new icon to create a new Virtual Machine instance.
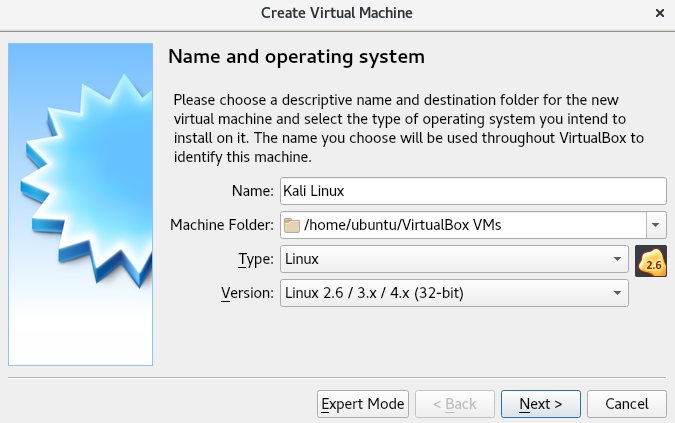
This will launch a new window to create a new virtual machine. Start by providing the name of the virtual machine.
Next, set the destination folder that will act as storage for the virtual machine’s files.
Next, select the type as Linux and Version as Debian 64 bit. This is not critical, and you can set Linux 2.6/3.x/4.x (64 bit). This, however, may be automatically set based on the name of the virtual machine specified.
Click next to proceed with the creation of the new virtual machine.
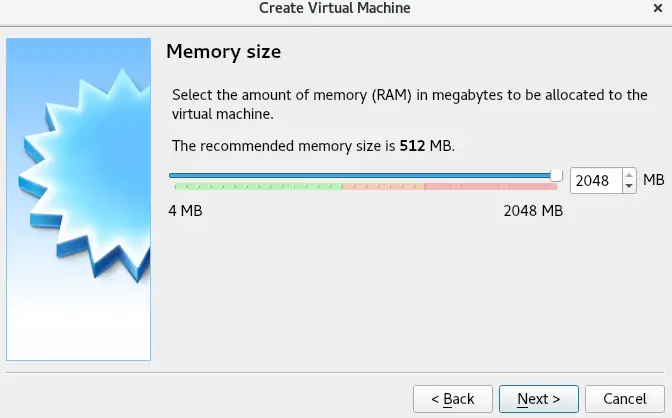
In the next step, select the memory size to allocate to the virtual machine. For basic usage, it is best to have at least 1024MB. However, this will vary depending on your needs.
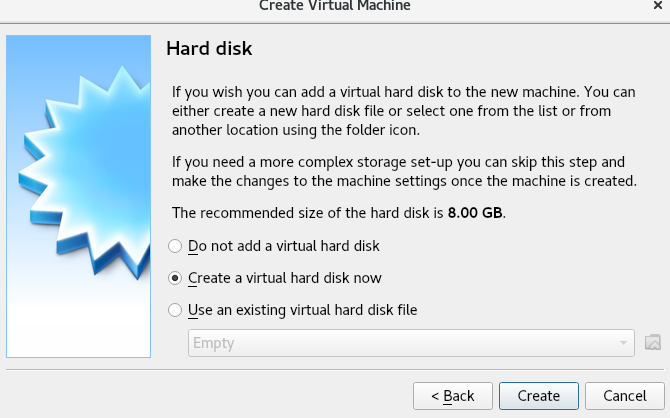
Click next and set up the hard disk allocations for your virtual machine. The default selection is to create a virtual hard disk file. However, if you have an already existing one, you can load it by selecting “Use an existing virtual hard disk file.”
Click on “create” to create a new virtual hard disk file for your virtual machine; select VDI (VirtualBox Disk Image) as the image type.
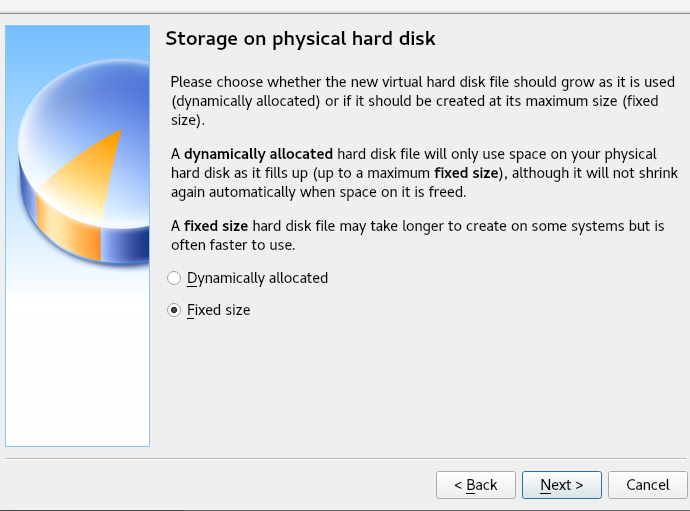
In the next step, select between Dynamically allocate or Fixed size. A dynamically allocated hard disk file will grow in size as required by the system until it hits the maximum size. For fixed size, it will not shrink or grow automatically, even when space is free.
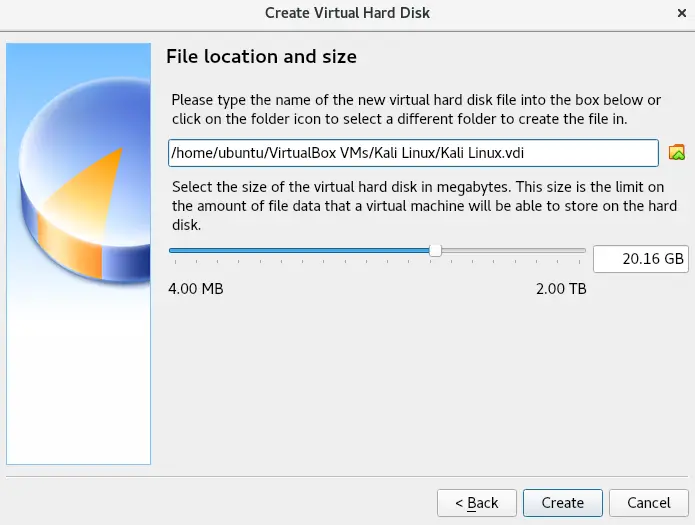
Finally, click next and set the amount of data to allocate to your virtual machine. Give at least 10GB and click on create.
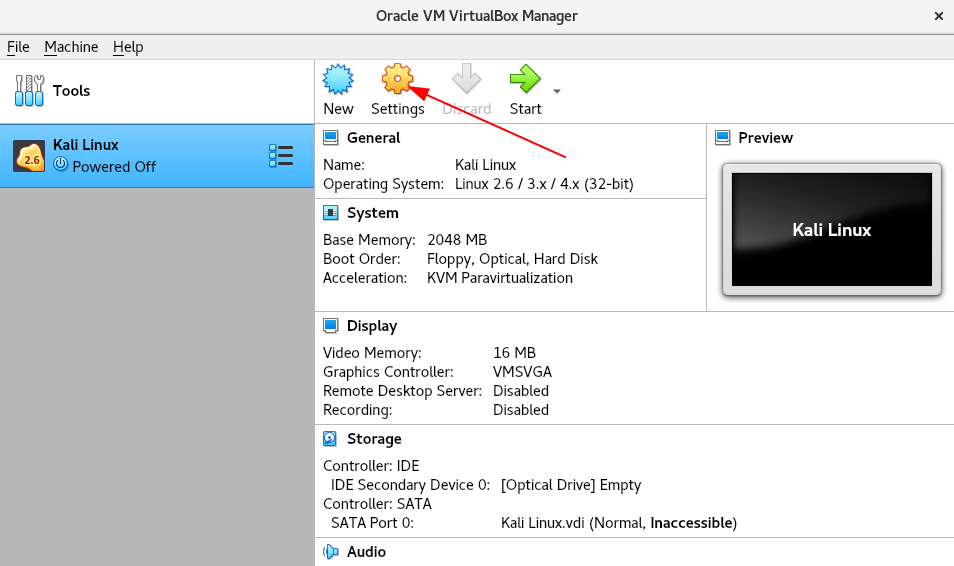
Once completed, you will see the new Virtual Machine in the list from VirtualBox Manager.
Step 3: Configure VM settings
Once we have created the virtual machine, we need to tweak a few settings to ensure that you get the best experience and load the ISO into the VM to boot up.
First, start by selecting the Virtual Machine we created. Next, click on the settings icon in the top menu to configure the settings for the VM.
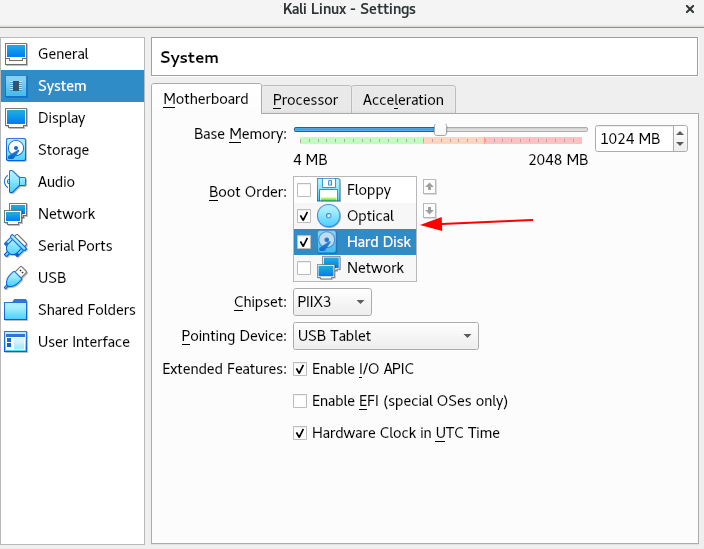
In the System’s Section, navigate to the Motherboard Tab and set the boot order to Optical -> Hard Disk (in that order). Deselect Floppy drive as it is not required.
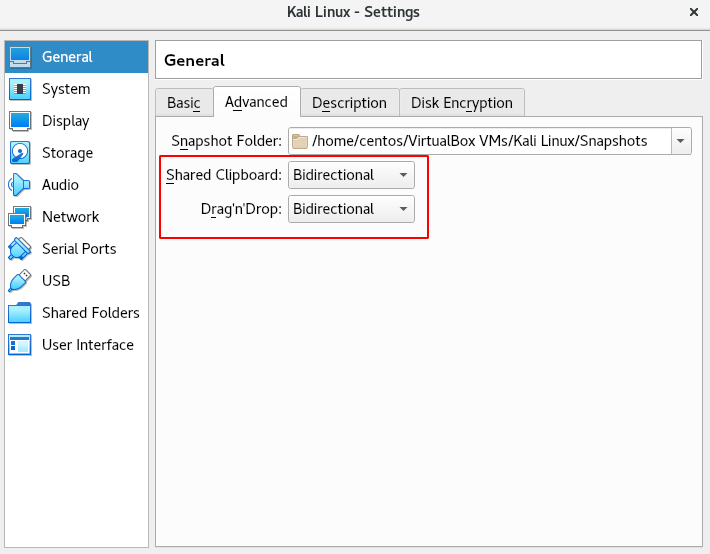
Move to the General section in the advanced tab, set the shared clipboard, and drag n’ drop to bidirectional. That allows you to share your clipboard between your VM and the host system.
In the Display section, set the video memory to 128MB. It is best to disable the 3D Acceleration.
The final setting we need to configure is the boot disk that allows us to set the Kali Linux image we downloaded earlier and boot into it.
In the settings page, navigate to the storage section, select Controller, IDE. Click on the disk icon on the left-hand side and select “Choose a disk file.” Next, browse and select the Kali Linux image.
Finally, click OK to save the file.
Once all settings are done and saved, boot up the virtual machine by selecting start in the main menu.
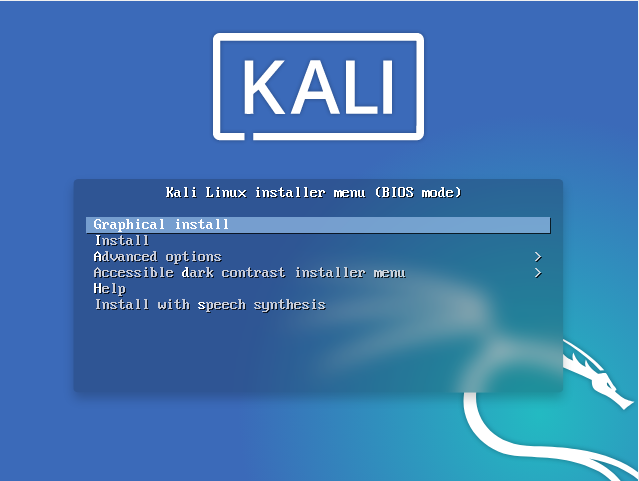
This will launch the Virtual Machine and boot the Kali Linux image, allowing you to install the operating system as if you were doing it on real hardware.
NOTE: If you want a quick guide on how to install Kali Linux on VirtualBox, consider the video resource provided below:
https://www.dropbox.com/s/s3z6poicq0obmmy/install_kali.mp4?dl=0
Conclusion
This tutorial discussed creating, configuring, and running Kali Linux as a Virtual Machine using VirtualBox.


