This write-up will demonstrate the step-by-step procedure to use MySQL with Docker Compose.
What are the Steps to Use MySQL With Docker Compose?
To use MySQL with Docker Compose, follow the given-provided steps:
- Create Compose file and set MySQL services
- Start the Compose services
- View running container
- Access MySQL container
- Connect to MySQL server
- Run MySQL commands
Step 1: Create Compose File
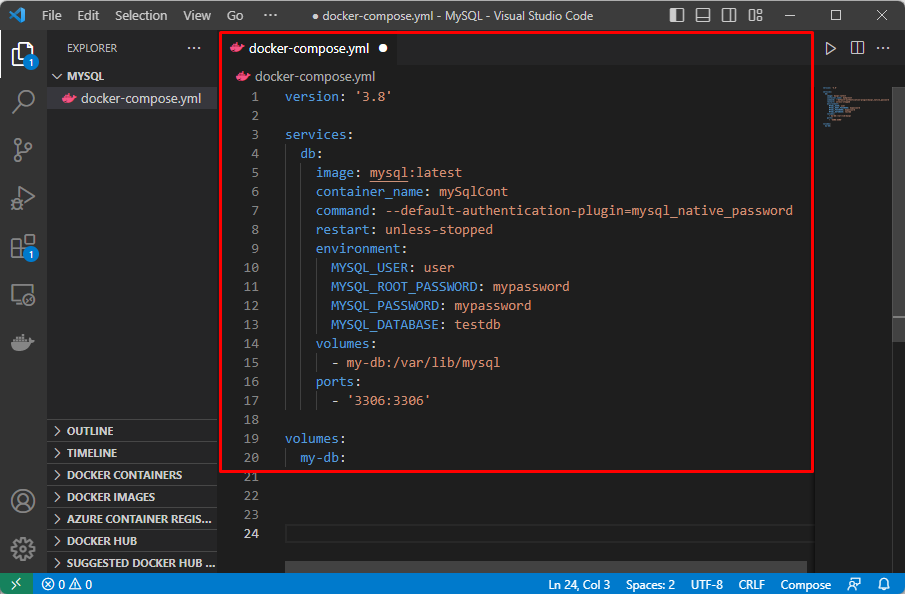
On Visual Studio Code, first, create a compose file named “docker-compose.yml” and add MySQL services into it:
services:
db:
image: mysql:latest
container_name: mySqlCont
command: --default-authentication-plugin=mysql_native_password
restart: unless-stopped
environment:
MYSQL_USER: user
MYSQL_ROOT_PASSWORD: mypassword
MYSQL_PASSWORD: mypassword
MYSQL_DATABASE: testdb
volumes:
- my-db:/var/lib/mysql
ports:
- '3306:3306'
volumes:
my-db:
In the above code:
- “version” specifies the version of the Docker Compose file format that the file uses. In our case, it is “3.8”.
- “services” defines the services that need to be run with Docker Compose.
- “db” is the name of the MySQL service.
- “image” specifies the image to use i.e., “mysql:latest”.
- “container_name” defines the name of the container i.e., “mySqlCont”.
- “command” specifies the command to be run in the container.
- “restart” sets the container to automatically restart unless it is manually stopped.
- “environment” sets environment variables for the MySQL container such as user, root password, user password, database, etc.
- “volumes” set up a volume named “my-db” to persist the data in the MySQL container even if the container is deleted.
- “ports” is utilized to assign port i.e., “3306:3306”:
Step 2: Start the Compose Service
To start the MySQL services defined in the compose file, execute the given command:
Step 3: View Running MySQL Container
After that, type out the provided command to view if the MySQL container is running or not:
The above output indicates that the MySQL container is running successfully.
Step 4: Access MySQL Container
Next, access the MySQL container to run the Bash shell inside it using the following command:
After executing the above-provided command, a Bash shell opens, and the user can execute the command within the running MySQL container.
Step 5: Connect to MySQL Server
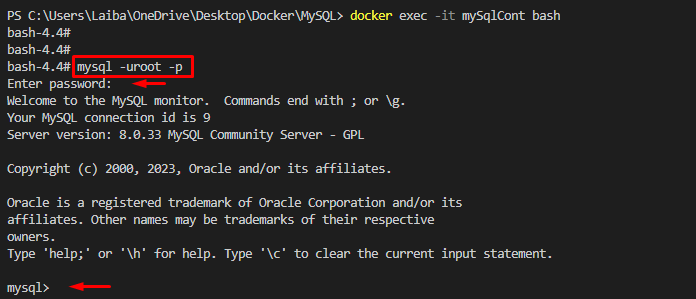
Now, connect to the MySQL database as the root user via the below-listed command and enter the password interactively:
As users can see, the MySQL shell has been started.
Step 6: Run MySQL Commands
Finally, execute the MySQL commands in the MySQL container. For instance, execute the “SHOW DATABASES;” command to view all the existing databases:
In the above screenshot, all the available databases can be seen.
To select a particular database, type out the “USE <database-name>;” command:
Furthermore, to create a new table in the database, utilize the “CREATE TABLE table_name (column1 <datatype>, column2 <datatype>, column3 <datatype> );” command:
Moreover, execute the provided command to view the newly created table in the database:
The above output has displayed the “Persons” table.
We have successfully used MySQL via Docker Compose.
Conclusion
To use MySQL with Docker, first, create a compose file on Visual Studio code and set MySQL services. Then, start the Compose services using the “docker-compose up -d” command and view the running container. Next, access the MySQL container and connect to the MySQL server. Lastly, run MySQL commands in it. This write-up has illustrated the procedure to use MySQL with Docker Compose.


