- Not Attached (network card is present, but the cable is unplugged).
- NAT (Network Address Translation)
- NAT Service
- Bridged Networking
- Internal Networking
- Host-only Networking
- Generic Networking
What will we cover?
This guide will learn how we can configure Bridged networking mode in a VirtualBox virtual machine. We will use Ubuntu 20.04 VM running inside Oracle VirtualBox. We will check the connectivity with the ‘ping’ command. Let us first understand the concept and working of Bridged networking mode.
VirtualBox Bridged Networking Mode
NAT or Network Address Translation is the default networking mode of any new VM inside VirtualBox. The drawback with this mode is that other devices (including the Host) and VMs on the network cannot access the guest VM and the outside internet, and the Host can access selected services on the VM only using port forwarding. To overcome this limitation, a bridged networking mode was introduced.
In the Bridged networking mode of VirtualBox, a device driver called ‘net filter’ is used on the Host machine. This driver filters the data from the physical adapter of the Host. By using this driver, VirtualBox takes data from the physical network and also inserts it into it. This also creates a new network interface in software. When we attach this software interface to a virtual machine, it appears to the Host machine as if the virtual machine is physically connected to the interface via a cable. Data can be sent from the Host to the virtual machine using this interface. In this way, a route or a bridged network has been set up between the virtual machine and the network to which the Host machine is connected.
All the machines connected to your LAN can communicate with your virtual machine as if it is another machine on the Lan. This VM can access all services on the network in the same way as any other machine on the Lan.
Enabling Bridged Networking Mode
To enable Bridged networking mode in VirtualBox, follow the below steps:
Step 1. From the left pane of the VirtualBox main window, select the virtual machine from the list. Right-click the virtual machine’s name and select the option ‘Settings’ or select the ‘Settings’ icon from the right pane.

Step 2. In the new pop-up window, select the label corresponding to ‘Network.’
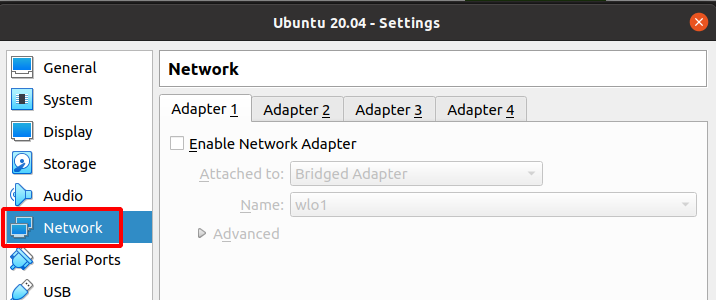
Step 3. On the right pane, under Adapter 1 tab:
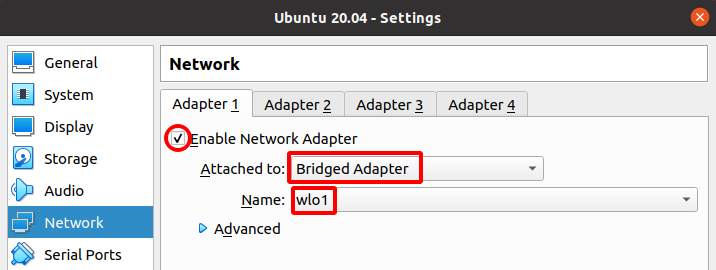
1. Check to mark the ‘Enable Network Adapter’ option:
2. Under the ’Attached to’ label, select the ‘Bridged Adapter’ option from the drop-down menu.
3. From the drop-down menu with the label ‘Name,’ select the network’s name (wlo1 in our case). Save settings and exit.
Step 4. Now launch your virtual machine and check the IP of the interface. You can use the ‘ip a’ command for this

In my case, the active connection on the Host is a wireless connection attached to the device ‘wlo1’. The DHCP server’s IP address provided to my Host machine is 192.168.43.150 on a /24 (255.255.255.0) network. The IP address of the Ubuntu VM is 192.168.43.216, which is in the same network range as that of the Host machine.
Testing the Bridged Mode Connectivity
To check if the virtual machine is accessible over the LAN, we can use the ping command. Another way is to install the Apache webserver on the virtual machine and access the index.html page from another device on the LAN. We will use the ping method as it is a quick one:

We can see that a successful ping response is coming from the Host machine.
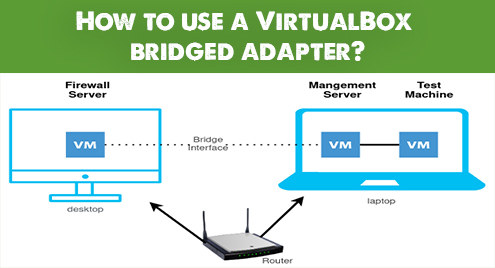
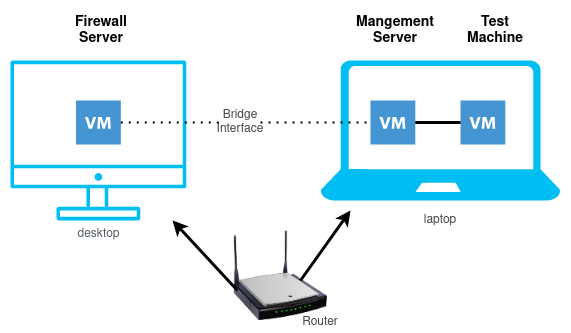
Special Use Case of Bridged Networking Mode
Bridged networking mode is particularly helpful when dealing with multi-machine scenarios. E.g., when learning the Checkpoint firewall for network security, I needed to work with three VMs for a Firewall server, a management server, and a test machine, respectively. I was working on a laptop with 8GB RAM. When I tried to set up the scenario for distributed deployment by giving each virtual machine 2GB RAM, my Host system started hanging. This performance degradation occurred due to inadequate RAM on my Host system. To make the scenario work smoothly, I installed VirtualBox on my Desktop PC and created a Firewall server VM. I put the Management virtual machine and the test virtual machine on the laptop. To connect Firewall VM with the management server VM (running on the laptop), I attached both of them with a bridged interface. Now both of them got IP addresses from my home routers and were communicating very easily. This helped me reduce the RAM usage on my Host system and made everything sail smoothly.
Advantages of Bridged mode
1. Virtual machines can be easily accessed over LAN without the need to configure NAT (Network Address Translation) or Port Forwarding.
2. Virtual machine will get its own IP address from the DHCP server.
3. Suitable for production environments.
Disadvantages of Bridged mode
1. If too many VMs or other devices are attached to the network, the DHCP server may run out of IP address space or at least may not be able to allocate a static IP you want.
2. If there are multiple NICs on the Host machine, switching them will require you to reconfigure your network configuration each time.
Conclusion
VirtualBox is a very easy-to-use yet powerful tool to build and test different networking scenarios. A good understanding of VirtualBox’s various features can help create various configurations and scenarios for testing before deployment.