Prerequisites:
You must have a Raspberry Pi with Raspbian operating system flashed onto the SD card. If you don’t know how to flash Raspbian image to SD card, read the article Install Raspbian on Raspberry Pi. If you don’t have an external monitor and would like to setup Raspberry Pi with Raspbian operating system in headless mode, read the article Raspberry Pi Connect to Wifi Using wpa_supplicant. Once you have Raspbian operating system up and running on your Raspberry Pi, you can move on to the next section of this article below.
Network Configuration:
In this article, I will set 2 different static IP addresses on my Raspberry Pi 3 Model B. One for the ethernet network interface eth0 and one for the Wi-Fi network interface wlan0. My network configuration is given below. It will be different for you. So, make sure to replace them as required.
Ethernet network interface eth0 configuration:
IP Address: 192.168.0.21
Netmask: 255.255.255.0 or /24
Router/Gateway address: 192.168.0.1
DNS nameserver address: 192.168.0.1 and 8.8.8.8
Wi-Fi network interface wlan0 configuration:
IP Address: 192.168.0.31
Netmask: 255.255.255.0 or /24
Router/Gateway address: 192.168.0.1
DNS nameserver address: 192.168.0.1 and 8.8.8.8
Setting Up Static IP to Ethernet Network Interface:
To configure a static IP to the ethernet network interface eth0, you have to edit the configuration file /etc/dhcpcd.conf configuration file.
To edit the configuration file /etc/dhcpcd.conf with nano text editor, run the following command:
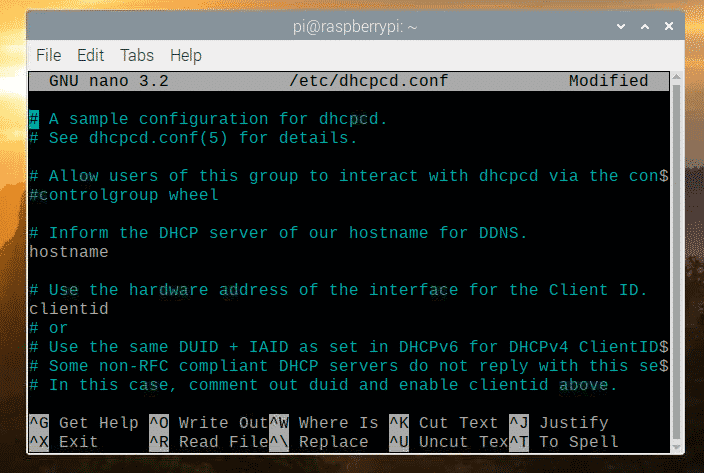
The dhcpcd.conf file should be opened with the nano text editor.
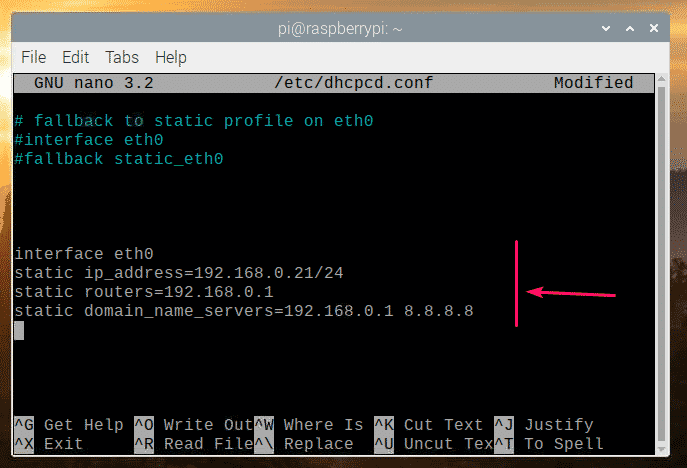
Now, go to the end of the configuration file and add the following lines.
static ip_address=192.168.0.21/24
static routers=192.168.0.1
static domain_name_servers=192.168.0.1 8.8.8.8
The final configuration file should look as follows. Now, save the dhcpcd.conf configuration file by pressing <Ctrl> + X followed by Y and <Enter>.
Now, reboot your Raspberry Pi with the following command:
Once your Raspberry Pi boots, check the IP address of the ethernet network interface eth0 with the following command:
Your desired IP address should be assigned to the ethernet network interface eth0.
As you can see in the screenshot below, the static IP address 192.168.0.21 is assigned to the ethernet network interface eth0 of my Raspberry Pi 3 Model B as I wanted.
So, this is how you set a static IP address to the ethernet network interface eth0 of your Raspberry Pi running Raspbian operating system.
Setting Up Static IP to Wi-Fi Network Interface:
To configure a static IP to the Wi-Fi network interface wlan0, you have to edit the configuration file /etc/dhcpcd.conf configuration file.
To edit the configuration file /etc/dhcpcd.conf with nano text editor, run the following command:
The dhcpcd.conf file should be opened with the nano text editor.
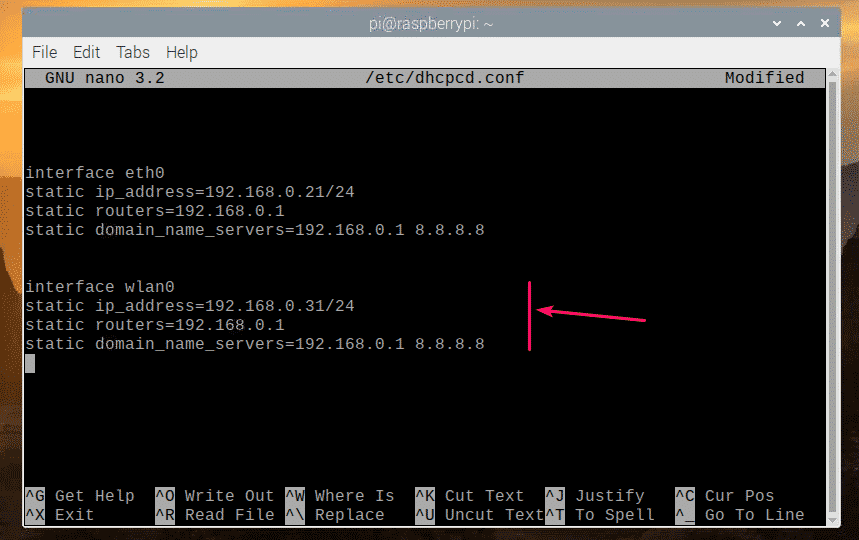
Now, go to the end of the configuration file and add the following lines.
static ip_address=192.168.0.31/24
static routers=192.168.0.1
static domain_name_servers=192.168.0.1 8.8.8.8
The final configuration file should look as follows. Now, save the dhcpcd.conf configuration file by pressing <Ctrl> + X followed by Y and <Enter>.
Now, reboot your Raspberry Pi with the following command:
Once your Raspberry Pi boots, check the IP address of the Wi-Fi network interface wlan0 with the following command:
Your desired IP address should be assigned to the Wi-Fi network interface wlan0.
As you can see in the screenshot below, the static IP address 192.168.0.31 is assigned to the Wi-Fi network interface wlan0 of my Raspberry Pi 3 Model B as I wanted.
So, this is how you set a static IP address to the Wi-Fi network interface wlan0 of your Raspberry Pi running Raspbian operating system.
Thank you for reading this article.


