This article will illustrate:
- What is the Purpose of the “docker build –no-cache” Command?
- How does the “docker build –no-cache” Command Work in Docker?
What is the Purpose of the “docker build –no-cache” Command?
The “docker build –no-cache” command is utilized for building a Docker image by using a Docker file without utilizing any previous image cache. This ensures that the build process starts from scratch and does not use any previous image cache.
This can be helpful in situations where users have made important modifications to the Docker file or if users are facing problems with a previously cached image. The “–no-cache” option forces Docker to build the entire image again from the beginning, without utilizing any cached intermediate images.
How does the “docker build –no-cache” Command Work in Docker?
To see the working of the “docker build –no-cache” Command, check out the below-provided instructions.
Step 1: Create a Program File
On Visual Studio Code, create a new program file named “index.html” and paste the given-provided snippet into it:
Step 2: Create a Docker file
Next, make a new file called “Dockerfile” and insert the below-provided code into it to containerize the HTML program:
COPY index.html /usr/share/nginx/html/index.html
In the above code:
- “FROM” instruction is utilized to define a base image for the container.
- “COPY” command pastes the “index.html” file into the container path.
Step 3: Build Docker Image
After that, create a new Docker image by utilizing the “docker build” command along with the “-t” flag to define the image name. For instance, we have specified “myhtml-img” name for the image:
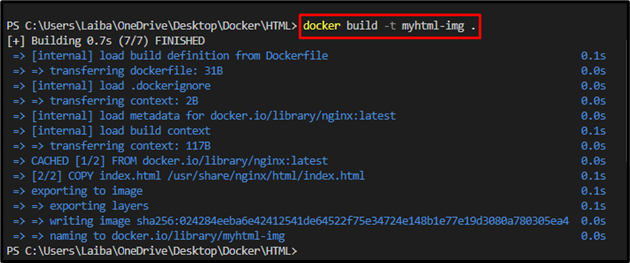
The Docker image has been created successfully.
Step 4: Modify the Program File
Now, make some changes to the program file. For instance, we have added the “<body></body>” section in our program:
Step 5: Rebuild Docker Image
Execute the below-listed command again to build the Docker image again with recent changes:
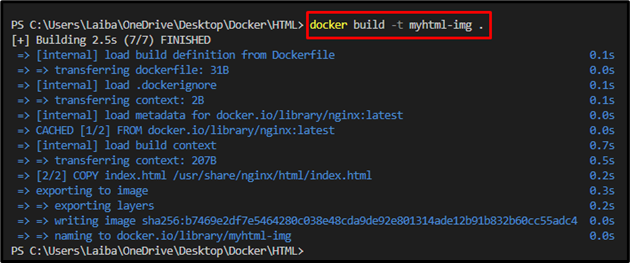
In the above output, the times in seconds show that only the modified part is rebuilt, and the command used a previous image cache for the entire image.
Step 6: Rebuild Docker Image Without Cached Layer
Use the “–no-cache” option with the previous command to restrict Docker from utilizing a previous image cache and entirely rebuilds the Docker image:
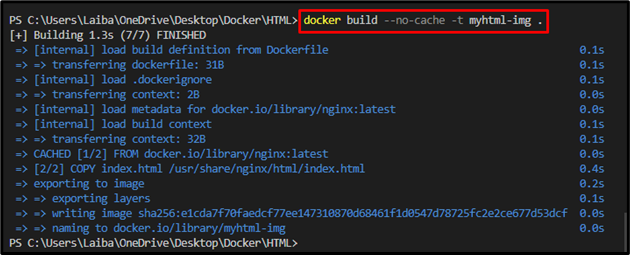
This command has created a new image from scratch without using any cached layers from previous builds.
Conclusion
The “docker build –no-cache” command is utilized to build a new image from a Docker file without using any cached layers from previous builds. This ensures that the image is built from scratch and reflects the latest changes in the Docker file and the base image. This article has illustrated the purpose of the “docker build –no-cache” command.