Docker is one of the most popular containerization tools that is utilized for developing, and distributing projects, applications, and software. It enables developers to run different applications isolated from the host system without having the individual OS for them to run on. It introduced containers that are supported and managed by multiple Docker components and volumes are one of them.
This comprehensive tutorial will provide the easiest way to mount Docker volume to the host.
How to Mount Docker Volume to Host?
To mount the Docker volume to the host, check out the following instructions:
- Generate a new volume by running the docker volume create
- List the volume verifications.
- Display and select the Docker image to create a new container along with mounting the volume.
- Execute the docker exec -it <con-name> sh command to run the container.
- Add a new file inside the container, and add some text.
- Create another Docker container and mount the volume from the first container.
- Edit the existing data volume file and restart the container.
- Execute the cat command to display the content of the file that was added through two different containers for verifications.
Step 1: Create Volume
Initially, use the following command to generate the new volume:
Here:
- docker volume create command is utilized for generating a volume.
- –name tag is used for specifying the volume name.
- V1.0 is our new volume name:

After doing so, the volume will be created.
Step 2: List Volume
Then, list all the existing volumes by running the below-given command to verify whether the new volume has been created or not:
According to the below-given output, the new volume has been created successfully:

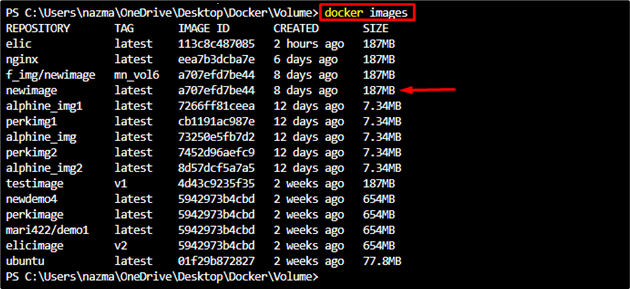
Step 3: Display Docker Images
Next, execute the provided command to display Docker images: From the given output, we have selected the newimage:latest for further process:
Step 4: Mount Docker Volume
Afterward, generate a new Docker container with the volume attached to it with the help of the below-given command:
Here:
- -d flag used to execute the container in the background.
- –name option is used for specifying the container name.
- con_img2 is our new Docker container name.
- -v option denotes the volume.
- V1.0 is the previously created new volume.
- newimage:lastest is the existing Docker image that generates the new container:

Step 5: Create a File Inside the Data Volume
Now, generate a new file and add some text to it. To do so, move to the Docker shell by executing the provided command:
Next, execute the echo command to generate and edit the new file. After that, use the exit command to exit the container:
# exit

Step 6: Create a Container and Add Data Volume
To create a new Docker container and add data volume to it run the provided command:
In the above-stated command:
- –name flag used to add the container name.
- —volumes-from tag is utilized for mounting the volumes from another container.
- con_img2 is the source container.
- newimage:latest is our built Docker image name:

Step 7: Edit File Inside Data Volume
Now, run the Docker container by using the docker exec command and navigate to its shell mode:
After doing so, edit the previously created file inside the new container by executing the echo command:
# exit
As a result, the sample1.txt file will be updated successfully:

Step 8: Restart Docker Container
To verify whether the Docker volume mounted or not run the docker restart command along the container name:

Step 9: Run Container
Lastly, run the container and display the data of the particular file to confirm both containers can read and write to the same data volume by running the cat command:
# cat /V1.0/sample1.txt
It can be seen that the text that was added from two different containers to the same data volume has been displayed successfully:

That’s it! We have provided a detailed procedure for mounting the Docker volume to the host.
Conclusion
To mount the Docker volume to the host, first, generate a new volume by running the docker volume create command, and list them for verifications. After that, select the Docker image to create a new container along with mounting the volume. Then, execute the container, create a file, and add some data. Now, create another Docker container and mount the volume from another container. Modify the data volume file and restart the container. Lastly, execute the cat command for the added content verifications. This article has illustrated the way to mount Docker volume to host.