Under the hood, Milvus collections are implemented using various data structures such as indexing methods, storage formats, and more. This helps to facilitate and optimize the vector similarity search and retrieval.
Therefore, before you can store any data in a Milvus database, you need to create a collection with the schema of your data.
In this tutorial, we will explore the various methods that you can use to list the available collections on the server.
Requirements:
Before diving into the methods of listing the collections in the Milvus server, ensure that you have the following:
- Milvus server
- Milvus CLI
- Attu for Graphical Administration
With the given requirements met, we can proceed to the next step.
Create a Collection in Milvus
Before learning how to drop an existing Milvus collection, let us start by setting up a sample Milvus collection for demonstration purposes.
Start by opening the Milvus CLI with the following command:
Next, login to your Milvus instance with the following command:
For example, the following command logs into a locally hosted Milvus instance on the default port and alias.
Output:
+---------+---------------------+
| Address | 192.168.100.2:19530 |
| User | |
| Alias | default |
Once logged in, we can create a sample Milvus collection as shown in the following command:
The given command should create a new film collection with the defined schema fields and types.
If you are new to Milvus collections, check the tutorial on creating the Milvus collections in the following link:
https://linuxhint.com/milvus-create-collection
List the Collections in Milvus Using the Milvus CLI
The first and most common method of interacting with the Milvus server is using the Milvus CLI.
Once connected to the Milvus CLI, you can run the “list collections” command as shown in the following syntax:
The parameters are explained as follows:
- -t – This sets the maximum duration of an RPC call in seconds. If this parameter is missing, the client waits until the server responds or an error occurs.
- -l – It shows the loaded collections only.
For example, to show all the collections in the server, we can run the following command:
Resulting Output:
| | Collection Name |
+====+===================+
| 0 | articles |
+----+-------------------+
| 1 | images |
+----+-------------------+
The given output shows two collections on the server.
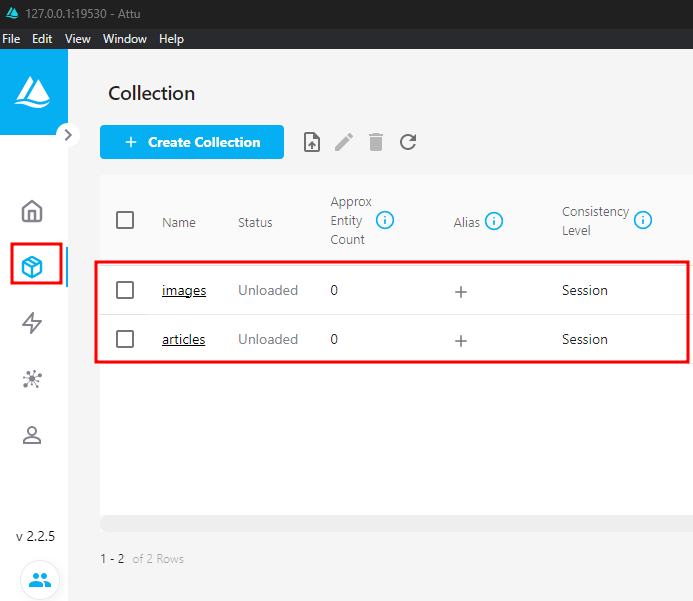
List the Collections in Milvus Using Attu
The second method that we can use to list the collections in the Milvus server is using the Attu manager for Milvus.
If you don’t have Milvus installed, you can check the tutorial on https://linuxhint.com/milvus-install-attu.
Once installed, launch Attu and connect to the Milvus server. In the left-hand pane, select the “Collection” tab to view all the available collections on the server.
Conclusion
You learned the two main methods of viewing all the available collections in the Milvus server using the Milvus CLI and the Attu GUI Manager.

