Docker environments include different elements, such as images, containers, networks, Docker Hub, volume, and many others that make development a breeze. However, these elements also take up much of your system space and may clutter the Docker development environment. Decluttering is a process that involves managing and removing images, volume, containers, and networks.
In this post, we will explain:
- Is It Possible to Declutter the Development Environment With Docker?
- How to Declutter a Development Environment?
Is It Possible to Declutter the Development Environment With Docker?
Yes, it is possible to declutter the development environment with Docker. Decluttering the development environment contains managing Docker images and removing old, unused Docker components.
To manage the Docker images, Docker provides us with different means, such as cloud storage, Docker Hub official Docker registry, and private Docker registries on which you can publish the docker images and declutter the Docker environment by saving all things in one place. You can also utilize the GitHub remote repository to save the project code and images.
How to Declutter a Development Environment?
The essential components of Docker used in development are containers and docker images. The containers also declutter the development as it encapsulates all project dependencies and source code. However, images are building blocks to create and maintain the Docker containers and are also referred to as the Docker container framework. You can push these images to the registry to manage them on cloud storage and declutter the Docker development platform.
To declutter the development environment by removing and publishing the images on Docker Hub, utilize the provided instructions.
Step 1: Create Dockerfile
First, generate a simple Dockerfile and add the instructions to containerize your application in the following way:
- Use the “FROM” statement and define the base image.
- Next, utilize the “COPY” command and copy the source file to the destination or container path.
- If your application needs the installation of other dependencies, define them in the “RUN” command.
- Specify the “ENTRYPOINT” for the container.
For instance, we have containerized a simple “index.html” file using “nginx:latest” base image:
COPY index.html /usr/share/nginx/html/index.html
ENTRYPOINT ["nginx", "-g", "daemon off;"]
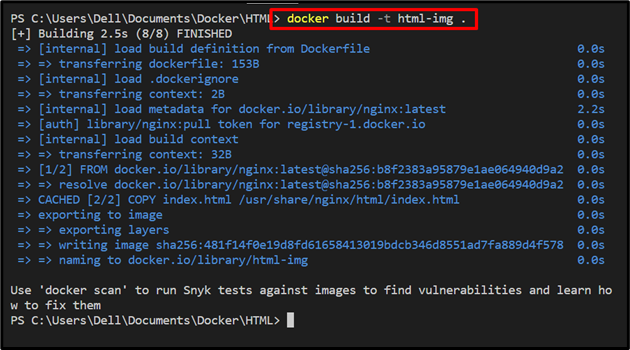
Step 2: Generate an Image
Next, generate the Docker image through “docker build” command:
In the above command, “-t” is utilized to specify the tag of the image or name of the image:
Step 3: Tag Image
To manage the image on Docker Hub official repository, first tag the image as “<user-name>/<image-name>:<tag>”. For this purpose, look at the below command:

Now, list down all Docker images and verify if the image is tagged or not:
Here, you can see we have tagged the image “rafia098/html-img”:

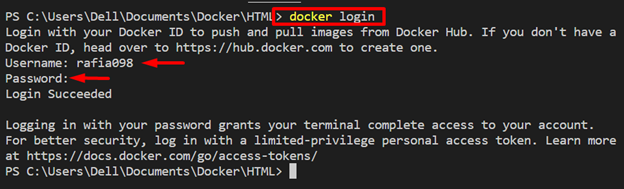
Step 4: Log in to Docker Hub
In order to push the image, first, log in to Docker Hub or in your private registry using “docker login” command:
Add the requested information, such as the username and password. If the “Login Succeeded” message appears, it means that you have successfully logged into Docker Hub:
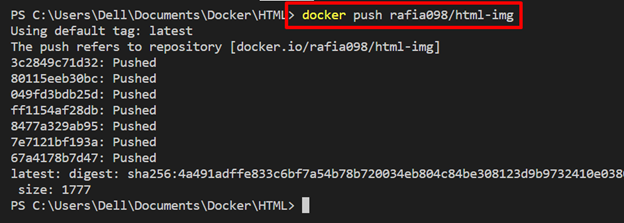
Step 5: Push Docker Image
Next, push the tagged image to Docker Hub by utilizing the below command:
Step 6: Remove Images From Your System
After publishing your image in Docker Hub, remove these images from Docker platform from your system for decluttering. To do so, the “docker rmi” command will be used along with the “-f” option to remove the image forcefully:

Remove the tagged image as well from your system as it is published and managed on Docker Hub:

For that verification, again list down all images using the “docker images” command:
Here, you can see we have successfully removed the images and decluttered the Docker development environment:

How to Pull Image After Declutter Development Environment With Docker?
After decluttering the Docker environment by containerizing the project by creating and managing the Docker image on some remote or cloud repository, you can access these images from your system or from any other machine and easily deploy the project. For this purpose, take a look at the provided procedure.
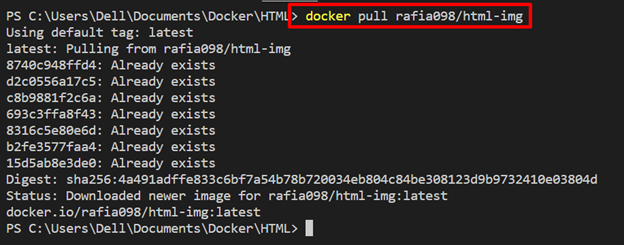
Step 1: Pull Image From Docker Hub
First, log in to Docker Hub or your registry, as explained in the above section. After that, pull the Docker image to your local repository on your local machine with the help of the “docker pull <image-name>” command:
Step 2: Fire up the Container
Execute the image to create and fire up the container through below given command:
In the above command:
- “-d” is utilized to execute the container in the background.
- “-p” specify the exposing port for the container on the host machine:

After that, navigate the “localhost” on your favorite browser and check whether the application is running or not:
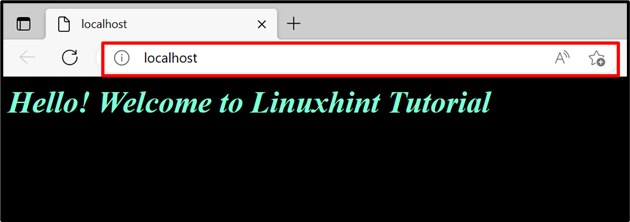
It can be observed that we were successful in running the application by pulling the image from Docker Hub.
Conclusion
Yes, it is possible to declutter the Docker development environment by managing the images and other sources on cloud storage or Docker registries. However, containers also declutter the development environment as they encapsulate all required libraries, packages, and source code to develop and run the application. Docker Hub official registry can be used to publish and save the Docker images, which can be easily accessed from any machine. This post has explained how to declutter your development environment with Docker.