This is generally a framework for web programmers, free and open-source program contributors, and those delivering to Linux server settings. The WSL can be used by anybody who likes to work on Bash, standard Linux applications, and programming platforms along with the Windows productivity applications. So, this article is for all those users who want to install kali Linux on Windows 10 using WSL on PowerShell.
Enable WSL on Windows:
Make sure that your windows system is already updated. To use the WSL on any windows system, it is necessary to have a built equal to or higher than 18362. Otherwise, we will not be able to install kali Linux on the windows system using the windows subsystem for Linux (WSL). Begin by running Windows PowerShell as an administrator. By Right-clicking it, you can pick “Run as Administrator” from the menu.
A blue Windows PowerShell screen will be opened on your system. To enable WSL on our Windows 10 system, you need to execute the instruction shown in the image within your PowerShell without a single mistake. Enabling it will take a little time. The image shows the result.
After the enabling feature processing line reached 100 percent, the WSL is successfully enabled at our end as shown in the image below.
Enable Virtual Machine on Windows:
After enabling the WSL tool on our system, it’s time to enable the virtual machine platform tool on our system as well. Although it is an optional feature to install, it can be of great use. Use the very same old instruction on the PowerShell with the feature name “VirtualMachinePlatform” to install it. The enabling feature processing line is showing the processing of enabling it. The image shows the result.
Within no more than 1 minute, it will be completely enabled on our system as per the 100 percent processing bar. Kali Linux can now be downloaded and installed on Windows. The image shows the result.
Download WSL Linux Update Package:
It is quite necessary to make our Linux system up to date. For this, we need to download the Linux kernel update package for the WSL and install it in our Windows system. After installing it, try restarting your Windows 10 system to make your system up to date.
Set Default Version for WSL:
After rebooting and logging in from your system, you need to open the PowerShell once again and set the WSL version you want to use as default. For this, try using the “wsl” command with the “—set-default-version” option followed by the version number (i.e., 2.)
We have been using the default version 2 for WSL here in our Windows 10 system. After a while, it will be set and your system is now ready to download and install kali Linux on it. The image shows the result.
Download and Install Kali Linux:
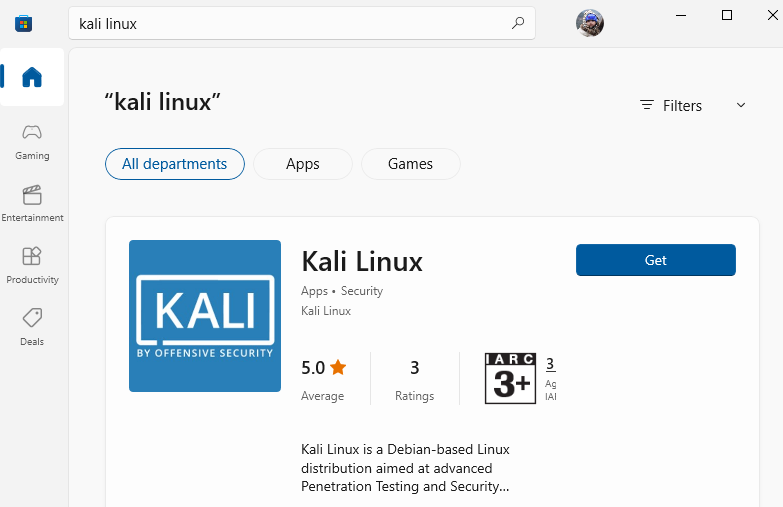
To get the Klai Linux on your system, you need to download it first. To download, you need to use the Microsoft Store of your Windows 10 system and search “Kali Linux” on it. You will be provided with a kali Linux tool on your screen as shown below. Next to it, press the “Get” button. The image shows the result.
It will start downloading the Kali Linux on your Windows 10 system for use. You will see the number of bytes downloaded in MegaBytes as compared to the total Megabytes needed to download along with the “downloading…” text beneath the loading download button. The image shows the result.
When the Kali Linux download process is complete, the “Open” text will appear on the same button. You have to Hit on it to begin installing in your Windows 10. The image shows the result.
Now a black screen named “Kali Linux Rolling” will appear on your Windows 10 desktop screen. The image showsre the result.
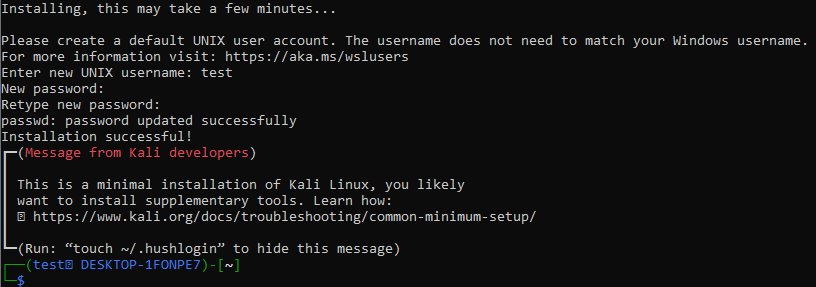
Wait for a while until it asks you to create a new username and its password. A text bar “Enter new Unix username:” will appear. You need to add a new username to create a root user.
After adding a username i.e. “test”, it will ask you to create a new password and retype that password as well. After adding a password, the Kali Linux installation will get completed and the console of Kali Linux will be opened on the same very black screen. The image shows the resultr.
We have tried the “update” instruction with the “apt” package on its console area and it asks for our root password to continue. We have added our currently added password to it and it started to update the Kali Linux itself without any delay. The image shows the result.
The Kali Linux operating system will be updated in some seconds as shown beneath.
Conclusion:
This is about the installation of Kali Linux on the Windows 10 operating system utilizing the Windows subsystem for Linux. We have started this article by enabling WSL and virtual machine tools on Windows 10 first using PowerShell. We have also installed the Linux update for WSL and downloaded the Kali Linux. It ends well by installing it with the downloaded one.


