
The main purpose of Alpine Linux is minimalism in terms of high security, scope, and space. In this, the location of programs in memory is randomized using a technique called position-independent executables. This prevents any attacker from taking over the machine and exploiting memory quirks. Alpine Linux achieves its small size by providing most utilities in an executable using the BusyBox suite.
If you want to use the Alpine Linux but wants to give it a try before making it the current OS of the system, you can use the VirtualBox. In this tutorial, we will briefly explain how to install and use the Alpine Linux on VirtualBox.
How to Install Alpine Linux on VirtualBox
Before moving to the setup process, here are some prerequisites that you need to follow:
- Installed VirtualBox in the system
- Latest ISO file of Alpine Linux
- Minimum 10 GB storage
- At least 2GB of disk space
Like other Linux distributions, you can easily install the Alpine Linux on VirtualBox.
First, go to the official website of Alpine Linux and download its standard version. Depending on your system architecture, you can download the x86_64 or x86 version.

The x84_64 version is suitable for today’s modern systems, so we will download it here.

Once the ISO file is downloaded, it goes to your “Downloads” directory by default. This downloaded file represents Alpine Linux and is required to install it on VirtualBox.
Now, open the virtual machine and click on “New”.

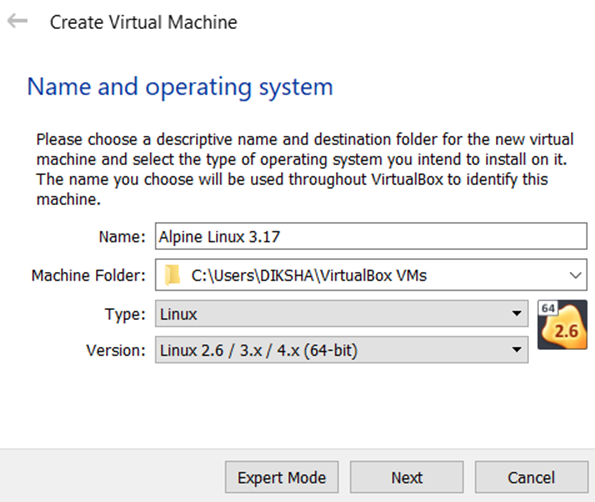
First, name the OS of your choice. Here, we named it “Alpine Linux 3.17”. Select “Linux” under “Type” and “Linux 2.6 / 3.x / 4.x (64-bit)” for “Version”. Then, click “Next”.
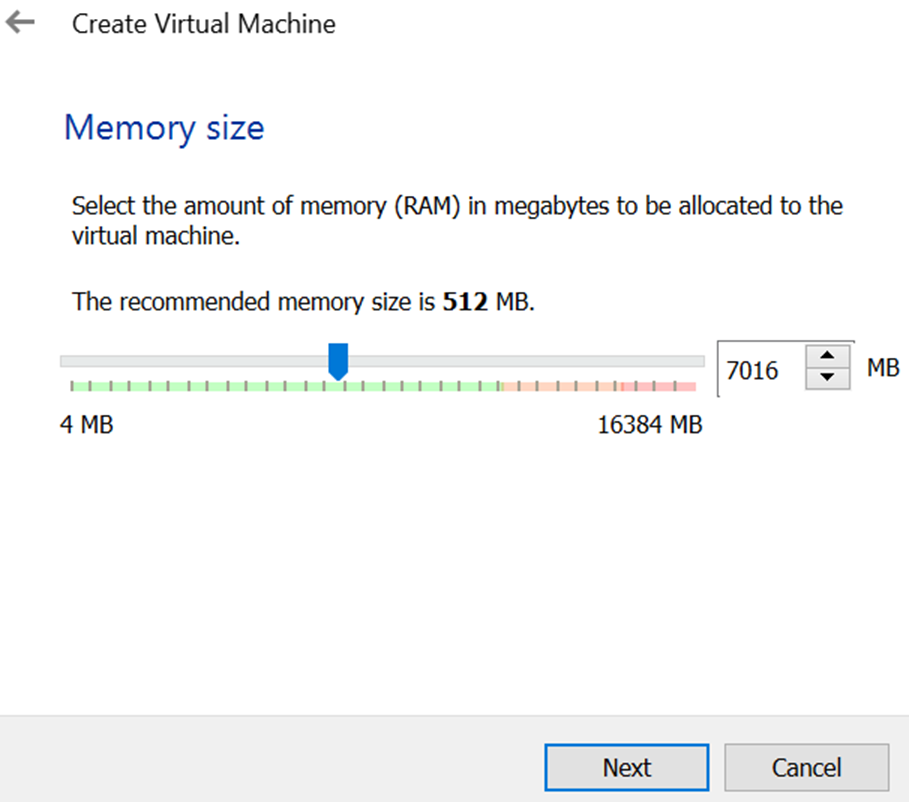
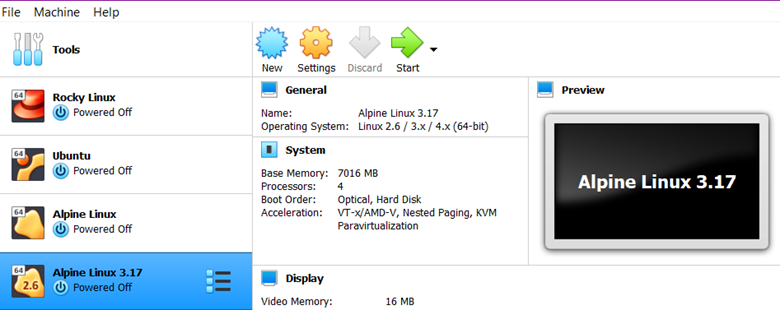
Now, please provide a memory for the virtual machine from your system. Since Alpine is a small distro, it only requires a little memory. You can run it easily by giving up to 2GB of memory, but we provided 7GB here to make it run more smoothly.
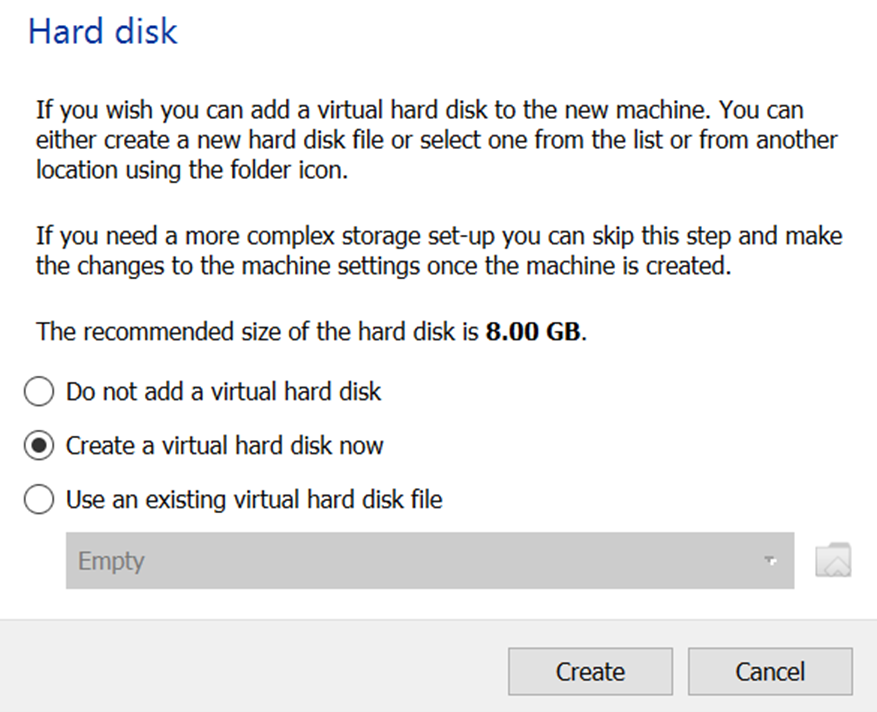
Next, we need to create a hard disk to store the data. To do this, click on “Create a virtual hard disk now” and proceed by clicking on “Create”.
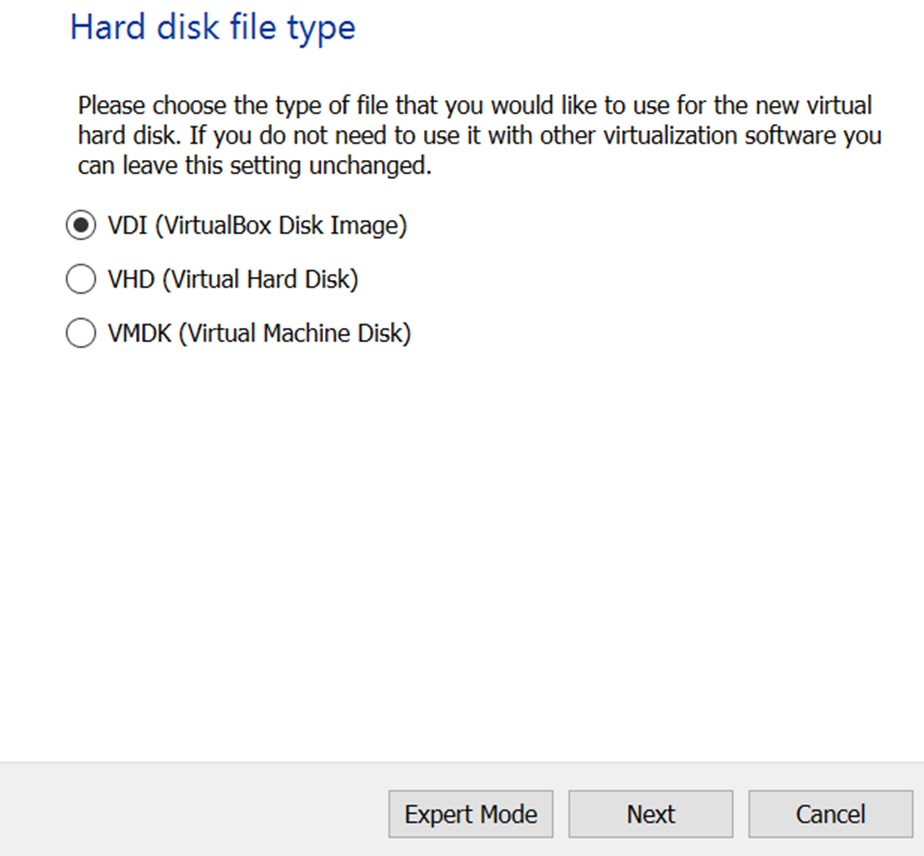
Proceed by selecting “VirtualBox Disk Image (VDI)” for the type of file disk.
Next, we choose a “Dynamically allocated” disk because in a fixed size, the disk has a fixed size and you cannot change it. Conversely, you can increase or decrease its size in a dynamically allocated disk.

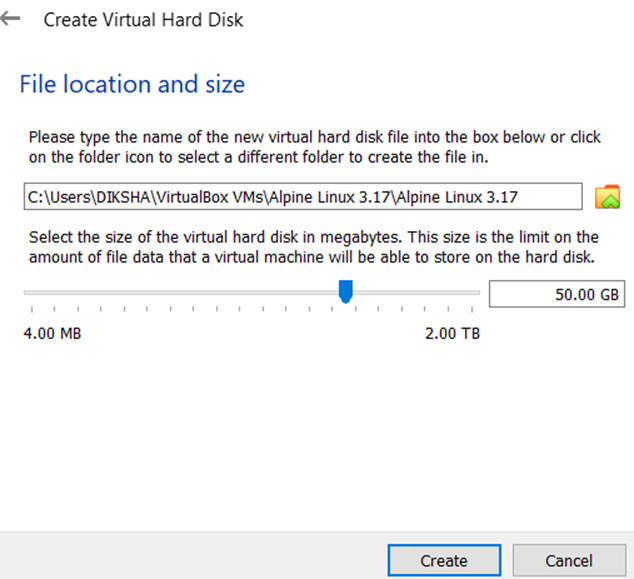
You can select a disk size of up to 10GB by default, since Alpine Linux has a smaller size. For the system to work properly, we fixed the disk size at 50GB.
As you can see, Alpine Linux is now ready to install.
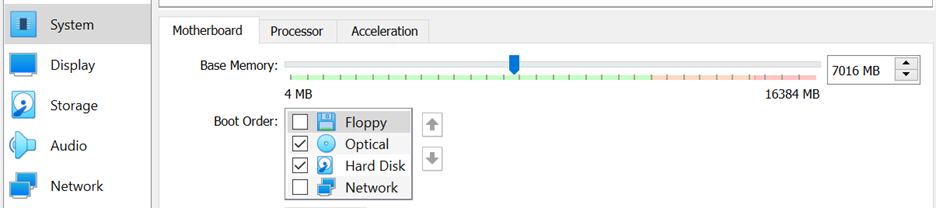
Now, go to Settings > System > Motherboard and tick on the “optical” and “hard disk” options as shown in the following image:
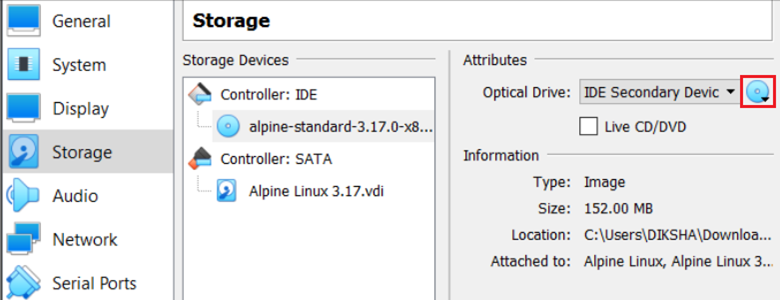
Next, go to “Storage” and click on “empty”. Afterward, click on the icon that is marked in the following image and select the downloaded ISO file.
After making the previous settings, start the Alpine Linux by clicking on the “Start” button. After setting everything right, you will see the following screen when you click on “Start”.
Note: In this situation, you are using Alpine but it is still not fully installed.
Alpine Linux also has the login. The default user on Alpine is “root”. Login to the localhost login prompt by typing “root”.

Type “setup-alpine” to set up Alpine and press “Enter”.

Now, Alpine asks you to select the keyboard first. Here, we select that keyboard by typing “us”. When prompted for the next keyboard variation, type “us” again and press “Enter” to proceed.

The system now asks you to enter the hostname. Here, you can enter the hostname as per your choice.

Next, we are not going to configure the “etho” network interface. Press “Enter” two times for automatic configuration.

When prompted for manual network configuration, type “n” and enter for automatic configuration. Make sure that you connected to the internet and it gives the dynamically allocated IP addresses.

To change the password for the root user, enter any strong password that you want, twice.
![]()
Note: For security reasons, you will not see anything typed while typing the password.
Once the password is set, our screen returns to the setup menu. When prompted for your time zone, you have to enter the area. Use “?” to list the appropriate list for your timezone. You will see that the list of all the zones will appear in front of you.

Since our timezone is “Asia”, we proceed by using it. Immediately after this, it asks for the sub-timezone. Type “?” again to get a list of sub-timezones by type. Under this, our sub-time zone is “Kolkata”, so we will write that.

Next is a proxy URL which we do not need. Proceed by pressing “Enter”. Chrony works for our NTP client, so press “Enter” again to proceed. This process may take some time.

Alpine now needs to install some packages and wants to know where to download the packages. An extensive list of mirrors is available from which you can choose. Currently, Alpine is going through 70 packages and sees which package is the fastest, but this process takes some time. If you can wait, press “Enter” to find the fastest one.
Here, we write “r”. By doing this, it randomly takes any package.

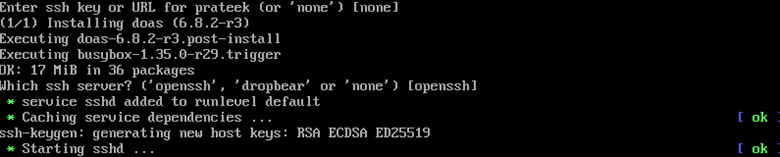
It asks you to set up the user. But for now, without setting up the user, we proceed by pressing “Enter”. After this, it asks you for root SSH login permission. If you need to enter a password while doing the root SSH login, type “yes”; otherwise, proceed by typing “no”.
![]()
Now, Alpine starts downloading some tools. First, it asks to choose an SSH server. Out of which, we choose the OpenSSH by default.
Finally, you must choose the disk on which you want to install the Alpine Linux. As you can see, we have only one disk. Apart from this, we have no other option. So, we choose “sda”.
Next, write “sys” to use the disk as the sys drive. When the system prompts you to erase the disc, type “y” and press “Enter”.
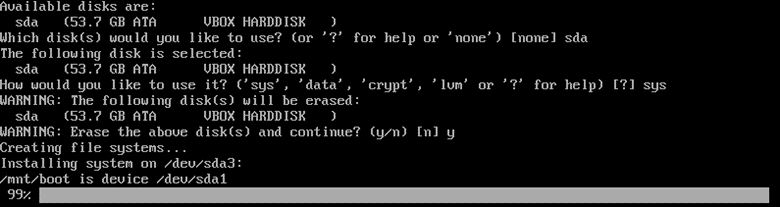
The previous process may take some time, but Alpine is installed after that. Finally, reboot the system by typing “reboot”.

When Alpine restarts, you will see the name that you provided as the system hostname. To proceed, type “root” and enter the password that you entered earlier.

Next, point the repositories using the following command:

Here, we open the repositories using the Vi editor. For this, run the following command:
![]()
Upon running the previous command, you will see the following repositories. Out of this, we remove the “#” from the previous two repositories to un-command them. By doing so, the repositories are enabled for Alpine Linux.

Run the following update command to ensure that the repositories are working correctly:

You can see that the repositories of Alpine Linux are working correctly, and around 17000 packages are available under it.
To set up the graphical interface of Alpine Linux, use the following command:
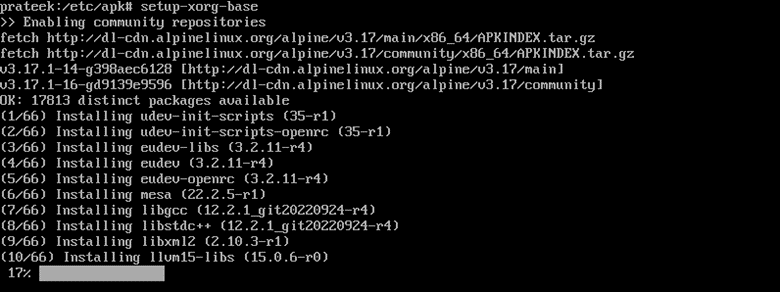
This command installs all the necessary packages for the graphical interface of Alpine Linux.
Next, we install “pciutils” via the following command to monitor the status of PCI devices, list them, and set their configuration registers:

Now, we need to install the video drivers. First, we search for the video drivers using the following command:
![]()
All these video drivers are available in the Alpine repository.

Here, we only install the selected video drives which are as follows:

All the previous three video drivers are essential and are successfully installed. These are necessary for the graphical interface of Alpine Linux to work.
Now, let’s install some input drivers for devices like the keyboard and mouse. We first search the input drivers in the Alpine repository using the following command:

We only install the “vmmouse” and “synaptics” input drivers.

Next, install the virtualbox guest addition; it is available in the Alpine repository by default:

Afterward, install all the gnome utilities. Here, we install all the necessary utilities through the following command:
![]()
The previous utilities may take some time to install.

Now, you need to add some services. Here, we add four services (dbus, udev, virtualbox-guest-additions, and gnome desktop manager) using the following command:

![]()
Finally, create a login user with a home directory. For this, provide the username and password correctly.

Reboot the system to check that “gdn” is appropriately installed.
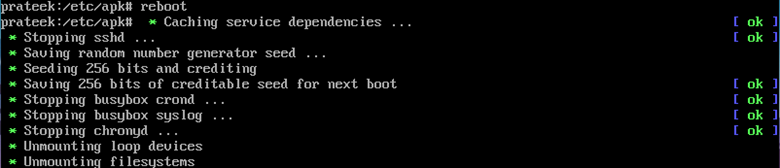
As you can see, the gnome desktop manager is successfully installed. Now, using this login user, you can start the gnome desktop manager of Alpine Linux.

Conclusion
One of the main features of Alpine Linux is its small size. Installing Alpine Linux is tricky compared to other Linux distros. In this tutorial, we learned the installation process of Alpine Linux on VirtualBox, which is lengthy. After installing Alpine, we described the entire process of its configuration.
For this Linux distro, the graphical interface must be installed separately, and some packages and drivers must also be added separately. With this tutorial, you can install the Alpine Linux on VirtualBox without hassle.