The post will discuss the step-by-step instructions to style HTML Form with Tailwind CSS.
How to Style HTML Form with Tailwind CSS?
The HTML Form is a widely used component by many web developers, to collect the user’s data in an organized manner. However, when it comes to styling in an efficient and time-saving manner users can use the Tailwind CSS framework. As it offers many pre-designed components for styling HTML elements.
Step 1: Create an HTML Form
Let us suppose we have this HTML form for a Trip Destination company that wants to collect client information, trip details, its type, and any expectations that the customer has from the trip.
<form>
<!-- Customer Information -->
<div>
<label for="clientName">Client Name:</label>
<input type="text" id="clientName" name="clientName" required />
</div>
<!-- Trip Information -->
<div>
<label for="TripDays">Days of Trip:</label>
<input type="number" id="TripDays" name="TripDays" required />
</div>
<div>
<label for="DesiredDestination">Desired Trip Destination:</label>
<select id="DesiredDestination" name="DesiredDestination">
<option value="">--Select Country--</option>
<option value="maldives">Maldives</option>
<option value="canada">Canada</option>
<option value="mexico">Mexico</option>
<option value="japan">Japan</option>
<option value="usa">USA</option>
<option value="italy">Italy</option>
<option value="france">France</option>
</select>
</div>
<!-- Trip Date -->
<div>
<label for="startDate">Start Date:</label>
<input type="date" id="startDate" name="startDate" required />
</div>
<div>
<label for="endDate">End Date:</label>
<input type="date" id="endDate" name="endDate" required />
</div>
<!-- Trip Type -->
<div>
<label>Trip Type:</label>
<div>
<input type="radio" id="business" name="tripType" value="business" required />
<label for="business">Business</label>
<input type="radio" id="solo" name="tripType" value="solo" required />
<label for="solo">Solo</label>
<input type="radio" id="family" name="tripType" value="family" required />
<label for="family">Family</label>
</div>
</div>
<!--Additional Information-->
<div>
<label for="tripexpectations">Trip Expectations:</label>
<textarea id="tripexpectations" name="tripexpectations" rows="2"></textarea>
</div>
<button type="submit">
Submit
</button>
Output
The above output has displayed the simple HTML form.
Step 2: Add Tailwind CSS to HTML Form
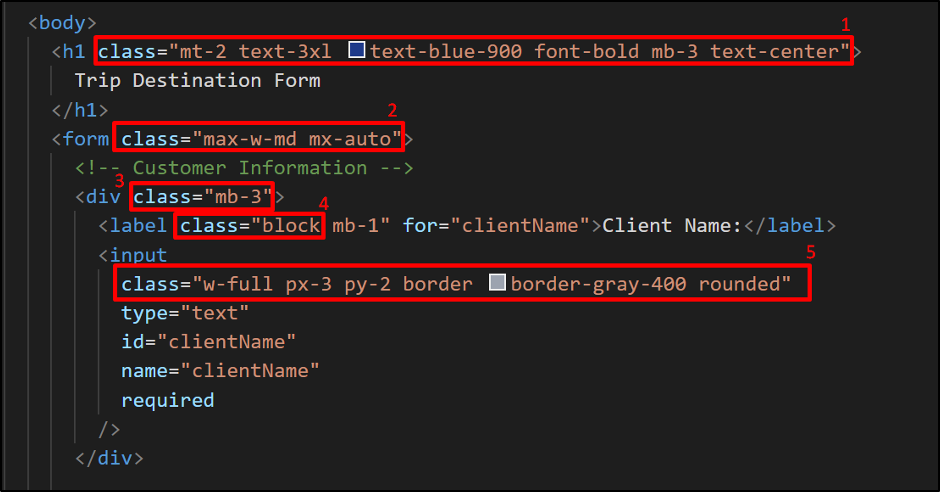
Let us add the Tailwind CSS to this HTML Code and discuss its properties utilized for designing this form. The image below shows the styling of a few HTML elements:
Here is the Tailwind CSS code shown in the above image:
- The “h1” element used different Tailwind CSS classes to add the top margin of 0.5 rem, and bottom margin of 0.75 rem, increase the text size, change the text color to dark blue, make the text bold, and appear in the center.
- The “form” element is set to consume the maximum width of 28 rem and has auto left and right margins.
- The “div” element contains elements for gathering customer information with a bottom margin of 0.75 rem.
- The “label” element is displayed as a block element with a margin-bottom of 0.25 rem.
- The “input” element will consume the full width of the form element having a 0.75 rem top and bottom padding along with 0.5 left and right padding and a solid 1px border with gray color and round corners.
Step 3: Design Elements for Gathering Trip Information
Let us style the elements for gathering the trip information, the picture is given below with the Tailwind CSS:
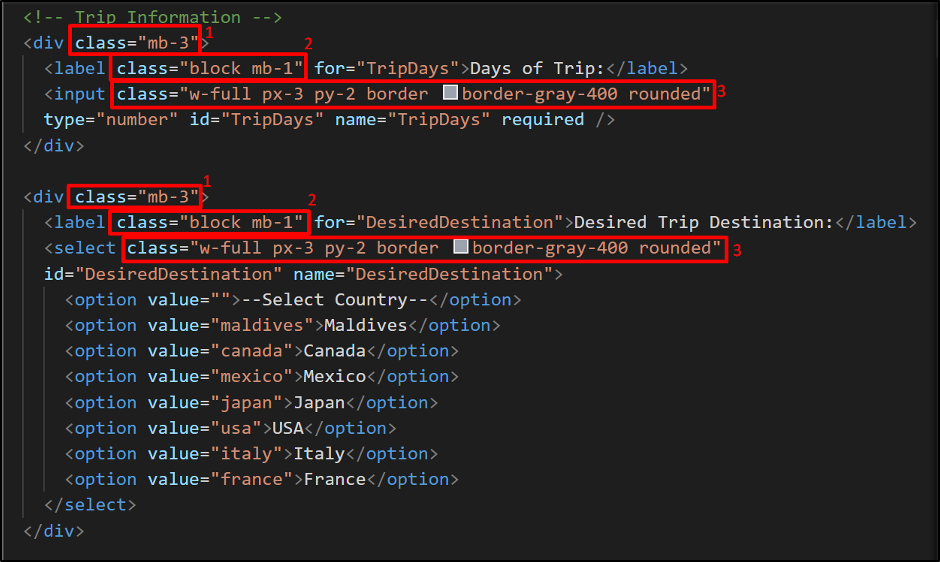
In the above image the Tailwind CSS styles:
- The “div” elements have a bottom margin of 0.75 rem.
- The “label” elements are set as a block element “block” and the bottom margin as 0.25 rem.
- The “input” element will consume the full width of the form element having a 0.75 rem left and right padding along with 0.5 top and bottom and a solid 1px border with gray color and round corners.
Step 4: Design “div” Elements for Trip Type
The image below shows the Tailwind CSS styling for elements for trip type:
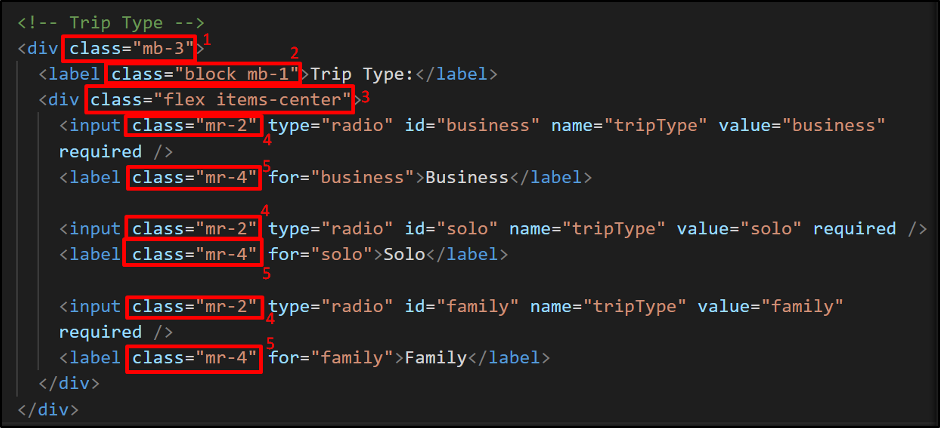
Here in the above Tailwind CSS code:
- The outer “div” element has a bottom margin set as 0.75 rem.
- The “label” element will be displayed as a block element “block” with a bottom margin of 0.25 rem.
- The “div” element to store the radio button is set as flex and the items are displayed in the center.
- The “input” elements have a right margin of 0.5 rem.
- The “label” elements have a right margin of 1 rem.
Step 5: Design “div” Elements for the Button Element
The image below has the Tailwind CSS styling for the div element for additional information and a button:
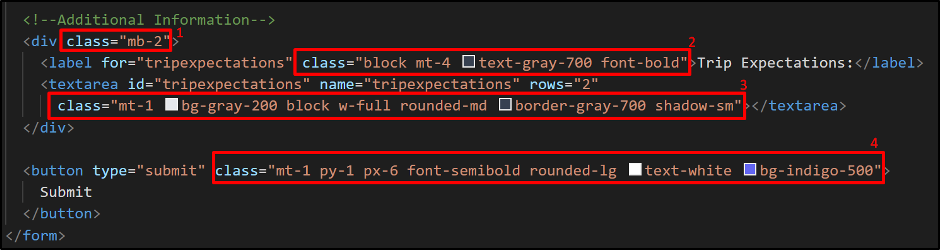
Here in the above Tailwind CSS code:
- The “div” element has a bottom margin set as 0.75 rem.
- The “label” element is displayed as block “block” with a top margin of 1 rem, bold text, and text color gray.
- The “textarea” has a background color gray, a top margin of 0.25 rem with full width, text-shadow, a border radius of 0.375 rem, and a border color of dark gray.
- The “button” element has a top margin of 0.25 rem, a 0.25 rem top and bottom padding along with 1.5 left and right padding, font-weight equals 500, white color text, round borders, and indigo background.
Code of the Styled HTML Form with Tailwind CSS
The complete code for the above HTML form with Tailwind CSS styling is provided below. You can copy and run the code in your project to view it:
Trip Destination Form
</h1>
<form class="max-w-md mx-auto">
<!-- Customer Information -->
<div class="mb-3">
<label class="block mb-1" for="clientName">Client Name:</label>
<input class="w-full px-3 py-2 border border-gray-400 rounded" type="text" id="clientName" name="clientName" required />
</div>
<!-- Trip Information -->
<div class="mb-3">
<label class="block mb-1" for="TripDays">Days of Trip:</label>
<input class="w-full px-3 py-2 border border-gray-400 rounded"
type="number" id="TripDays" name="TripDays" required />
</div>
<div class="mb-3">
<label class="block mb-1" for="DesiredDestination">Desired Trip Destination:</label>
<select class="w-full px-3 py-2 border border-gray-400 rounded"
id="DesiredDestination" name="DesiredDestination">
<option value="">--Select Country--</option>
<option value="maldives">Maldives</option>
<option value="canada">Canada</option>
<option value="mexico">Mexico</option>
<option value="japan">Japan</option>
<option value="usa">USA</option>
<option value="italy">Italy</option>
<option value="france">France</option>
</select>
</div>
<!-- Trip Date -->
<div class="mb-3">
<label class="block mb-1" for="startDate">Start Date:</label>
<input class="w-full px-3 py-2 border border-gray-400 rounded"
type="date" id="startDate" name="startDate" required />
</div>
<div class="mb-3">
<label class="block mb-1" for="endDate">End Date:</label>
<input class="w-full px-3 py-2 border border-gray-400 rounded"
type="date" id="endDate" name="endDate" required />
</div>
<!-- Trip Type -->
<div class="mb-3">
<label class="block mb-1">Trip Type:</label>
<div class="flex items-center">
<input class="mr-2" type="radio" id="business" name="tripType" value="business" required />
<label class="mr-4" for="business">Business</label>
<input class="mr-2" type="radio" id="solo" name="tripType" value="solo" required />
<label class="mr-4" for="solo">Solo</label>
<input class="mr-2" type="radio" id="family" name="tripType" value="family" required />
<label class="mr-4" for="family">Family</label>
</div>
</div>
<!--Additional Information-->
<div class="mb-2">
<label for="tripexpectations" class="block mt-4 text-gray-700 font-bold">Trip Expectations:</label>
<textarea id="tripexpectations" name="tripexpectations" rows="2" class="mt-1 bg-gray-200 block w-full rounded-md border-gray-700 shadow-sm"></textarea>
</div>
<button type="submit" class="mt-1 py-1 px-6 font-semibold rounded-lg text-white bg-indigo-500">
Submit
</button>
</form>
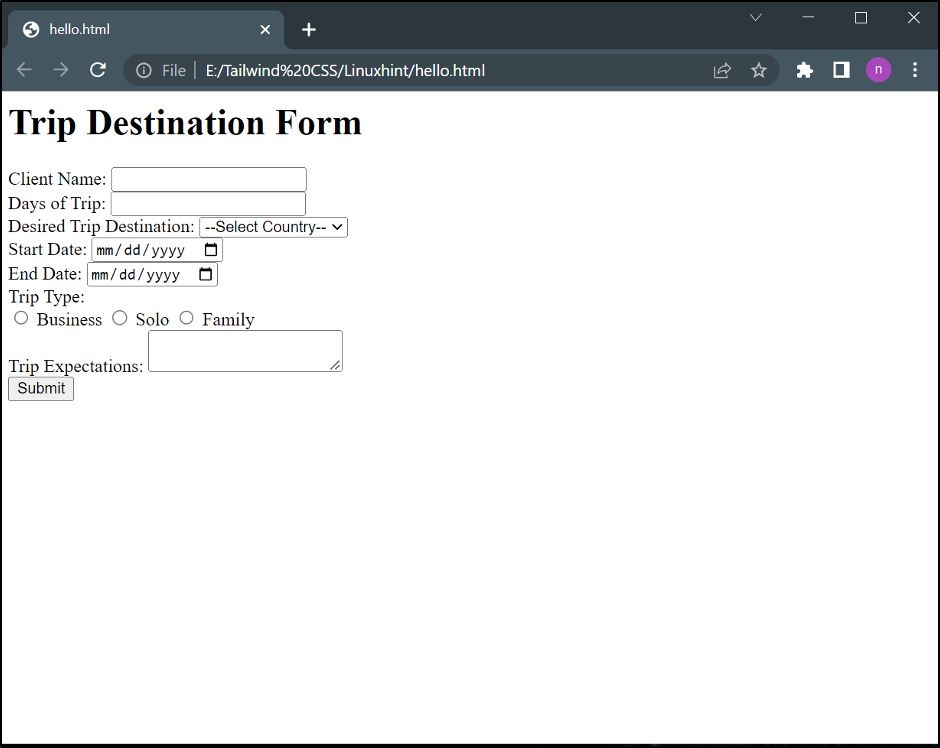
Output
The output of the styled HTML Form with Tailwind CSS is given below:
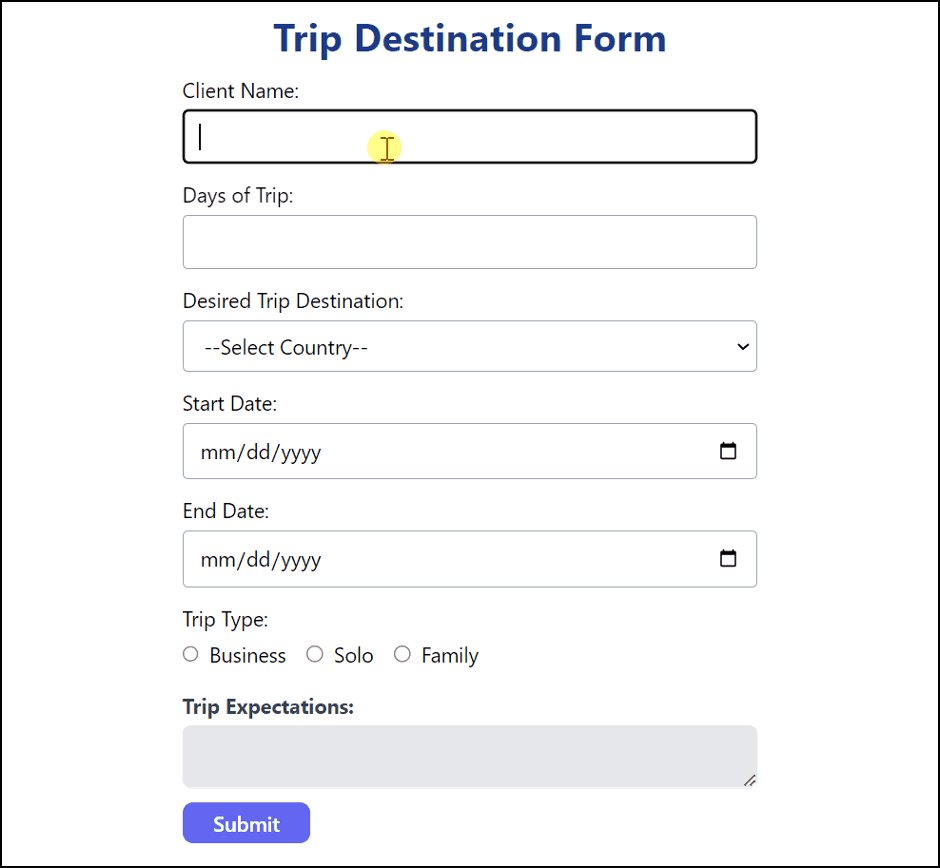
The output depicted the complete working and styling of the HTML Form using Tailwind CSS.
Conclusion
Tailwind CSS is an easy and efficient way to style HTML form and make it visually appealing and user-friendly. It provides a wide range of pre-designed components that can be added to form elements by using classes to create custom designs. This post has provided a detailed example of styling an HTML form using Tailwind CSS.