Tailwind CSS offers a grid system that enables users to divide the web page into columns and rows using the grid-cols and grid-rows utilities. It also provides the grid column start and end utilities to control the sizing and placement of elements across grid columns. These utilities allow users to specify the starting and ending positions of an element within the grid layout.
This article will explain the method to make columns start or end at the specific nth grid line in Tailwind CSS.
How to Make Columns Start or End at the nth Grid Line in Tailwind?
To make columns start or end at the nth grid line in Tailwind, utilize the “col-start-<n>” and “col-end-<n>” utilities with the grid elements in the HTML program. The “col-start-<n>” class sets the starting position of an element within the grid to the specified column index n. The “col-end-<n>” sets the ending position of an element within the grid to the specified column index n. These utilities can be used with the “col-span-<n>” utilities to span a certain number of columns.
Step 1: Specify Starting and Ending Positions of Grid Elements in the HTML Program
Make an HTML program and use the “col-start-<n>” and “col-end-<n>” utilities to set the starting and ending position of desired elements within the grid. For instance, we have used the following grid column start and end utilities:
<h1 class="text-2xl text-center">
Tailwind CSS - Column Start/End
</h1>
<div class="grid grid-cols-4 gap-3 m-3">
<div class="col-start-2 col-span-2 bg-teal-500 p-5">1</div>
<div class="col-start-1 col-end-3 bg-teal-500 p-5">2</div>
<div class="col-start-3 col-end-5 bg-teal-500 p-5">3</div>
<div class="col-start-2 col-span-3 bg-teal-500 p-5">4</div>
<div class="col-start-1 col-end-5 bg-teal-500 p-5">5</div>
</div>
</body>
Here, in the parent <div> element:
- “grid” is utilized to create a grid layout.
- “grid-cols-4” class specifies that the grid should have 4 equally sized columns.
- “gap-3” class sets a spacing of 3 units between each grid item.
- “m-3” class adds a margin of 3 units around the grid container.
In the inner child <div> elements:
- “col-start-2” property specifies that the grid item starts at column 2.
- “col-span-2” indicates that the grid item occupies 2 columns.
- “col-start-1” is used to start the grid item from column 1.
- “col-end-3” specifies that the grid item ends at column 3.
- “col-start-3” indicates that the grid item starts from the second column.
- “col-end-5” property ends the grid item at column 5.
- “col-span-3” specifies that the grid item occupies 3 columns.
- “bg-teal-500” sets the teal color to the background of all grid items.
- “p-5” adds a padding of 5 units to the content inside the grid items.
Step 2: Verify Output
To ensure that the grid column starting and ending positions have been applied, view the HTML web page:
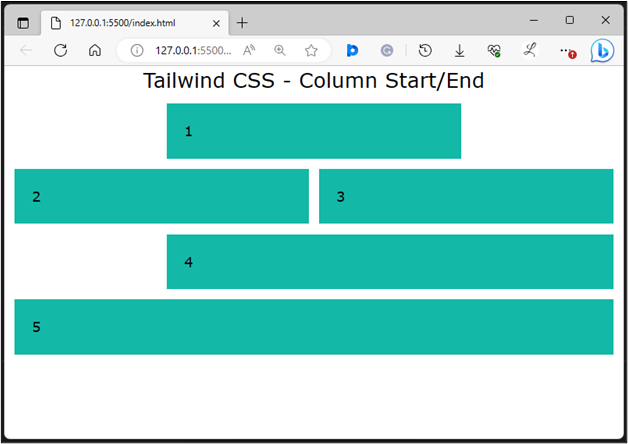
The above output indicates that the grid column starting and ending positions have been applied successfully according to which they were specified.
Conclusion
To make columns start or end at the nth grid line in Tailwind, the “col-start-<n>” and “col-end-<n>” utilities are used with the grid elements in the HTML program. The “col-start-<n>” class sets the starting position of an element whereas the “col-end-<n>” sets the ending position of an element within the grid to the specified column index n. This article has explained the method to make columns start or end at the specific nth grid line in Tailwind CSS.