In earlier times, the tables were utilized to make the website layout. Nowadays, the HTML <fieldset>, <ol>, <li>, or several other elements are mostly used to create a form. These elements help to make an appealing form without using tables. Moreover, CSS has become more advanced and provides many properties for HTML elements. Using these properties, the styling of the form can be made attractive and organized.
This post will provide a stepwise guide on how to make an HTML form without tables using CSS.
How to Create a Form Without Tables Using CSS?
Several CSS properties and HTML elements can be utilized to create a form. Examine the example below, which demonstrates a step-wise guide to creating a form without tables.
Step 1: Add “form” Element
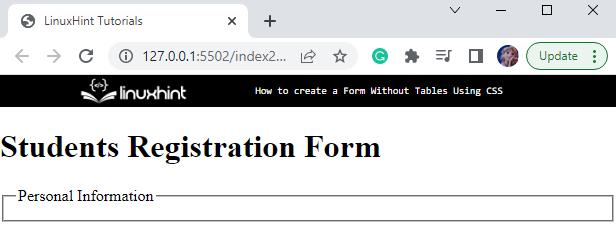
In HTML, add a “<div>” tag and assign it a class “form-main”. Then, add the “<h1>” element in between the “<div>” element to include a heading to the document. Then, add an HTML “<form>” element to create a form:
<h1>Students Registration Form</h1>
<form></form>
</div>
Step 2: Add “fieldset” Element
After that, in between the opening and closing “<form>” tags, place the “<fieldset>” element with an “id” attribute “personal-Info”. Within it, add the “<legend>” element:
<legend>Personal Information</legend>
</fieldset>
Here:
-
- The “<fieldset>” element is utilized to group the form elements. It draws a line around the group elements.
- The “<legend>” element is utilized to apply a caption to the “<fieldset>” element.
Output
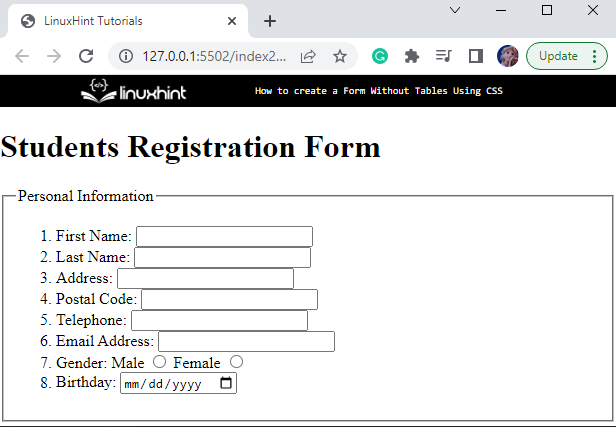
Step 3: Add Form Items
We will add form items inside the “<fieldset>” element using the listed tags:
-
- First, add an HTML “<ol>” tag that will mark the sequence numbers before the list items.
- Inside the ordered list, add the form contents as a list.
- Each of the “<li>” elements contains the “<label>” and “<input>” elements. Note that, the “<label>” element’s “for” and the “<input>” element’s “id” attributes must have the same value:
<li>
<label for="FirstName">First Name:</label>
<input type="text" name="FirstName" id="FirstName">
</li>
<li>
<label for="LastName">Last Name:</label>
<input type="text" name="LastName" id="LastName">
</li>
<li>
<label for="Address"> Address:</label>
<input type="text" name="Address" id="Address">
</li>
<li>
<label for="PostalCode">Postal Code:</label>
<input type="number" name="PostalCode" id="PostalCode">
</li>
<li>
<label for="Telephone">Telephone:</label>
<input type="tel" name="Telephone" id="Telephone">
</li>
<li>
<label for="Email">Email Address:</label>
<input type="email" name="Email" id="Email">
</li>
<li>
<label for="gender">Gender:</label>
<div style="display: inline-block;">
<label for="gender">Male </label>
<input type="radio" name="gender" id="male" value="Male">
<label for="gender">Female</label>
<input type="radio" name="gender" id="female" value="Female">
</div>
</li>
<li>
<label for="b-day">Birthday:</label>
<input type="date" name="birthday" id="birthday">
</li>
</ol>
The output of the above-provided code is shown here:
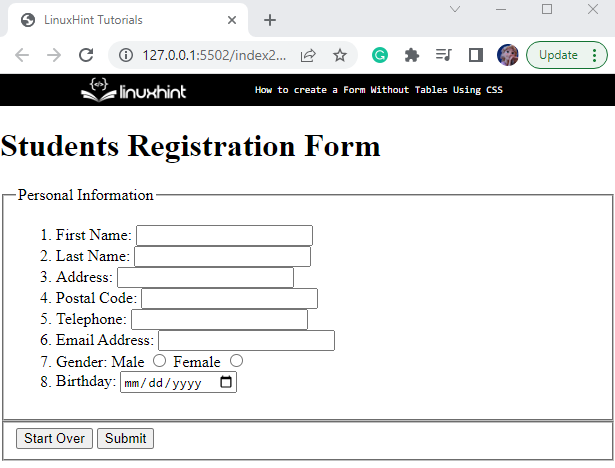
Step 4: Add “button” to Form
Let’s add two buttons to the “<form>” element for the “reset” and “submission” operations. To do so, add the “<fieldset>” element with an id “buttons”. Inside this tag, add two input elements with the type “reset” and “submit”:
<input type="reset" id="Reset" name="Reset" value="Start Over">
<input type="submit" id="Submit" name="Submit" value="Submit">
</fieldset>
The attributes associated with the input elements are explained below:
-
- “type” specifies the input type, such as text, checkbox, radio, reset, or more.
- “name” defines a name for the elements utilized in JavaScript for further manipulation.
- “id” designates the element special id.
- “value” attribute specifies the value for the element. It is utilized differently for different input elements. When the input type is “reset”, “button”, and “submit”, the value is displayed on the button.
The output shows that the buttons have been created successfully:
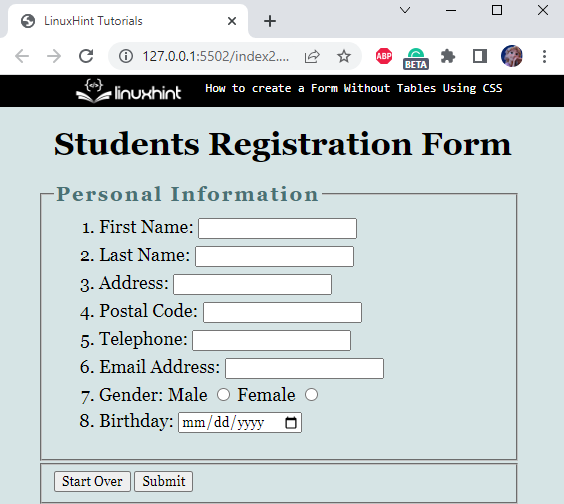
Move toward the CSS section, where the HTML elements are applied with different styling properties.
Step 5: Style “all” Elements
font-family: Georgia, 'Times New Roman', Times, serif;
}
The asterisk “*” symbol is used to point to all HTML elements. The “font-family” property with the list of values is applied. This list is specified to ensure that the other font will be applied automatically if the browser does not support the first font.
Step 6: Style “form-main” div
Next, access the “div” container having class “form-main” and apply the “background-color” property to set the background color:
background-color: #D6E4E5;
}
Step 7: Style “li” Element
margin: 5px;
font-size: 18px;
}
The “<li>” element of the “<div>” container has a “form-main” class is styled with the listed properties:
-
- “margin” applies space around the element.
- “font-size” determines the element’s font size.
Step 8: Style “legend” Element
color: #497174;
font-size: 20px;
font-weight: bold;
letter-spacing: .1em;
}
The “<legend>” of the “<fieldset>” element having the id “personal-Info” is styled with the given properties:
-
- “color” specifies the element’s font color.
- “font-weight” adjusts the font’s thickness.
- “letter-spacing” is utilized to add space between the font letters.
The form elements are not aligned yet, so let’s move forward to apply the CSS properties to make it look more appealing.
Step 9: Style “label” Elements of “li” Elements
width: 170px;
display: inline-block;
}
The “>” symbolizes the child elements. The child “<label>” elements of the HTML “<li>” elements are styled with these properties:
-
- “width” is utilized for adjusting the element’s width.
- “display” suggests the element’s display behavior. The value “inline-block” makes the display inline and permits us to set the element’s width and height.
Step 10: Style “input” Text Element
border-radius: 5px;
font-size: 18px;
outline: none;
}
The “<input>” element of the “<fieldset>” element with the id “personal-Info” is applied with the following CSS properties:
-
- “border-radius” property sets the element’s corners round.
- “outline” is the property that produces an outline around the element when clicked.
Step 11: Style “input” button Element
background-color: #364b4d;
padding: 10px;
width: 150px;
box-shadow: 1px 1px 1px 1px gray;
font-size: 18px;
border-radius: 5px;
color: #fff;
border: none;
}
The “<input>” elements inside the “<fieldset>” element having the id “buttons” are applied with the following properties:
-
- “padding” produces space around the element’s content.
- “box-shadow” sets a shadow around the element. It is a shorthand property that specifies the “x-offset”, “y-offset”, “blur effect”, “spread effect”, and “color” for the shadow.
- “border” property with the value set as “none” will remove the element’s border.
Here is the final result:
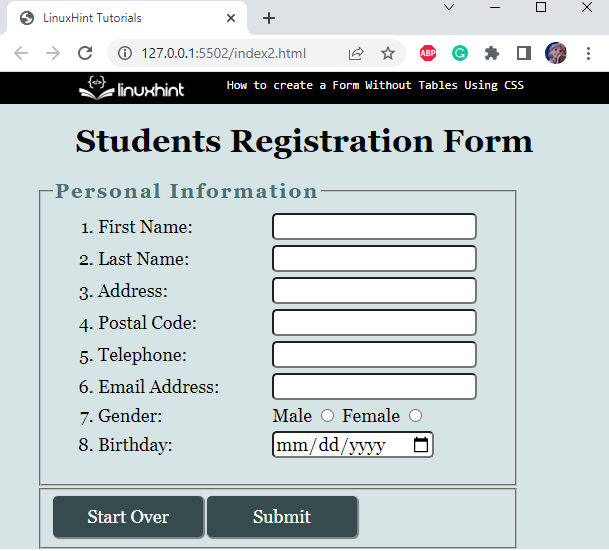
In this way, the form is created without tables using CSS.
Conclusion
In HTML, the “<fieldset>”, “<legend>”, “<ol>
”, “<li>”, “<input>”, and “<label>” elements can be utilized to create a form without using the table. The “<fieldset>” element is utilized to group the form items. The form can be aligned as well as styled using various CSS properties. Particularly, this article has demonstrated how to create a form without tables using CSS.