
GNU Make is an essential tool for building and managing the projects, especially where the project contains different files which are built using different tools. In that case, the GNU Make locates the makefile for that project as the file specifies the required dependencies between various files in the given project and the commands which are required to build the project.
GNU Make is designed for handling large projects. It determines the sections of a program that must be recompiled after a given action and offers the commands to recompile the sections. Today’s post provides a hands-on guide to understanding everything about GNU Make.
Understanding a Makefile
GNU Make reads the makefile of a project to determine what it should do to build and manage the project. A makefile has three key components: target, prerequisite, and recipe.
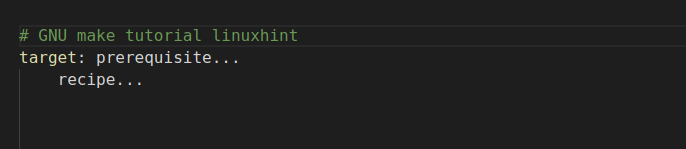
A target represents the file that the “make” command can generate. The target can depend on the prerequisites and can also be an action to be carried out. Ideally, the target highlights the file to be built once we execute the “make” command.
A prerequisite represents the file to be used as the input for creating the target. A target can depend on multiple prerequisites.
A recipe is an action or command that is carried out by “make” to recompile the target whenever the prerequisite changes. The recipe can contain different commands on the same or different lines. A tab space precedes each new recipe line, and the editor raises an error if you miss on adding the tab character.
The recipe acts as a series of shell commands starting with a tab character. Here’s an example of a simple makefile which highlights the target, prerequisites, and recipe:

The provided makefile consists of one rule in the recipe. Note that make uses the first rule in the makefile as the default rule. So, in such a makefile, “make” uses the gcc -o welcome great.c as a rule to build and manage the project. The rule specifies that for you to make the file to generate the welcome file, we must run the command which uses the great.c as the input to create the welcome file.
Again, not all rules have a prerequisite. For instance, if you have a makefile to delete the intermediate files which are created when building a file, such a rule won’t have any prerequisite. Take a look at the following example:
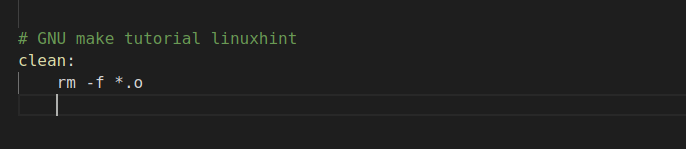
In this case, the rule deletes all the files which contains a *.o extension. Thus, a prerequisite is not required in such a case as no recompilation of the target is required.
Working With a Makefile
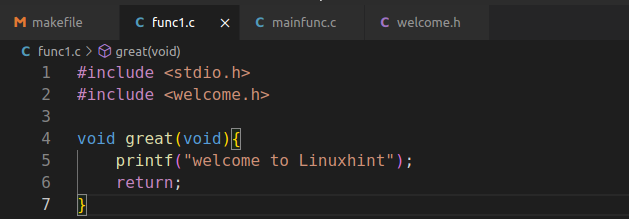
The first example is a simple C project with two C files and a header file. We create a function that prints a welcome message and includes an external header file in our project.
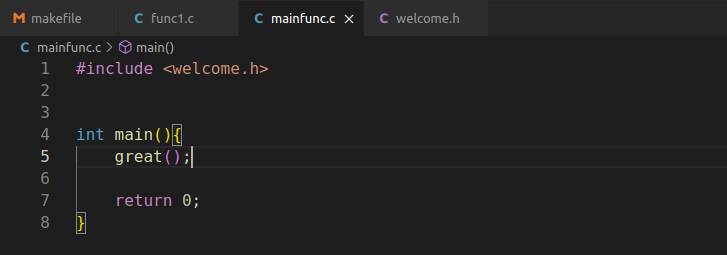
Here’s the main function:
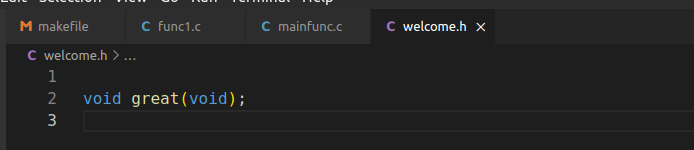
Our header files looks like the following:
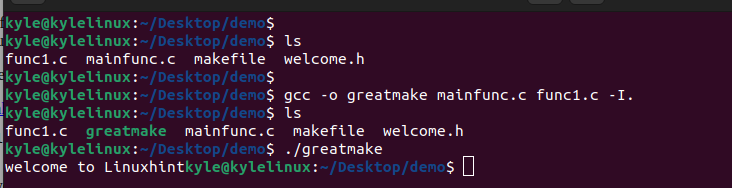
Now, let’s create a makefile that compiles the project files to create an executable file in the current directory. Ideally, we execute the following command to build the project:
In the following image, we can note how the compile successfully builds the project. If we run the created executable file, we get the desired output.
How can we represent the same and use a makefile instead? Here’s the thing: although directly compiling the project on the command line works fine, the problem comes in when you switch the computers or lose the compilation code. In such a case, you must recompile the project. Again, whenever you make changes to one file, you must manually recompile the project to accommodate the changes.
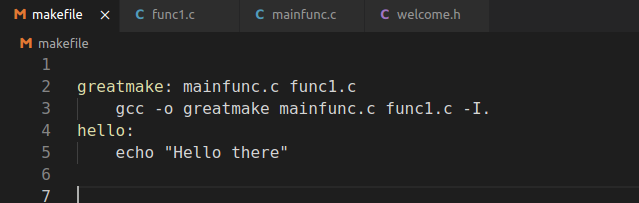
All this hassle can be excluded by creating a simple makefile as shown in the following:

The makefile contains two targets: one with prerequisites and a command and the other with only the command.
Earlier, we noted that “make” uses the first command as the default command to build the project. Hence, we can type make in the project directory to execute the command for creating the project. The make command generates the target which is greatmake as the executable file. Take a look at the following:
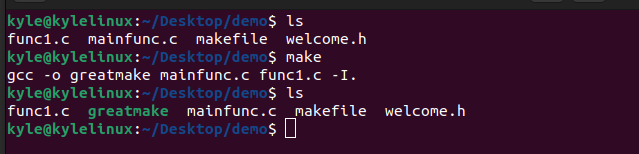
Now, we can comfortably run the executable file to see the output of the created project.

Suppose we use “make” to execute another command instead of the default one. Specify the target that you want to execute with the make command.
Let’s use the same makefile and use the hello target:

Notice how we manage to get “make” to run the command as no prerequisites are specified with the target.
If we make some changes to one of the files in the project, running the “make” command accommodates the changes without needing to recompile the project manually.

Still, if you run the “make” command with no new changes, “make” notifies you that the executable file is up to date.

Suppose you are unsure of the changes you made or what the make command does when executed. You can do a dry run by adding the -n flag.
The first example in the following illustration, the make -n, shows the command that gets executed with the default command. In the next case, the make -n shows the changes which are added to the hello target.

If you are comfortable with the changes, you can execute the make command for the given target to accommodate the changes as in the following example:

How to Use the Makefile Variables
So far, we understood how “make” works with a makefile. However, our approach so far is not the best for handling large projects, especially where some values must change with time. A better approach involves using variables such that if you want to change the compiler for the program, you can edit the variable instead of manually changing the makefile code for the compiler.
Moreover, variables help achieve a clean makefile code that anyone can read and understand.
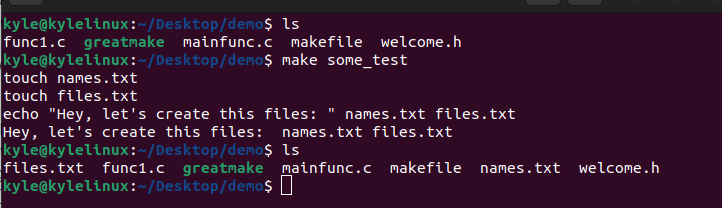
Let’s have an example of using the variables to create files.
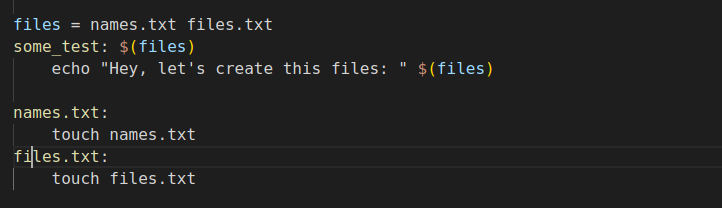
In the makefile, we define a variable named files which contains two values for the files that we create when we build the project:
In this example, let’s refer to our earlier example of compiling the C program. But, in this case, let’s add a few variables that we can change throughout the program.
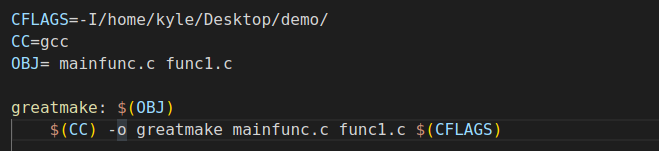
First, we specify the path that the compiler should use to locate the header files as the current directory (.). A better approach is to specify the path as a variable. You can specify the variable that is to be used by the compiler using the CFLAGS special constants which are used to communicate with the compiler.
Use the $(CFLAGS) variable placeholder in place of the path.
Still, we can set the type compiler to use as a variable, such that someone who uses a different compiler could change the variable to specify a compiler to use for their case.
Use the $(CC) variable placeholder in place of the compiler. Here’s the final makefile with the added variables:

When we run the make command, we get the same output as we did earlier, only that our makefile code is now cleaner and we eliminated any redundancies.
When creating the makefile, you can create a macro OBJ to represent the prerequisites which are required to create a target. That way, you can quickly edit the object files from the macro without tampering with the other makefile. For instance, we can have a macro OBJ for our target as shown in the following:
Note that we replace the prerequisites with the object variable.
Handling Dependencies
The “include” files depend on the “.c” files in the project. When working with a large project and you edit the “include” file, “make” won’t recompile the “.c” files. This error means that your project won’t get recompiled properly unless we make the makefile note the existing dependencies between the “.c” and “.h” files.
In that case, we need to use the special constant DEPS to create a macro to handle these dependencies. We can represent the DEPS as a rule, as shown in the following:

The previous rule first creates a DEPS macro whose value is the header file in the project files. Next, it instructs “make” that before it generates the “.o” file, it must first compile the “.c” file using the specified compiler. Next, the -c flag indicates the compiler to generate an object file while the -o $@ instructs “make” to put the compiled output to the left of the colon.
With this rule, we handle all dependencies such that whenever we change any file, “make” accommodates it when recompiling the project.
Adding Other Makefiles
When working with a makefile, it’s possible to include the other makefiles. That way, the current makefile can read from the included makefiles to support the compilation.
To include other makefiles, add the include keyword which instructs “make” to pause the reading of the current makefile and read the other included makefiles.
You can also include other file types with the include keyword, provided that you add the spacing between the file names.
Splitting Long Lines in Makefiles
Although “make” has no limit on how long a statement can be, long sentences quickly become unreadable and are bad formatting style. GNU “make” accommodates the splitting of long sentences by adding the backslash character.
func1.c
In this example, “make” reads the previous line as OBJ= mainfunc.c func1.c and ignore the backslash.

In the provided image, we split the recipe line with a backslash.
Suppose you want to represent one word without adding a whitespace. Replace the backslash with a dollar sign, a backslash, and a new line.
Here’s an example:

When “make” reads the makefile, it first ignores the backslash for a new line. Next, it reads the dollar sign as a space that represents a variable with one character.
Therefore, it eventually treats your split lines as one word with no whitespace. When we use “make” to read the makefile, we get no error since “make” treats the split lines in the variable as one word.

Cleaning a Directory
Once you compile a program using “make”, you may need to clean unnecessary files which are generated as output. Although creating a clean target is possible, that’s not the recommended approach, as shown in the following:
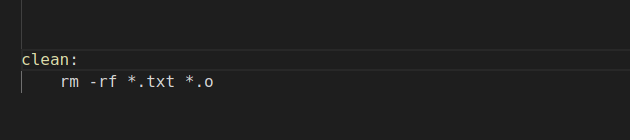
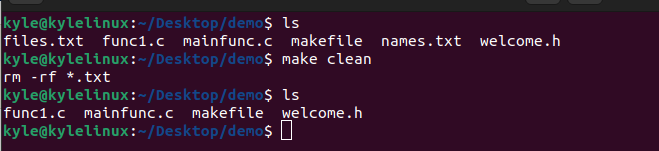
The previous image instructs “make” to delete all the text files and “.o” extension files which are created in the current directory.
To handle the unanticipated situations, it’s best to create a more precise rule and ensure that you don’t add it as the default (first) rule in the makefile.
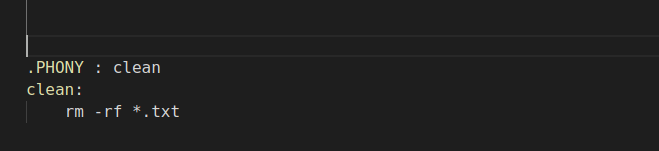
When executing the clean rule, use the “make clean” command.
Conclusion
GNU “make” is a handy tool for building and managing small and large projects. Knowing how to use it is an added advantage, as it helps you read your makefiles and compile your projects neatly. We learned how to use the GNU “make” in-depth and how to work with a makefile, including the understanding on how make reads the makefile. Hopefully, this guide has laid a foundation to enhance your GNU Make skills in handling your projects.