
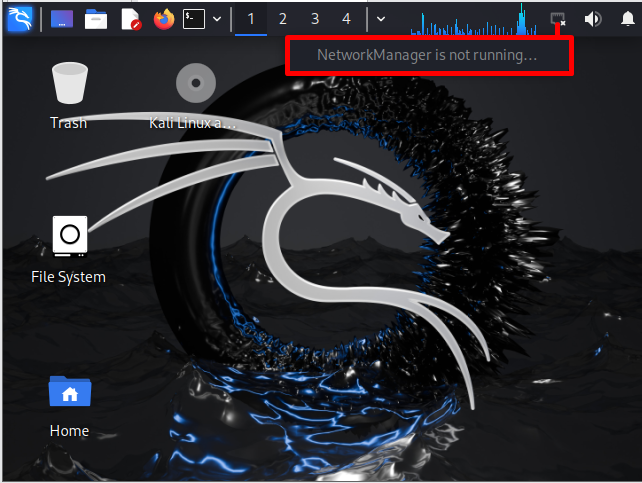
While starting with Kali, the user may encounter a problem in connecting to the network and face the error “NetworkManager not running” as shown below. This is due to different purposes such as by default NetworkManager service is disabled, or the user may try to attempt illegal activity, or maybe the Network Manager package is not found on the system and many more:
Note: According to an official source, misuse of Kali’s tools, such as security tools within a network without authorized credentials can block the Kali system and cause irreparable damage.
The blog will provide the methods to fix the “NetworkManager is not running” problem in Kali Linux.
How to Fix the “NetworkManager is not running” in Kali Linux?
The NetworkManager not working problem can occur due to various reasons such as NetworkManager service being disabled, use may be required to restart the system, or the Network Manager tool being outdated. To fix the stated issue, the following solutions can be utilized:
- Update the Kali Linux Package
- Restart NetworkManager Service
- Enable NetworkManager Service
- Kill NetworkManager Service Using the “airmon-ng” Command and Start the Service Again
- Install or Upgrade the “network-manager” Package and Restart the NetworkManager Service
Follow the above-provided solutions one by one until the “NetworkManager not running” problem is resolved.
Solution 1: Update the Kali Linux Package
Sometimes, the system repository is not updated which may prevent the system from working properly. To fix the stated issue, first, try to update and upgrade Kali’s packages. For this purpose, go through the following illustration.
Step 1: Launch Kali’s Terminal
First, launch Kali’s terminal either by clicking on the below pointed “Terminal” icon or by firing up the “CTRL+ALT+T” key:

Step 2: Update the Kali’s Repository
Update the Kali’s APT repository by utilizing the “apt update” command:
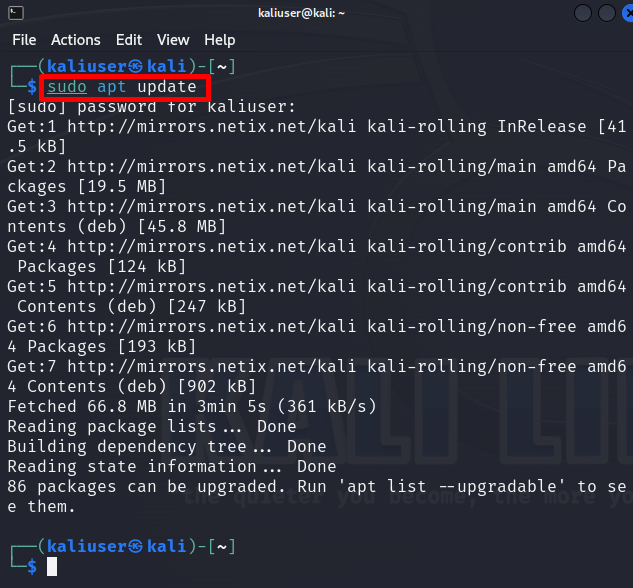
The above result shows that Kali needs to upgrade “86” packages from the repository.
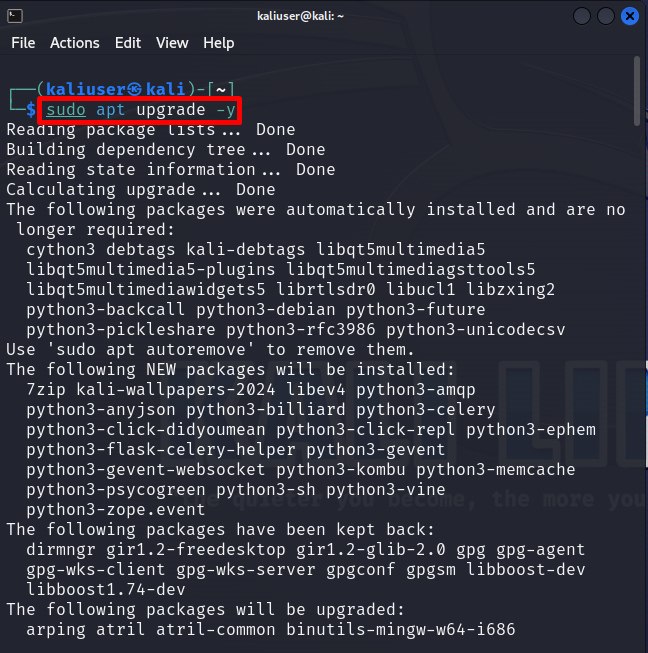
Step 3: Upgrade the Kali’s Packages
To upgrade Kali’s upgradeable packages, utilize the “apt upgrade” command. This command may require the root privileges to save changes. For this purpose, run the command with “sudo” rights:
After updating and upgrading Kali’s repository, reboot the system and check if the NetworkManager service problem is fixed or not.
Solution 2: Restart NetworkManager Service
While starting work with the newly installed Kali system, sometimes the NetworkManager service is disabled by default to prevent the system from any network attack. To enable or restart the NetworkManager service, follow the given demonstration.
Step 1: Check NetworkManager Service Status
First, check if the NetworkManager service is running or not. To check any service on Kali Linux, run the “systemctl status <service-name>” command:
The below output shows that the NetworkManager service is currently inactive:
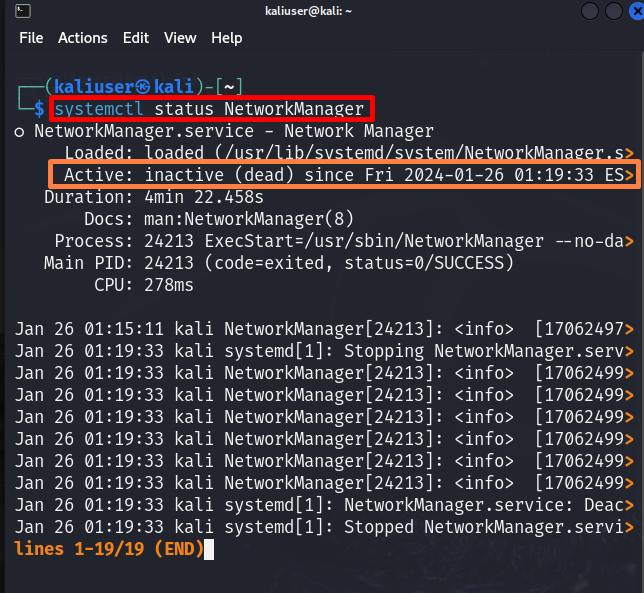
To move back to the command shell, press the “Q” key.
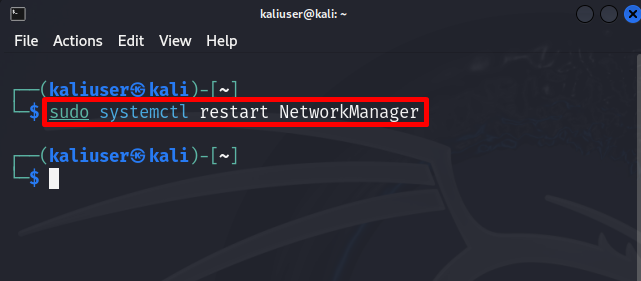
Step 2: Restart the Service
To activate the NetworkManager service, restart or start the service using the “systemctl restart” command. This command may require root permissions. So, run the command with “sudo” rights:
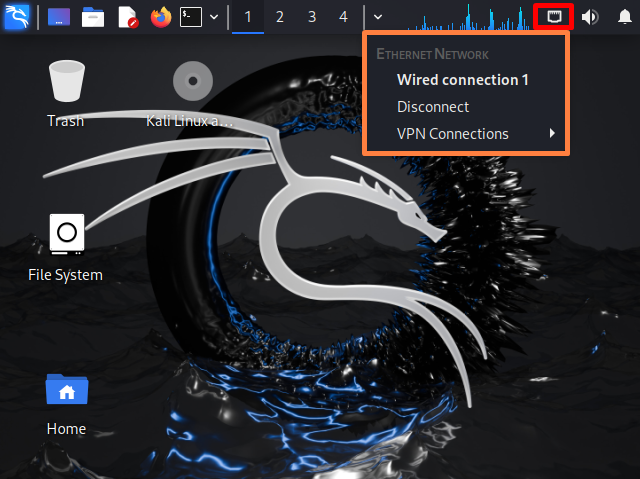
Step 3: Verification
For confirmation, click on the “Network” icon and check if the system is connected to a network or not. Here, you can see we have effectively resolved the “NetworkManager not running” problem:
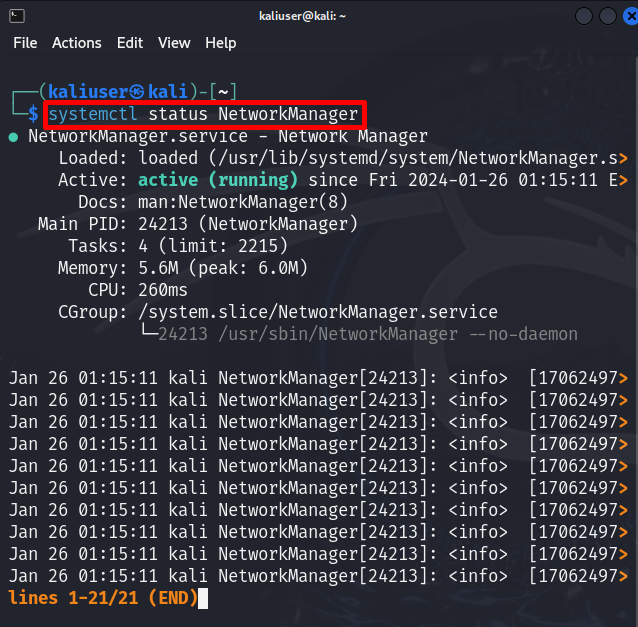
Alternatively, again check the NetworkManager service status by executing the below command:
The service status “active” means now the NetworkManager service is successfully executing:
Solution 3: Enable NetworkManager Service
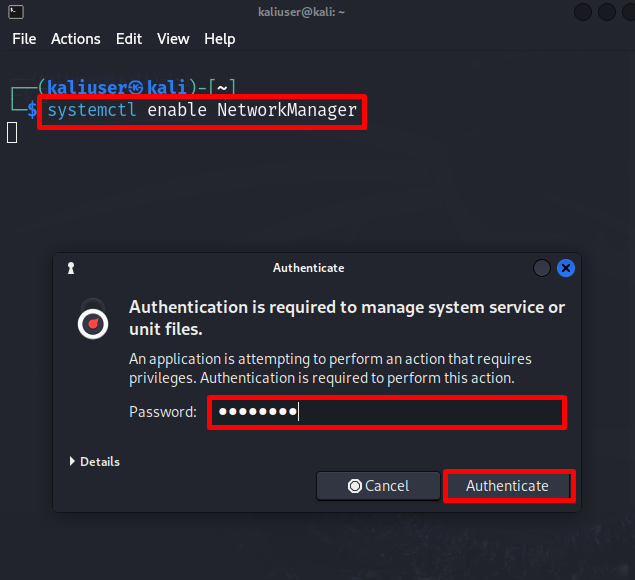
Sometimes, the “systemctl restart NetworkManager” will not restart or enable the service, and the specified problem still exists. If the above solution does not fix the issue, manually enable the service using the “systemctl enable <service-name>” command:
This command requires authentication. For this purpose, provide the password of the system and press the “Authenticate” button:
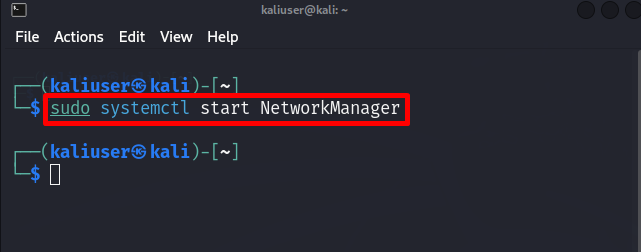
Users can also try to start the service from scratch by executing the below command:
For confirmation, again check the “NetworkManager” service status using the below command:
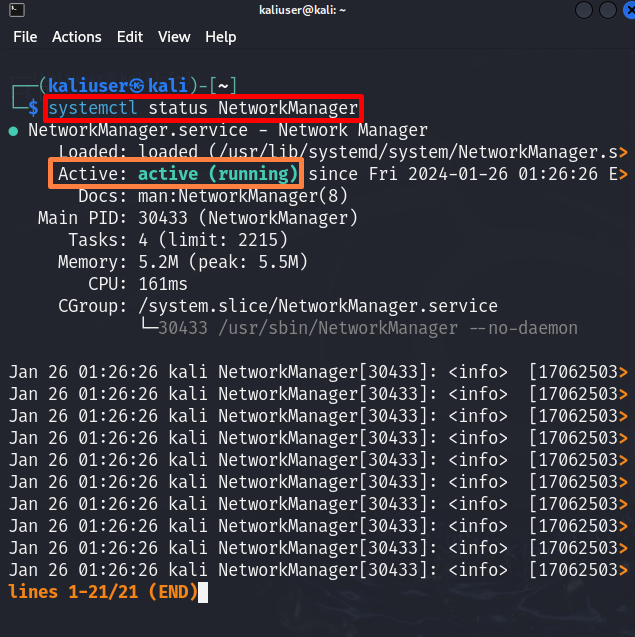
After implementing the system, the user may be required to restart the system and recheck if the problem is fixed or not.
Solution 4: Kill NetworkManager Service Using the “airmon-ng” Command and Start the Service Again
The “airmon-ng” is a command line utility that is used to switch between monitor mode and wireless mode. However, this command is also used to kill the NetworkManager service completely. Another possible solution to fix the “NetworkManager service not running” is to completely kill the NetworkManager service using “airmon-ng” and then re-enable or restart the service. Look at the given steps for illustration.
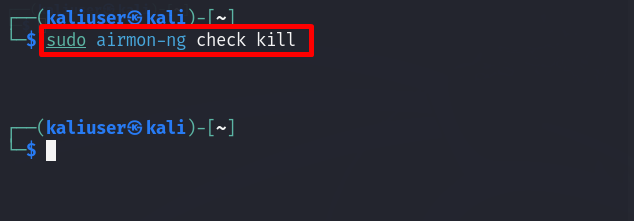
Step 1: Kill NetworkManager Service
To kill the NetworkManager service, utilize the below command with root privileges:
In the given command, the “check kill” is utilized to kill the processes that are interfering or interacting with the airmon-ng’s suite:
This command will completely kill the process that is running the NetworkManager service.
Step 2: Start the NetworkManager Service
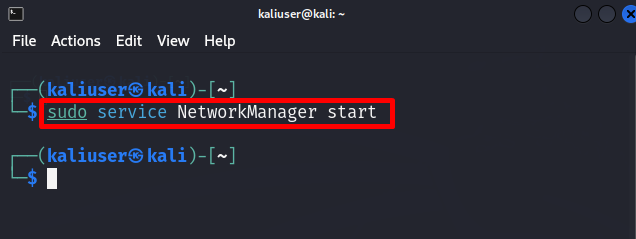
To re-enable or start the service again, utilize the “sudo service <service-name> start” command:
Here, we have started the “NetworkManager” service in Kali Linux:
This will possibly resolve the stated “NetworkManager not running” error in Kali.
Solution 5: Install or Upgrade the “network-manager” Package and Restart the NetworkManager Service
Sometimes, the “network-manager” package is outdated or may be removed from the repository unintentionally. This can lead to stopping the NetworkManager service and cause the NetworkManager is not work. To fix the stated issue, install or upgrade the “network-manager” package in Kali. For proper guidelines, follow the following illustration.
Step 1: Install “network-manager” Package
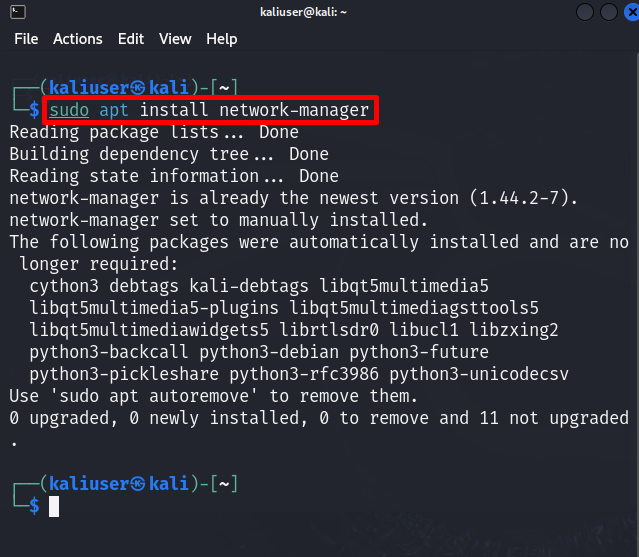
First, install the “network-manager” package by executing the given command:
This will install the “network-manager” package if it is not found in Kali:
Step 2: Upgrade the Package
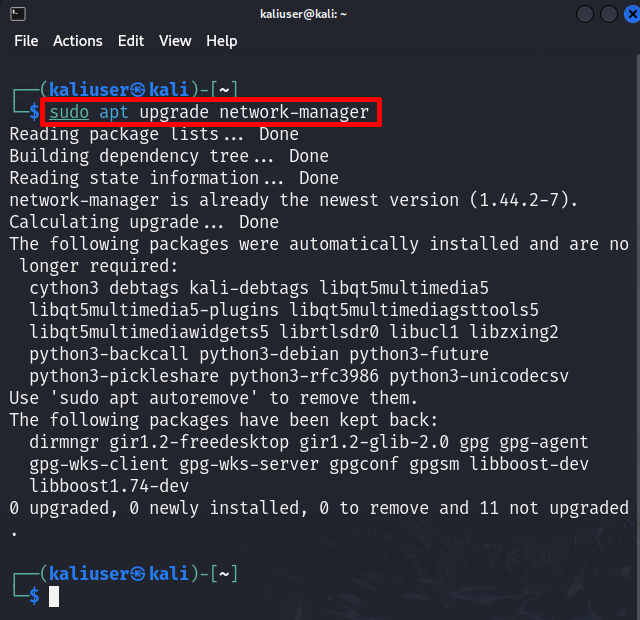
In order to upgrade the “network-manager” package to the latest version, utilize the “apt upgrade” command with root user rights:
Step 3: Restart the Kali’s NetworkManager Service
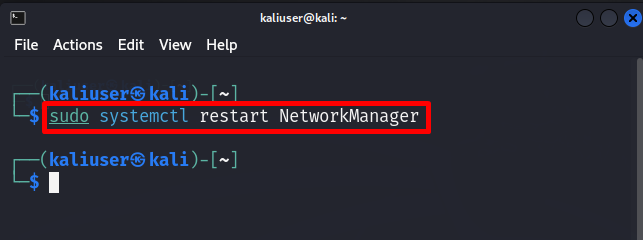
After installing and upgrading the “network-manager” package, the user may need to restart the “NetworkManager” service. To do so, follow the given command:
This will resolve the “NetworkManager is not working” problem in Kali:
We have elaborated the solutions to fix the “Network Manager is Not Running” on Kali Linux.
Conclusion
Sometimes, the user may face problems in connecting to the network due to “NetworkManager is not working” on Kali linux. To fix the problem, the user needs to update the Kali Linux, restart the NetworkManager service, or completely kill the service and re-enable it. The other possible solution is to install or upgrade the “network-manager” package and start Kali’s NetworkManager service. We have covered the solutions to tackle Kali’s Network Manager service is not working.