In this article we will be setting an ESP32 static IP address that can be remembered by other devices.
Introduction to ESP32 IP Address
Working with ESP32 might need a separate static IP address because when we design a web server for ESP32 we access that web server using the IP address of ESP32. This IP address is assigned by the WiFi network in which ESP32 is connected.
This might cause trouble while dealing with ESP32 in a project because every time ESP32 shutdown or reset a new IP address will be assigned to it by WiFi network. As a result, we need a new IP address for the web server. So, a quick solution to this is setting a static IP address for ESP32 which remains unchanged even if ESP32 is powered off or reset.
Normally DHCP (Dynamic Host Configuration Protocol) network management tool assigns IP addresses to all the devices connected inside a WiFi network. DHCP is helpful as it avoids the need of network administrators to manually assign IP addresses to all the devices connected inside the network. In the home network normally the WiFi router is acting as a DHCP server.
Along with IP address DHCP also assigns some other parameters which includes:
- Subnet Mask: It is a 32-bit number that masks IP addresses and divides them into network and host addresses.
- Gateway address: It is a device’s IP address that links local network devices to the internet normally in home it is a WiFi router.
- DNS: It is the domain name server IP address.
All these parameters are important to access the ESP32 web server. When we will be using a static IP address for ESP32 all these parameters must be passed otherwise ESP32 will fail to establish communication.
Once the ESP32 is assigned with a static IP address it will not use the DHCP server and will not fetch the required data. So, for connecting ESP32 in a WiFi network with a static IP address we must know the above-mentioned parameters for that first we will connect it to the WiFi network and check all the networks parameters including subnet mask, gateway address and DNS IP address.
After knowing the parameters, we can assign a static IP address.
Finding the Default Network Parameters
As discussed in the previous section we will connect ESP32 with the WiFi network to obtain all the parameters of that network. So, by defining the network SSID and password and using the WiFi.h library we can connect the ESP32 to a network.
Code
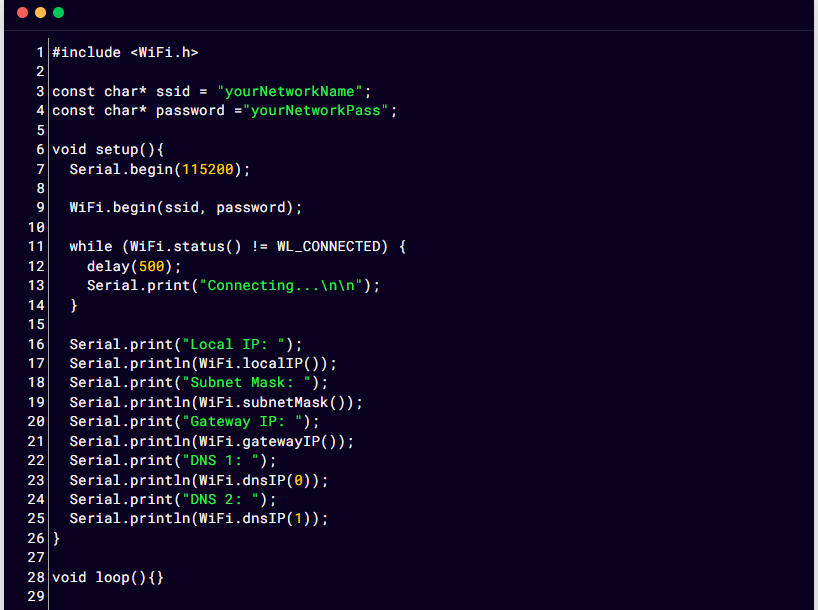
Upload the code given below in the ESP32 board and remember to change the SSID and password with your own network credentials.
const char* ssid = "yourNetworkName";
const char* password ="yourNetworkPass";
void setup(){
Serial.begin(115200);
WiFi.begin(ssid, password);
while (WiFi.status() != WL_CONNECTED) {
delay(500);
Serial.print("Connecting...\n\n");
}
Serial.print("Local IP: ");
Serial.println(WiFi.localIP());
Serial.print("Subnet Mask: ");
Serial.println(WiFi.subnetMask());
Serial.print("Gateway IP: ");
Serial.println(WiFi.gatewayIP());
Serial.print("DNS 1: ");
Serial.println(WiFi.dnsIP(0));
Serial.print("DNS 2: ");
Serial.println(WiFi.dnsIP(1));
}
void loop(){}
Code started by including the WiFi.h library. Next, we defined the SSID and password. Here ESP32 is connected to the WiFi network and all parameters needed will be set by the DHCP server.
In the second part of the code, we printed the IP address assigned by the DHCP server along with additional parameters: the subnet mask, the gateway IP and both DNS server IPs.
Output
In output we can see all network parameters printed on the serial monitor.
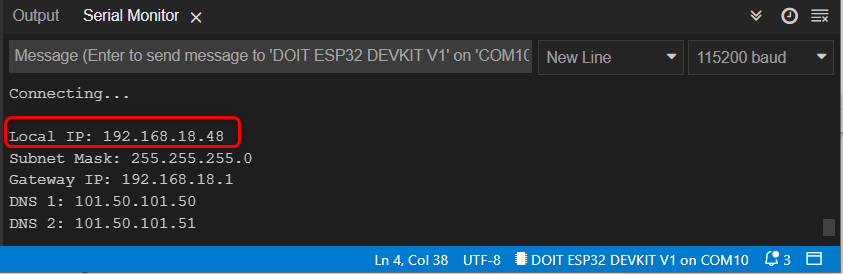
Now we will set a static IP to ESP32. Except for local IP addresses all remaining parameters will be used in the next section.
Setting a Static IP Address for ESP32
As we already know the parameters of the network where ESP32 is connected now we will use a custom IP address to connect ESP32 in the same network while using the other parameters unchanged as we got in previous output.
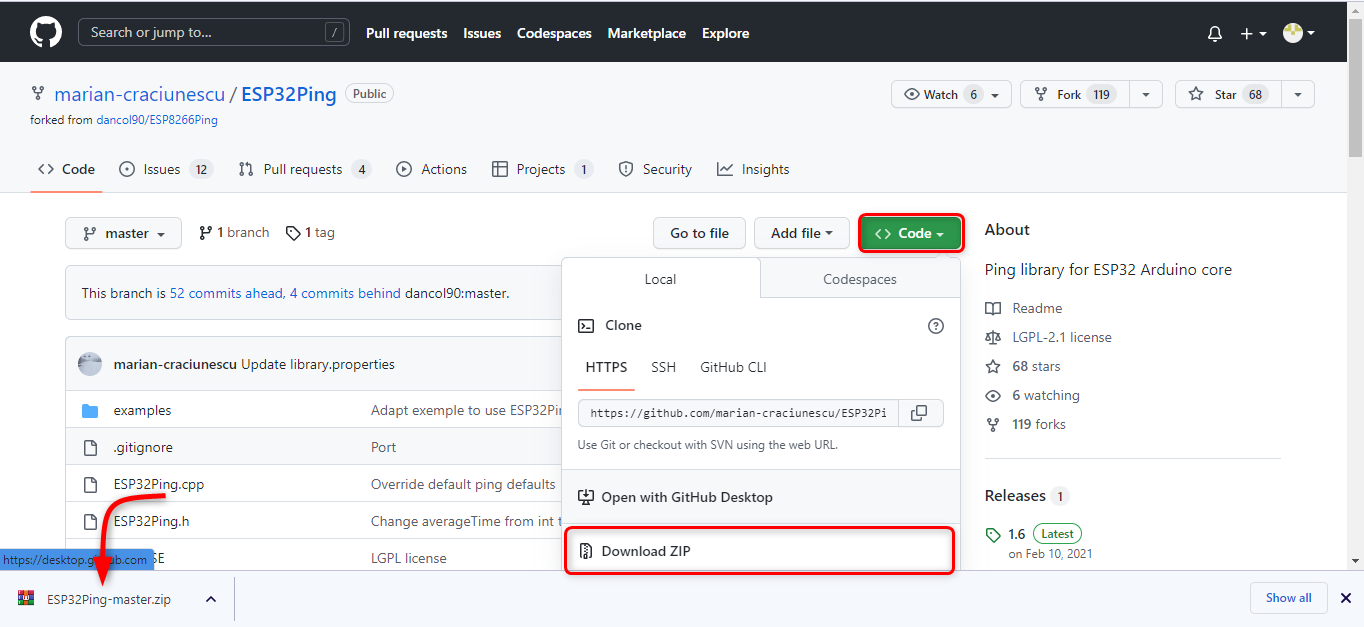
But before that we have to install ESP32Ping.h library in Arduino IDE. Using this library, we can verify weather our static IP address is working or not. Click to download ESP32Ping.h library.
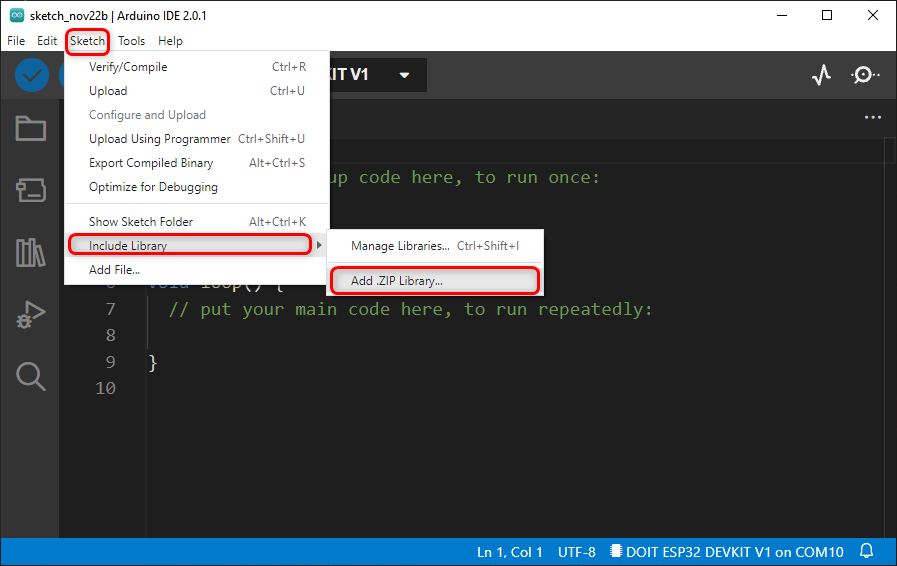
Once zip file is downloaded Go to: Sketch>Include Library>Add .Zip Library
Code
Now upload the code given below in ESP32. This code will set a static IP address for ESP32. Remember to replace the SSID and Password for the network.
#include <ESP32Ping.h>
const char* ssid = "yourNetworkName";
const char* password ="yourNetworkPass";
IPAddress staticIP(192, 168, 18, 53);
IPAddress gateway(192, 168, 18, 1);
IPAddress subnet(255, 255, 255, 0);
IPAddress dns(101, 50, 101, 50);
void setup(){
Serial.begin(115200);
if (WiFi.config(staticIP, gateway, subnet, dns, dns) == false) {
Serial.println("Configuration failed.");
}
WiFi.begin(ssid, password);
while (WiFi.status() != WL_CONNECTED) {
delay(500);
Serial.print("Connecting...\n\n");
}
Serial.print("Local IP: ");
Serial.println(WiFi.localIP());
Serial.print("Subnet Mask: ");
Serial.println(WiFi.subnetMask());
Serial.print("Gateway IP: ");
Serial.println(WiFi.gatewayIP());
Serial.print("DNS 1: ");
Serial.println(WiFi.dnsIP(0));
Serial.print("DNS 2: ");
Serial.println(WiFi.dnsIP(1));
bool success = Ping.ping("www.google.com", 3);
if(!success){
Serial.println("\nPing failed");
return;
}
Serial.println("\nPing successful.");
}
void loop(){}
Code started by including WiFi and Ping library. Next, we defined the SSID and password for the WiFi network.
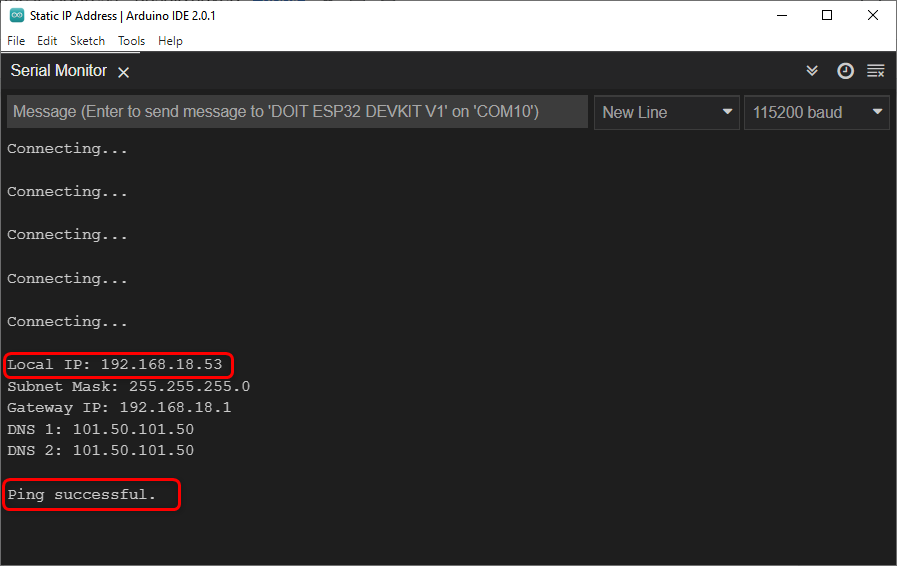
After that we defined all parameters including the static IP address along with DNS, IP gateway and subnet. Note that we have assigned an IP address (192, 168, 18, 53) which is in the same subnet of IP address we obtained earlier in previous code. Make sure this IP address is not used by any other device inside the network.
Once the WiFi is connected, we printed all the network parameters and tested the Ping using Google. If all parameters are defined correctly Ping successful message will appear.
Output

Now when we reconnected the ESP32 board to the PC after being disconnected, its static IP address was once more configured, indicating that it would not change even if the power goes out.
We have successfully given a static IP address to ESP32.
Conclusion
While working with ESP32 in designing of projects, a static IP address is necessary. When multiple devices need to connect with ESP32 static IP addresses make the whole process smooth. Using the network parameters, we can define any static IP address. Here in this article, we covered the steps needed for defining a static IP address.