ESP32 boards have support for multiple communication protocols. These protocols include serial USART, I2C (IIC) and SPI. Along with these ESP32 boards there are also wireless communication protocols available such as WiFi, dual Bluetooth, ESP-Now, LoRa and many more. Today we will be focusing on ESP32 SPI (Serial Peripheral interface) protocol.
SPI (Serial Peripheral Interface) in ESP32
SPI or serial peripheral interface is a short distance communication protocol used in multiple microcontroller devices such as ESP32. It is a synchronous communication protocol primarily used by microcontrollers to communicate with its peripherals, such that we can use this protocol to read and control devices that support SPI protocol.
SPI communication supports master slave configuration there is always a one master that controls multiple slaves. It is a full duplex communication so data can be exchange simultaneously from master to slave and slave to master.
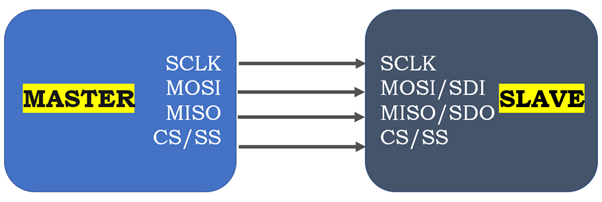
SPI communication in ESP32 needs four different pins to transmit and receive data to devices. Following are those four pins:
- SCK: Clock line determines the transmission speed
- MISO: Master in slave out is transmission pin from slave to master
- MOSI: Master out slave in is transmission line for master data to slave
- SS: Slave select line helps ESP32 to select a particular slave and transmit or receive data from that slave
Note: Some devices which are slave only and cannot act as master their pin naming is different such as:
-
- MISO is replaced with SDO (Serial Data Out)
- MOSI is replaced with SDI (Serial Data In)
SPI Pins in ESP32
ESP32 board comes with 4 different SPI peripherals integrated with its microcontroller.
-
- SPI0: For internal memory communication only- cannot be used with external SPI devices
- SPI1: For internal memory communication only- cannot be used with external SPI devices
- SPI2: (HSPI) have independent bus signals. Each bus can derive 3 slave devices
- SPI3: (VSPI) bus signal is independent. Each bus can derive 3 slave devices
Most ESP32 boards come with preassigned SPI pins for both SPI2 and SPI3. However, if not assigned we can always assign SPI pins in code. Following are the SPI pins found in most of the ESP32 board which are preassigned:
| SPI Interface | MOSI | MISO | SCLK | CS |
| VSPI | GPIO 23 | GPIO 19 | GPIO 18 | GPIO 5 |
| HSPI | GPIO 13 | GPIO 12 | GPIO 14 | GPIO 15 |
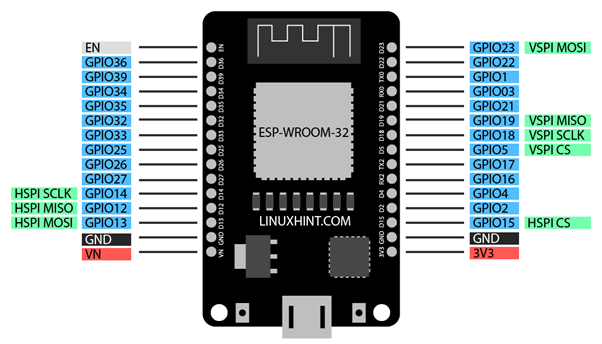
Above mentioned SPI pins can vary depending upon the board type. Now we will write a code to check ESP32 SPI pins using Arduino IDE.
How to Find ESP32 Default SPI Pins
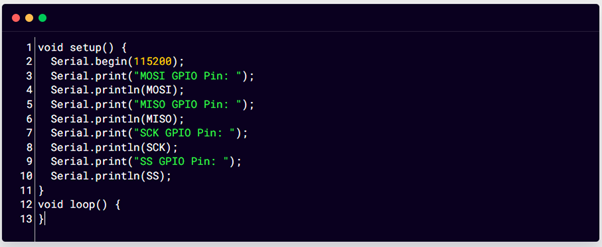
The code written below will help to find the default SPI pins in the ESP32 board. Open Arduino IDE connect ESP32 with PC, select the right port and upload the code. Then wait for the output. That’s it! that’s how simple it is
Code to Find ESP32 Default SPI Pins
Code given below will print the ESP32 default SPI pins on the serial monitor.
Serial.begin(115200);
Serial.print("MOSI GPIO Pin: ");
Serial.println(MOSI);
Serial.print("MISO GPIO Pin: ");
Serial.println(MISO);
Serial.print("SCK GPIO Pin: ");
Serial.println(SCK);
Serial.print("SS GPIO Pin: ");
Serial.println(SS);
}
void loop() {
}
Code starts by defining baud rate and continues by calling the default GPIO pin for ESP32 SPI communication protocol.
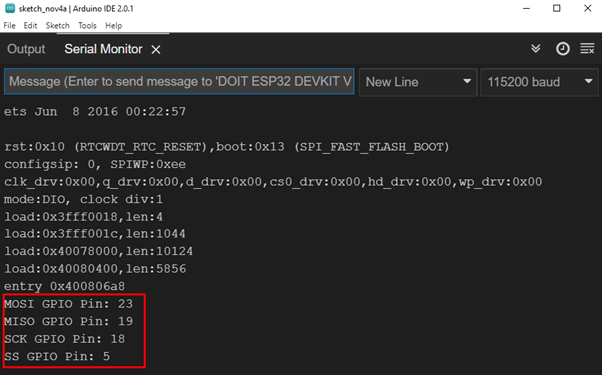
Output
Here in our case the serial monitor displayed the pin 23, 19, 18, and 5 for MOSI, MISO, SCK and SS respectively.
How to Use Custom SPI Pins in ESP32
Thanks to ESP32 multiplexing features it’s possible to configure any pin of ESP32 board as UART, I2C, SPI and PWM. One just needs to assign them in code. Now we will define new SPI pins and print them on the serial monitor to confirm.
Type the code given below in Arduino IDE editor.
void setup() {
Serial.begin(115200);
Serial.print("Default MOSI GPIO Pin: ");
Serial.println(MOSI);
Serial.print("Default MISO GPIO Pin: ");
Serial.println(MISO);
Serial.print("Default SCK GPIO Pin: ");
Serial.println(SCK);
Serial.print("Default SS GPIO Pin: ");
Serial.println(SS);
#define SCK 25
#define MISO 32
#define MOSI 26
#define CS 33
/*Library_Name Sensor_name (CS, MOSI, MISO, SCK); //call new SPI pins*/
Serial.print("MOSI NEW GPIO Pin: ");
Serial.println(MOSI);
Serial.print("MISO NEW GPIO Pin: ");
Serial.println(MISO);
Serial.print("SCK NEW GPIO Pin: ");
Serial.println(SCK);
Serial.print("SS NEW GPIO Pin: ");
Serial.println(SS);
}
void loop() {
}
Here in above code, we include SPI serial library then print the default SPI pins on serial monitor. One can skip this part of code if not needed. Next using define we assign new pins to SPI and print them one by one on serial monitor.

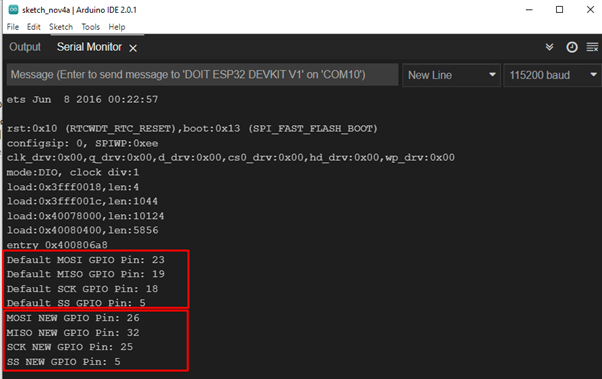
Output
Output displayed on the serial monitor prints all the new SPI pins for the ESP32 board.
ESP32 with Multiple SPI Devices
ESP32 has two SPI buses, and each bus can control 3 devices which means a total of 6 devices can be controlled using SPI of ESP32. To control more devices, we can use different multiplexing techniques.
While controlling multiple slave devices ESP32 will act as a master for them all three lines MISO, MOSI SCLK will be same for them only difference is CS clock signal line. To send data to a slave device CS pin of that slave device should be set to low.

Following syntax will be followed if we want to set CS to LOW.
Suppose we want to read data from any other device, so we must set the CS pin of first slave device as HIGH to disable it.
digitalWrite(CS_2, LOW); // Enable CS pin of SLAVE 2
Conclusion
Serial peripheral interface is wired communication protocol used by ESP32 microcontroller to exchange data between multiple slave devices. ESP32 SPI supports two different buses for communication with each bus ability of controlling 3 slave devices. By default, ESP32 comes with SPI pins; however, we can also define and use custom pins using code.