Working with ESP32 or any other microcontroller time is very important as the inbuilt timer is not that accurate so we can use a NTP server to fetch real time and can store it inside a variable that can be used later inside ESP32 code.
Network Time Protocol (NTP) uses the Coordinated Universal Time (UTC) that synchronizes the system clock with great precision and accuracy. On smaller networks NTP can provide us with clocks as accurate as 1 ms while larger networks such as LAN(Local Area Network) NTP can give accuracy with tens of milliseconds over the internet. Using this accurate clock ESP32 can execute instructions at a specific time.
This guide contains following contents:
- 1: Introduction to NTP (Network Time Protocol)
- 2: NTP Server and Time Settings
- 3: Printing Real Time Using the printLocalTime() Function
1: Introduction to NTP (Network Time Protocol)
NTP is an acronym of Network Time Protocol is a standard used for synchronizing devices time with their time zone. The network time protocol synchronizes the time of all network devices with the UTC also known as Coordinated Universal Time.
UTC is similar to GMT (Greenwich Mean Time) but it doesn’t change and remains the same all over the world. The main idea behind using the UTC is to read time from the NTP server and by applying the UTC offset we can get local time according to our time zone.
2: NTP Server and Time Settings
To read time from NTP server we need to declare the following variables inside code using these variables we can get the time from NTP server.
- NTP Server
- GMT Offset
- Daylight Offset
2.1: NTP Server
We will request time from pool.ntp.org which contains worldwide time data on the server and any one can request their local time using this pool. Following are some other servers that we can access:
| Area | HostName |
|---|---|
| Worldwide | pool.ntp.org |
| Asia | asia.pool.ntp.org |
| Europe | europe.pool.ntp.org |
| North America | north-america.pool.ntp.org |
| Oceania | oceania.pool.ntp.org |
| South America | south-america.pool.ntp.org |
2.2: GMT Offset
The GMT offset describes the time difference in hours between the time zone you are living to the GMT. For example, if we use the time zone of the USA, we can set it to UTC = -11:00.
2.3: Daylight Offset
Here the daylight offset is the daylight-saving time which is usually taken as 1 hour. Daylight saving time means moving the clock 1 hour forward during summer and changing them back again in winter. This command is usually used where a custom time zone is used and daylight saving rule is applied.
As we have covered the basics of NTP server now we will check how we can send a request to NTP server and read the local time using ESP32 with Arduino IDE code.
3: Printing Real Time Using the printLocalTime() Function
The printLocalTime() function will call the getLocalTime() function that sends the request to the NTP server and stores the received date and time inside the timeinfo variable.
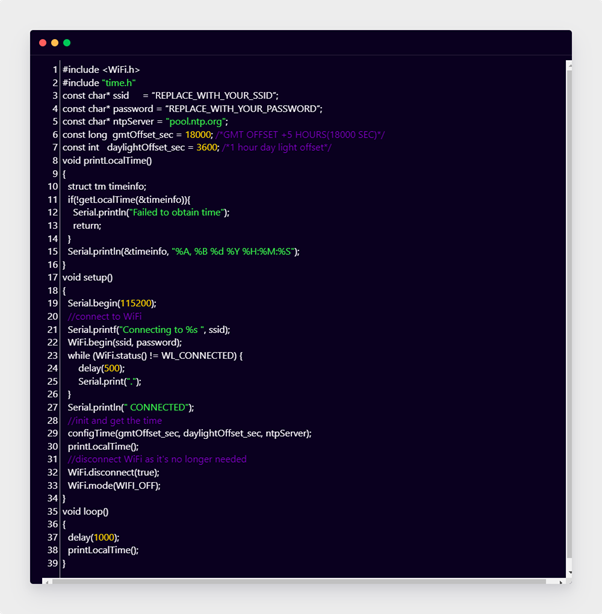
3.1: Code to Print Real Time
Paste given code for NTP client server in Arduino IDE editor. Connect ESP32 with PC, select the COM port and upload code.
#include "time.h"
const char* ssid = "Network SSID";
const char* password = "Network PASSWORD";
const char* ntpServer = "pool.ntp.org";
const long gmtOffset_sec = 18000; /*GMT OFFSET +5 HOURS(18000 SEC)*/
const int daylightOffset_sec = 3600; /*1 hour daylight offset*/
void printLocalTime() {
struct tm timeinfo;
if(!getLocalTime(&timeinfo)){
Serial.println("Failed to obtain time");
return;
}
Serial.println(&timeinfo, "%A, %B %d %Y %H:%M:%S");
}
void setup() {
Serial.begin(115200);
//connect to WiFi
Serial.printf("Connecting to %s ", ssid);
WiFi.begin(ssid, password);
while (WiFi.status() != WL_CONNECTED) {
delay(500);
Serial.print(".");
}
Serial.println(" CONNECTED");
//init and get the time
configTime(gmtOffset_sec, daylightOffset_sec, ntpServer);
printLocalTime();
//disconnect WiFi as it's no longer needed
WiFi.disconnect(true);
WiFi.mode(WIFI_OFF);
}
void loop() {
delay(1000);
printLocalTime(); }
Code started by including the WiFi and time library. WiFi library will help to connect ESP32 with a network while time library will handle the NTP server synchronization.
After that SSID and password of the network to which ESP32 will connect is defined. Replace your network credential here. After that we have defined GMT offset as 18000 sec which is (UTC+5 hour). You can replace your own timezone UTC here. Follow the link to get the GMT offset for your time zone.
In addition NTP server address is specified using the command:
This command automatically selects the time server which will search you. However we can also set a time zone using the NTP servers explained in the NTP Server section.
At the end we configure the ESP32 as NTP client and to obtain date and time. For that we used the configTime() function.
Lastly, using the printLocalTime() function, the current date and time is printed on the serial monitor. This function contains a time structure tm which stores all the information in the timeinfo variable.
Following commands represent the timeinfo structure.
Each letter of time structure relates to a specific information:
| Specifiers | Information |
|---|---|
| %A | Return day of a week |
| %B | Return month |
| %d | Return day of month |
| %Y | Return current year |
| %H | Return current hour |
| %M | Return current minutes |
| %S | Return current seconds |
3.2: Output
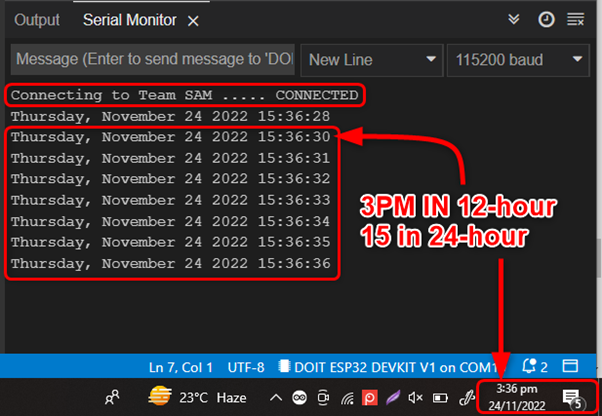
After uploading code ESP32 will connect with a WiFi network and send a request to the NTP server to receive the current date and time. Following output can be seen on the Arduino serial monitor.
Current time on my PC and ESP32 is matched.
We have successfully read time from NTP server using ESP32 as client.
Conclusion
Time is very important for applications like time stamping and executing instructions at specific times to generate output. Inbuilt timers are not so accurate, so we can use a NTP server to read the current time and date. This time can be stored inside a variable to use inside our code. This lesson helps in getting accurate time of any time zone around the world using ESP32.


