There are some conditions, like making changes in NIC, where you need to disable the network interface. This tutorial will briefly explain the methods you can use to enable and disable network interfaces on Pop!_OS.
How To Enable and Disable Network Interfaces on Pop!_OS
You can enable and disable network interfaces on Pop!_OS in many ways. Here, we discuss five approaches to enable/disable network interfaces in the system.
Using the Systemctl Command
First, check the status of network interfaces using the following ‘Systemctl’ command:
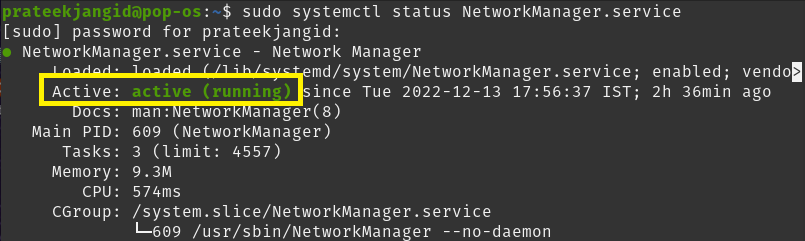
From the previous command’s output, you can see the system’s network interface is active or enabled.
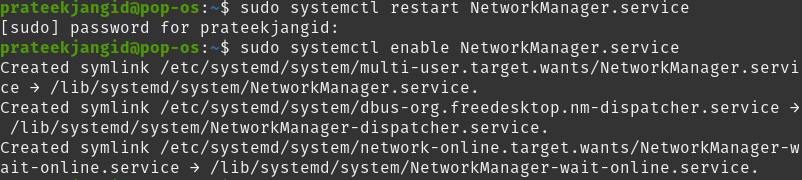
Now, disable a network interface through the Systemctl command. First, you need to stop using the following command so it cannot access the system resources:
After, run the same command to disable the network interfaces with the ‘disable’ keyword.

When you check the status of the network interface again using the Systemctl status command, you will be able to see that it has been disabled.

Similarly, you can enable network interfaces on Pop!_OS with the help of the Systemctl command. The only difference is that you have to use the ‘restart’ keyword and then the ‘enable’ keyword with the Systemctl command.
sudo systemctl enable NetworkManager.service
You will see that the interfaces have been enabled by running the status command.

Using the ifconfig Command
Enabling and disabling network interfaces through the ifconfig command requires the network tools in your system.
First, you must install network tools if it still needs to be installed in your system. Use the following command to install network tools in Pop!_OS:

Next, get the information about the built-in network interface in the system by running the following ‘ip’ command:

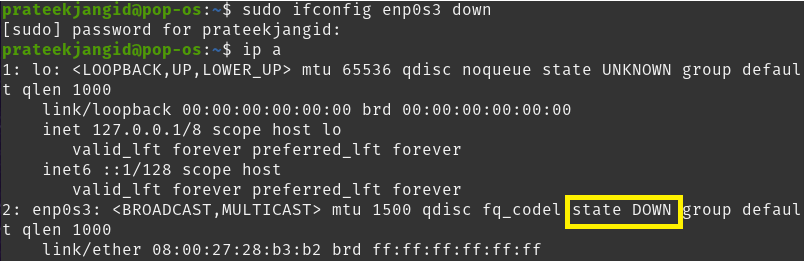
On running the previous command, you can see that the enp0s3 interface is up, i.e., active. Apart from this, you can also check the interface state separately with the grep flag, as shown below:

Here, you can disable it using the ‘ifconfig’ command. Hence, the interface name and state (which you must apply) must be used with an ifconfig command, as shown below:
You do not get any output from the previous command, but it changes the system’s network interfaces. Now, you can recheck the network interfaces with the following command to see if it is disabled or not:
To enable network interfaces, enter the ‘down’ state in the previous ifconfig command.
You can verify that the network interface is enabled by executing the following command:

Using the nmcli Command
The nmcli command-line utility is used as a replacement for nm-applet or other graphical clients. This utility lets you delete, update, create, and display network interfaces and enable and disable the system’s network interfaces.
It displays the profile name instead of the device name. Run the following command to get information about network interfaces:

Check the status of network interfaces with the help of the following command:

You can see that the network interface is connected or enabled. Execute the following command to disable it with the help of the nmcli command:

Thus, you can see that the twerk interface is disconnected or disabled by running the following command:

Similarly, you can enable or reconnect the network connection with the following command:

Using the IP Command
You can also enable and disable network interfaces through the IP command. The general syntax for enabling/disabling network interfaces with the help of IP command is as follows:
Use the following IP command to enable network interfaces:
Note that you will not see anything as output after running this command. You can see that the network is enabled using the IP command with the ‘a’ variable.

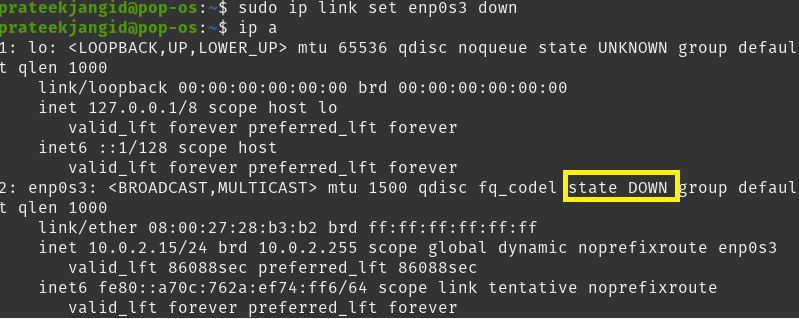
Similarly, you can also disable the network interface and check that it is disabled.
ip a
Using the nmtui Command
You can interact with the network manager services using the text-based user interface, ‘Nmtui’. It lets you configure network interfaces by providing a simple text user interface environment. Just type the ‘nmtui’ in the terminal to display its interface.
On running the previous command, the following window will appear in the terminal; you can change the network interfaces very easily.

Select the following option to deactivate the system when it is network enabled:
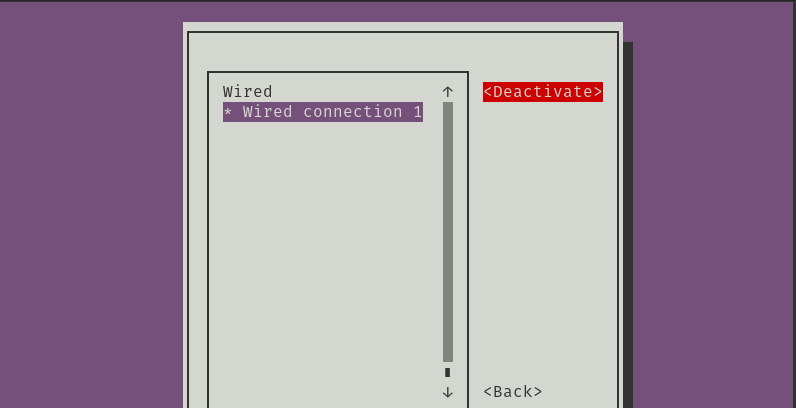
Similarly, you can again enable it by selecting ‘Activate’.
Conclusion
This tutorial explains different ways to enable and disable network interfaces on Pop!_OS. You can change and configure your system’s network interfaces using any of the methods mentioned earlier. We recommend you run the commands correctly, or you may face significant issues and errors.