Dockerfile is one of the most used files to create an image in the Docker platform. Dockerfile is referred to as a simple text file that includes commands or instructions that are essential to building a Docker image. However, these instructions can be executed by the terminal as well but executing each instruction one by one is hectic. Another advantage of Dockerfile is that users can create as many images as they want using a single Dockerfile.
This blog will provide a beginner guide to create and use Dockerfile.
Dockerfile Beginner Guide
Follow the below-listed method to completely understand the basic Dockerfile command, a method to create a Dockerfile, and how to use it to generate a new image:
Basic Commands of Dockerfile
The below-given table comprises the details related to Dockerfile commands and their description:
| Command | Description |
|---|---|
| FROM | The Dockerfile must start with the “FROM” statement. It is used to specify the parent image from which the new image will be generated. |
| RUN | This statement can execute any command in the Docker layers of the image. |
| WORKDIR | It is utilized to set the working directory for Dockerfile instructions, such as RUN, CMD, and ENV. |
| ENV | It is used to set the Docker environment variable to environment value. |
| VOLUME | It is utilized to mount the Docker volume with a specific path of the Docker container. |
| ENTRYPOINT | It is used to configure containers that will be executable and automatically run after the build. |
| CMD | The CMD provides defaults for running containers. It can also be used to give default arguments for ENTRYPOINT. |
| EXPOSE | It defines the exposed port on which the container will execute. |
| COPY | This statement is used to copy the instruction or folder from the source and paste it into the container destination path. |
| ONBUILD | It is utilized to specify instructions in the base image but execute them via the downstream image. |
How to Create and Use a Dockerfile to Generate a Docker Image?
To create and use a simple Dockerfile, first, create a file named Dockerfile. Remember that the file’s name must be “Dockerfile”, and do not use any extension. For a better understanding, check out the provided instructions.
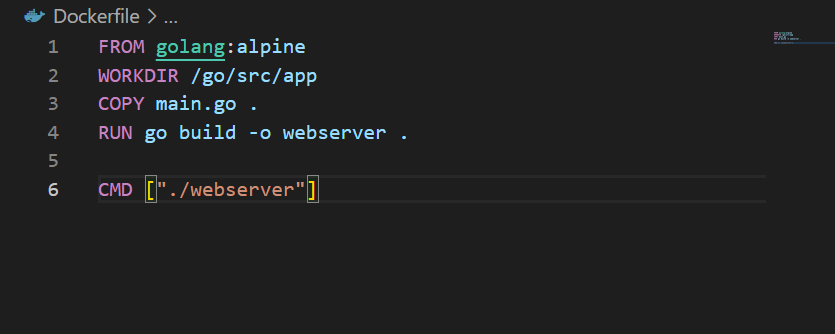
Step 1: Create Dockerfile
The below-provided instructions use the following statements:
- “FROM” is used to specify the base image.
- “WORKDIR” defines the working directory.
- “COPY” is copying the source content into the container destination path.
- “RUN” execute the “webserver” in the top layers of the Docker image.
- “CMD” specify the entry point or defaults to run the “/webserver”:
WORKDIR /go/src/app
COPY main.go .
RUN go build -o webserver .
CMD ["./webserver"]
After creating the Dockerfile, press “CTRL+S” to save it:
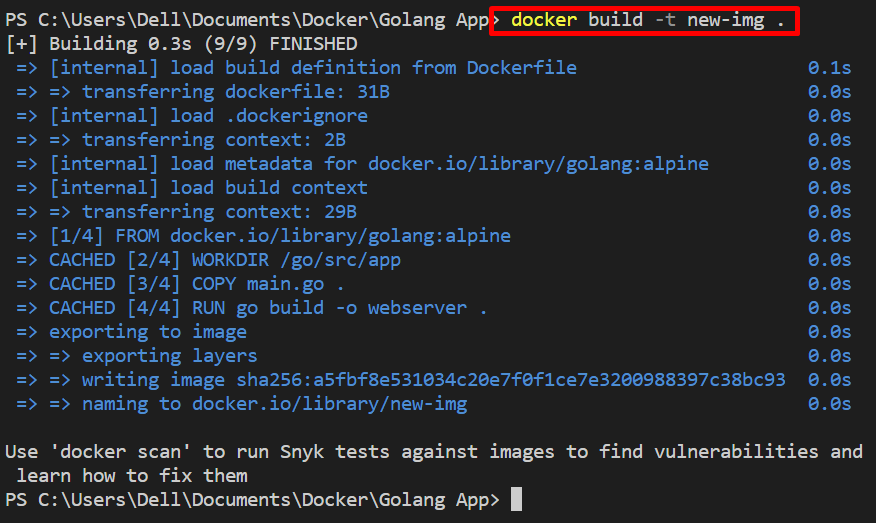
Step 2: Generate Docker Image
Next, generate the Docker image with the help of the “build” Docker command. Here, “-t” is utilized to define the image name:
It can be observed that we have successfully created a Docker image with the help of Dockerfile:
Note: Users can also generate the Docker image by specifying the path of the Dockerfile:
Conclusion
Dockerfile is a normal text file that includes instructions to generate a Dockerfile. The basic Dockerfile statements are “FROM”, “WORKDIR”, “COPY”, “RUN”, and “CMD”. The Dockerfile must be named “Dockerfile” without any file extension. To generate the image from the Dockerfile, the “build” Docker command is used. This blog has provided a beginner guide for Dockerfile.