CSS Class
To apply the initial and external CSS types, we use the two basic approaches. These include the id and class. Id and class are declared inside the style tags <style> either they are declared in the head section or outside the file in another text file with a CSS extension. A class contains a dot(.) symbol. For example, “.sample” is the name of a class. Inside the class, we can write several properties that we want to be applied to the HTML contents. That is the reason that the developers prefer the internal or external styling on inline CSS because we can apply more than one effect at a time on the different HTML contents rather than writing each effect separately inside the HTML tag. Inline CSS is preferable when a single property value is to be applied to the HTML tag.
Class Declaration
The properties can be related to any content like font color, font size, etc. To apply the effect of the class in the tags or to access this class either from the same file or from the external file, we write the name of the class in that specified tag where you want to apply the effects. This makes the HTML body code small and easily readable.
Suppose we want to create a paragraph and apply the effects of this class, we write the name inside the paragraph tag.
What Is the Concept of Multiple Classes in CSS?
While using the CSS class in the HTML code, we come across some questions. This question is one of them. As we declare a single “sample class”, multiple classes are declared in the same way. The purpose behind the use of the multiple classes is that we can apply the effects in more than a single class at a time. This is done by using the names of all the classes you want inside the tag as we did for a single class. Let us declare a sample for the multiple classes:
//effect; }
.class2 {
//effect; }
.
.classN {
//effect }
In this way, we can declare as many classes as we want. But the application lies only by using the specified class name inside the tag. If you want to apply the effect that is present in class 1 and class 3, we use the names of both the classes.
Implementation of CSS Multiple Class
Now, we will include some examples to elaborate on this concept.
Example 1: Multiple Classes Affect the Paragraphs
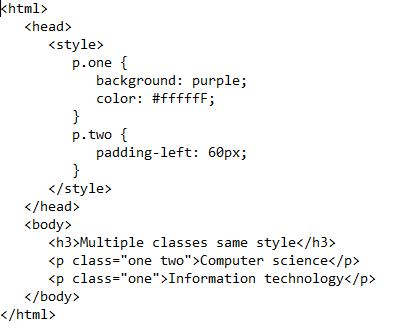
In a simple HTML code, inside the body section, we first declare a heading <h1>. After that, two paragraphs are used. Both of them used a different class names. The first one is with both classes one and two.
And the second paragraph tag contains the name of a single class that is one.
After that, the HTML body tag is closed.
HTML Body and CSS:
The head section contains the style tags. We declare the classes inside these tags. These classes can be declared with or without the HTML content name; it is an optional thing. In this example, we used the content name. Whereas in the second example, we use the class declaration without the HTML content.
background: purple;
color: #ffffff; }
A color code is used that is for the white color. Similarly, the second class will also be explained.
padding-left: 60px; }
After that, close the style tag and the head section. By doing this, you will be able to execute the text as a web page in the editor.
Output:
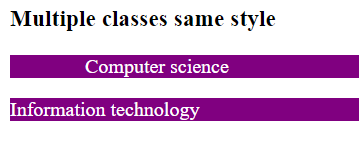
Upon execution, you will see that the first paragraph has the background written away from the left because of the padding effect. Whereas the second paragraph has the background but it is aligned to the left.
This change in effects is because of the difference in the use of the class. As the first paragraph contains both the class name, the background color and the padding effect are applied. The second class only has the first class name, so it is affected only by that background property written in the class one.
Example 2: Multiple Class Effect on Div Container
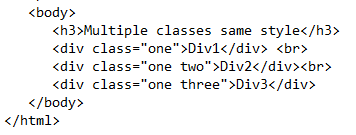
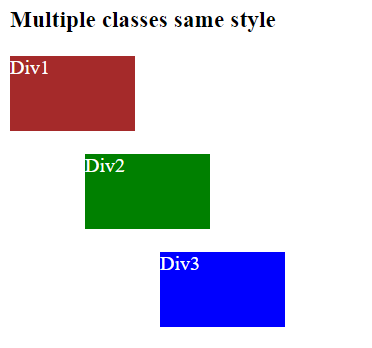
Now, we apply this multiple class effect to the div containers. Consider the body section of the HTML. Inside the body, a heading is used. After that, three divs are declared. Each time, we use the different class names inside the tags. The first div contains the class one only. The second div is accompanied by the class names of one and two. And the third class contains one and three. It means that one class is written in all three divs.
HTML Body Code:
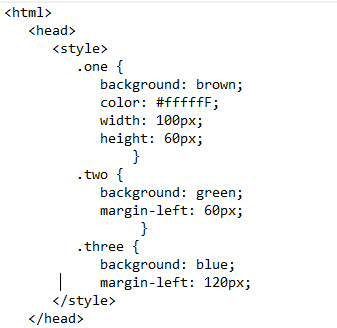
Add the text inside the div and close all the opened tags. Inside the head section, a style tag is used and all the three classes are declared. The class “one” contains the background color, the font color width, and the height of the div. As we have seen that all the three divs used this class, it means that these effects are applied to all of them by having the same height and width.
The rest of the two classes, two and three, have two properties.
CSS Code:
Save the whole code and execute the file in the browser.
Output:
Upon execution, you will see that all the three divs are of the same height and width. The first div is not shifted from the left; this is because the “one” class has no margin property. The second and third divs are displaced because they both used the one class as an additional with them. Furthermore, one thing is questionable: as the second and third divs implemented the one class and the second third, why is the color of the “one” div not applied to both?
This is because CSS has an overlapping effect capacity. If two same properties are applied in different classes, the effect that is applied later is implemented.
Conclusion
In this guide, we tried to explain the concept of the multiple classes in CSS. First, we explained the creation and use of class in CSS internal and external styling. Then, the use or function of the multiple classes is explained. We elaborated on the syntax of the multiple classes. The implementation portion contains two examples: one is about the use of the multiple classes in the paragraphs and the second example is about the div container and the multiple classes’ declaration. In multiple classes, the property that is applied in the latest class is implemented.

