A symbolic link, on the other hand, is a file system item that refers to a folder or file. In this guide, we will create a symlink and copy it within the docker container using the docker file. Make sure to remove all the old versions of docker installed at your end to avoid any inconvenience.

You need to enter “y” when you have been asked the shown-below question.
![]()
After a while, the removal will be completed. It will be time to update your Ubuntu system with the “apt-get” package within the update instruction. Your system will be updated in a while.
It’s time to install the docker utility on your system. For this, we will be making use of the “apt-get” utility in the installation query. Use the keyword “docker”, and “docker.io” to install it.
After a while, it will ask you to tap “y” to continue installing it. You can tap “n” if you don’t want to install it yet.
After the docker is successfully installed, you have to take a look at the images available for our use in Ubuntu 20.04 system. The “docker images” command has been provided to us by Ubuntu 20.04 to execute it with sudo rights and have a glance at all images. We have a total of 3 images available to get pulled.
You can take a look at the available and currently running containers of docker using the docker “ps” instruction. Use the “-a” instruction to see more details. On running this command with and without “-a”, we have got an empty output because we don’t have any containers yet.
If you want to pull the docker images in your system, try out the docker pull instruction along with the name of an image. The “docker run” instruction has been used to execute the images followed by each image name. Make sure to use the “sudo” rights in the following:
$ sudo docker run busybox
$ sudo docker run hello-world
Let’s run the docker ps instruction to see the newly created containers of docker. Now, we have 3 containers available and we can use any of them.
To copy a symlink using the docker, we will be creating its new container. Let’s start by creating a new simple text file named “one.txt” in the home folder of Ubuntu. Add some text data in it and display it on the shell as output via the “cat” instruction.
$ cat one.txt
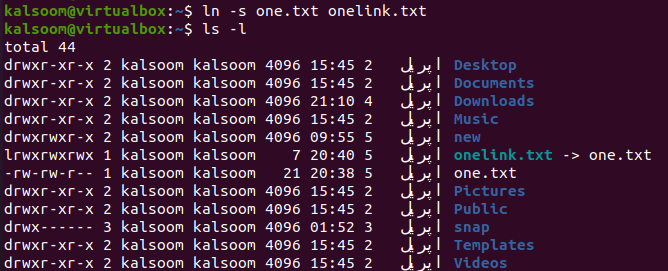
We will be creating a symlink for this new text file in our home directory. So, we used the “ln –s” instruction to create a symlink named “onelink.txt”. After creating a symlink, we listed all the contents of the home directory in detail using the “ls –l” instruction. The original file one.txt and its symlink “onelink.txt” pointing towards the original file are displayed.
$ ls -l
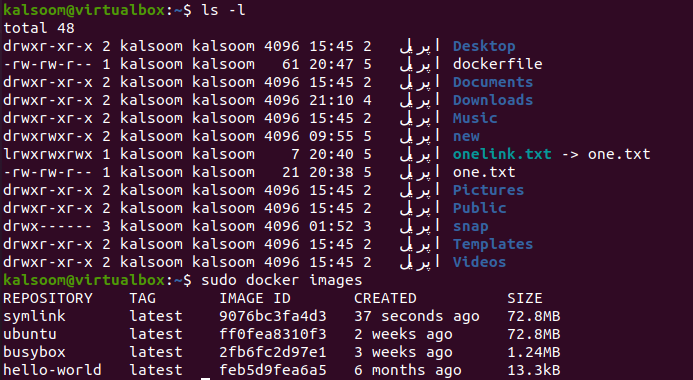
Now, you need to create a dockerfile to copy this symlink to another file or the same file. We used the “touch” instruction to create one and added a shown below script in the file as per the “cat” instruction. This script is showing that the onelink.txt symlink will be copied to one.txt file upon running this docker file.
$ cat dockerfile
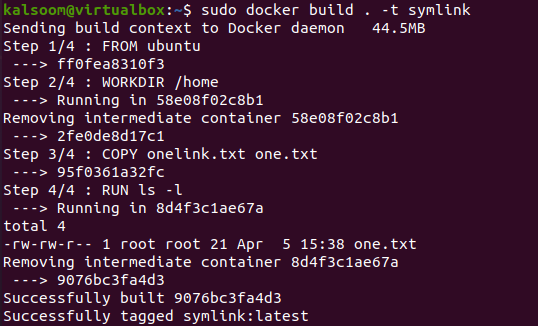
Now, it’s time to build the symlink into a new image of docker and copy the onelink.txt to one.txt. For this, you need to utilize the docker build instruction with the “-t” option and the name of a new container for a symlink.
We have named this container “symlink”. The “dot” in this instruction will automatically pick the “dockerfile” and build it. The output shows that symlink has been built and ready in docker.
Take a look at the list of images again using the docker images instruction. You will find the “symlink” container image here as we have just created it.
Now, how will you identify that the symlink has been copied to one.txt using the symlink image? For this, you need to use the docker run instruction to run the newly made “symlink” image container. We have been using the “—name” tag to give it a new name “Test” followed by the “-it” option.
The symlink container gets started i.e. console created. We tried the list “ls –l” instruction to see its contents. And we got the one.txt file displayed. As the symlink “onelink.txt” is pointing towards the one.txt file, thus the original file got copied here.
When you run the docker ps instruction with the “-a” option to see the newly generated containers, they are displayed with the symlink image having a container named “Test”.
Conclusion
We started with the definition of the symlink and explained its use in Ubuntu 20.04 and discussed the method to install docker, pull its images, and create containers. After that, we demonstrated the method to create a symlink for files and discussed the method to build the dockerfile and copy the symlink to another file. Lastly, we used the build container to display the result of copied symlink into the symlink container.


