This post demonstrates the procedure to configure the template paths in Tailwind CSS.
How to Configure Template Paths in Tailwind CSS?
The “tailwind.config.js” configuration file is used to configure the Template paths in which the user wants to embed the Tailwind CSS. It is not present by default however it can be created in the project using the “npm” package manager.
This section carries out some essential steps to configure the template paths in the “tailwind.config.js” file.
Note: To implement “Tailwind CSS”, first install the “Node.js” application in your system via the provided link “https://nodejs.org/en” to execute the commands.
Step 1: Install “TailwindCSS”
First, create a new project named “Project1” and open it in the code editor. Now, open up the new terminal and install the “Tailwind CSS” with the help of the following command:
In the above command, “npm” is the node package manager that installs “TailwindCSS”, as follows:
Here the output shows that the “Tailwind CSS” and its packages are successfully downloaded.
Step 2: Create the Tailwind Configuration File
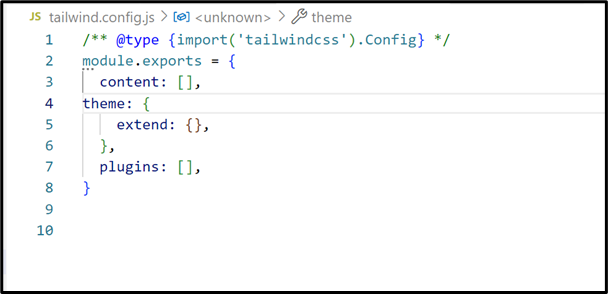
Next, create the Tailwind CSS configuration file “tailwind.config.js” to extend its functionality such as specifying the HTML template paths, user-defined classes, and many others using this command:
The output shows that the specified configuration file has been created. Now, have a look at the “tailwind.config.js” file:
Step 3: Add the Tailwind Directives to Main CSS File
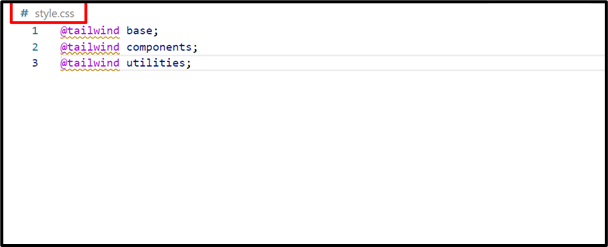
Now, for adding special functionality to the created Tailwind project, add the following three pre-existing tailwind directives in the main “style.css” file:
@tailwind components;
@tailwind utilities;
In the above code block:
- base: It is the first layer of “Tailwind CSS” that modifies the web page styling by default like background color, text color, or font family.
- components: This second layer is available inside the “container” class that adds the width according to the browser size. In its section, the user can add their own created external components.
- utilities: It is the third layer that adds up almost all the styling classes such as shadows, colors, adding, flex, and many other classes.
These directives can be seen in the following window:
Step 4: Build the CSS
Now, build the CSS using the Tailwind CLI tool by executing the following command. It will scan all the template files and build up the CSS in the “dist/output.css” file:
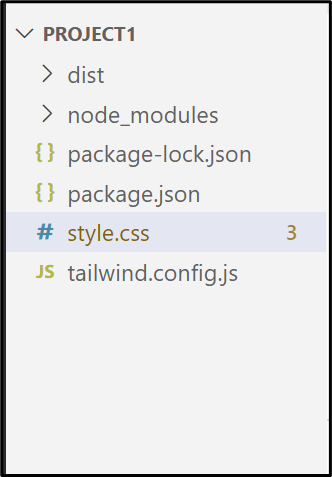
It can be observed that the above command is executed successfully. Now, the file structure of the “project1” looks like this:
Step 5: Create an HTML Template and Configure its Path
Create the HTML template in which the user wants to embed the “Tailwind CSS” and then configure its path in the “tailwind.config.js”. Let’s first have a look at the following HTML template “index.html”:
<link href="/dist/output.css" rel="stylesheet">
</head>
<body>
<h2 class="text-center font-bold text-white bg-orange-500">Welcome to Linuxhint!</h2><br>
<h3 class="text-center font-bold text-blue-600 bg-pink-400">First Tutorial: Tailwind CSS Framework.</h3><br>
<p class="text-center text-green-500">Tailwind CSS is a well-known CSS framework that helps in setting the pre-defined CSS classes to style your HTML elements.</p>
</body>
In the above code lines:
- The “head” section uses the “<link>” tag to link the created/compiled CSS file “/dist/output.css” with the existing HTML file “index.html”.
- The “body” section first specifies the “<h2>” tag that defines the first subheading using the Tailwind class “Text Align” to adjust its alignment at “center”, “Font Weight” to “bold” the text, “Text Color” to add the specified color, and the “Background Color” to apply the given background color, respectively.
- Next, the “<h3>” and the “<p>” tags also use the above-discussed Tailwind classes to style their content.
Configure HTML Template Path
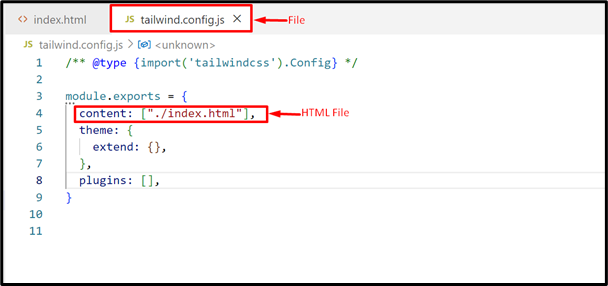
Next, open the “tailwind.config.js” and add the links or path in the “content” section of the HTML template file i.e., “index.html”:
Press “Ctrl+S” to save the new changes.
Step 6: Execute the HTML Code
Lastly, execute the HTML “index.html” code in the live server and see its output:
Output
As seen, the output shows the styled HTML content with the help of Tailwind CSS.
Conclusion
Tailwind CSS uses the “tailwind.config.js” configuration file to configure the created HTML template paths. It specifies the “content” section which includes the exact path of all HTML templates, source files containing Tailwind class names, and the JavaScript components. It scans the specified HTML file and then implements Tailwind CSS in its content. This post illustrated the complete procedure to configure template paths in Tailwind CSS.


