Apache Tomcat provides a default HTTP connector on port 8080, allowing you to use it as a web server such as Apache for your Java applications.
This article will show you how to fully set up the Apache Tomcat server on your Linux machine.
NOTE: I tested the instructions and installation methods on an Ubuntu 20.04 and Debian 10.7 server.
Requirements
For you to following with the installation process provided in this guide, you will require:
- A fully updated Linux server
- Sudo or root permissions
Installing Apache Tomcat
Let us start by installing Tomcat on our server.
Installing Java JDK
Before installing Apache Tomcat, we need to ensure a working Java version is installed on our server.
In our example, we will use the Amazon Corretto JDK.
Start by updating your system and install java-common, wget, and curl as:
sudo apt-get install java-common curl wget -y
Next, launch your browser and navigate to the Amazon Corretto download page as provided in the resource below:
https://docs.aws.amazon.com/corretto/latest/corretto-11-ug/downloads-list.html
Locate the package for your Linux system and copy the download link.
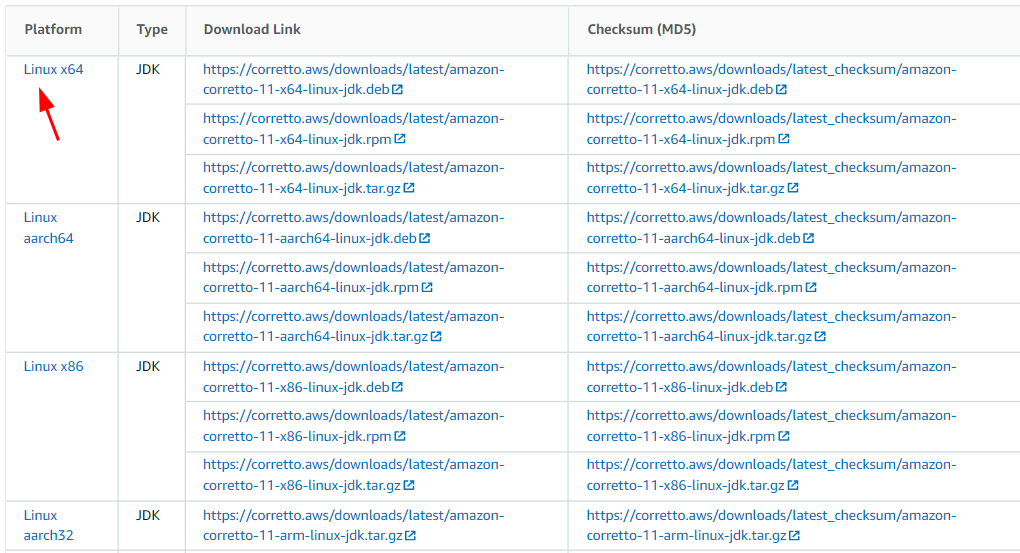
Once you copy the download link, open the terminal and enter the command below:
The above command will download the Corretto JDK to your system for installation.
Once the download completes, enter the command below to install the JDK package.
The above command will use the Debian package downloaded to install the JDK.
To verify the installation is completed and you have JDK installed, enter the command:
Executing this command should print the Java Version and the JDK vendor. Below is an example output:
OpenJDK Runtime Environment Corretto-11.0.12.7.1 (build 11.0.12+7-LTS)
OpenJDK 64-Bit Server VM Corretto-11.0.12.7.1 (build 11.0.12+7-LTS, mixed mode)
Setting Up Tomcat User
For security reasons, it is best to have a user account to run the Apache Tomcat services. Avoid using the root user to run the tomcat server.
Let’s start by creating the tomcat user with a default home directory and a shell set to false.
To verify the tomcat user exists with the correct information, cat the /etc/passwd file as:
Below is an example output:
Install Tomcat 10
The next step is to install the Tomcat binary on our system. As of writing this tutorial, Apache Tomcat 10 is not available in official repositories for major Linux distributions.
Launch your browser and navigate to the Apache Tomcat 10 Download page.
Select the tar or the zip archive and copy the download link.

Open the terminal and navigate to the Tomcat user home directory we created in the previous step.
Next, use wget or curl to download the tomcat archive as:
The final step is to unarchive the files and store them in the tomcat home directory. You can use the command:
The next step is to use the chown command to set the correct permissions for the apache tomcat files.
sudo chmod -R u+x ./bin/
How to Configure Apache Tomcat User In Linux
To configure the Apache Tomcat users, we need to edit the tomcat-users.xml file in the conf directory.
Edit the file and add the user details as shown in the example below:
Add the lines as
<user username="tomcat" password="" roles="manager-gui" />
<role rolename="admin-gui" />
<user username="admin" password="" \
roles="manager-gui,admin-gui"/>
</tomcat-users>
In the above example configuration, the username tomcat can only access the Tomcat manager, while the admin username can access both the manager and the admin interface.
Ensure to add the username configuration shown above between the following blocks
</tomcat-users>
Finally, save the file and close the editor.
To run the Apache Tomcat server, enter the command:
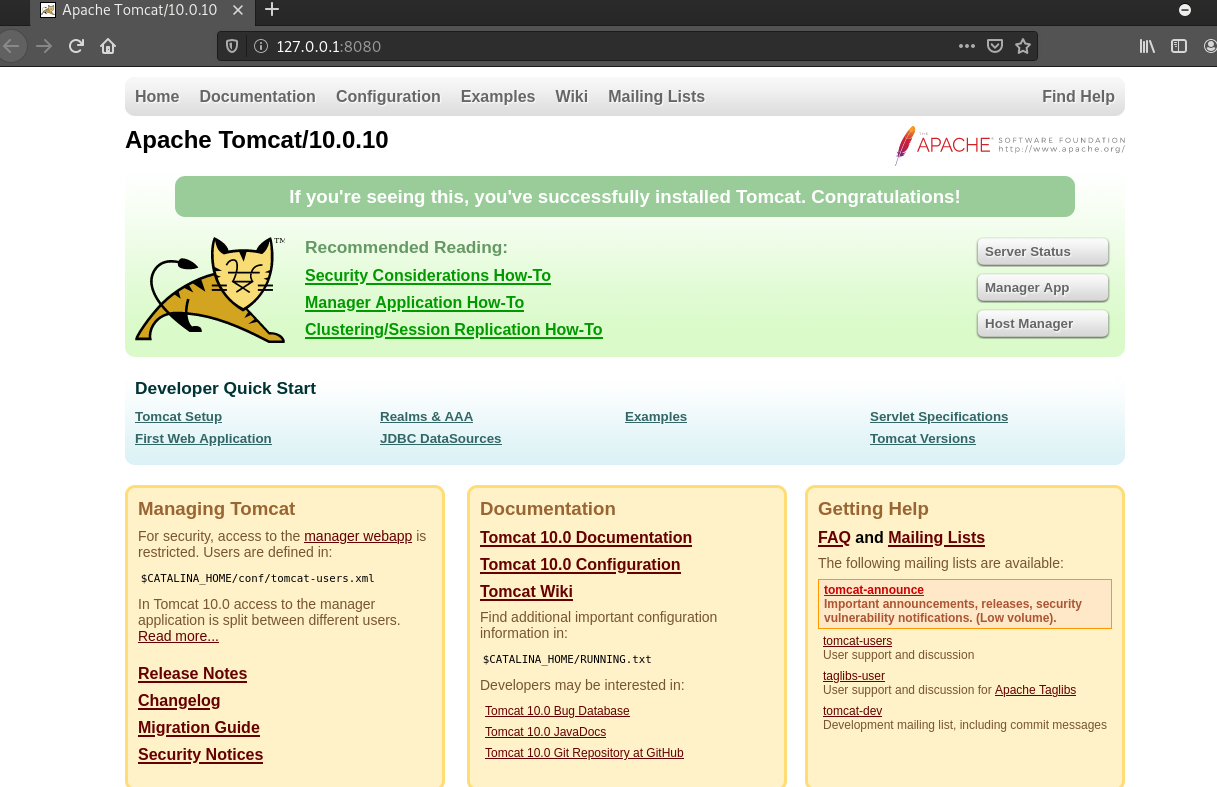
How to Access Tomcat
Once you start the Tomcat server, it will run on port 8080 by default, and you can access the interface by navigating to http://127.0.0.1:8080
If the tomcat server is running, you should see the tomcat default page:
If you want to learn various ways to start and stop the apache tomcat service, consider our tutorial on the topic.
Conclusion
This tutorial showed you how to install and configure the Apache Tomcat server on Linux. Check our other Tomcat tutorials to learn more about securing and administering your Tomcat server.