Kali Linux is an open-source free Linux distribution that is universally used to audit security and penetrate testing. It offers hundreds of open-source packages and tools that are used to fulfill user requirements and market modifications such as security research, testing, computer forensics, vulnerability management, and many more. Nowadays, it is widely used by IT professionals as well as students for learning, testing, and security purposes.
Mostly user uses Kali Linux by booting it live in the system. This is one of the most reliable and fastest methods to access and get started with Kali Linux at any time. For this purpose, users can create a Kali Linux bootable USB.
This blog will cover how to create a Kali Linux bootable USB through the following outline:
- Prerequisites
- Download the ISO Image of Kali Linux
- Method 1: How to Make a Kali Linux Bootable USB using Etcher?
- Method 2: How to Make a Kali Linux Bootable USB in Linux?
- Method 3: How to Make a Kali Linux Bootable USB on Mac?
- Conclusion
Prerequisite
To get started with making a Kali Linux Bootable USB, all you need is:
- ISO Image of Kali Linux
- USB(at least 8GB)
Let us begin with downloading the Kali Linux ISO Image from its Official Website.
Download the ISO Image of Kali Linux
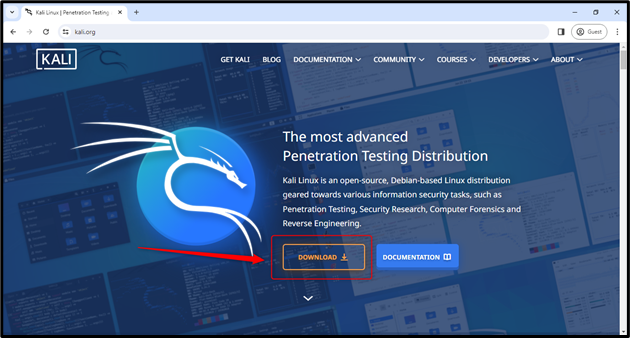
To download the ISO of Kali Linux, visit the Kali Linux Official Website:
Click on the orange-colored “Download” button as shown in the above picture.
It will take you to the “Get Kali” page to choose the Platform for Kali:
Select the installer image card box, and it will slide you down to the relative section for choosing the installer image of your choice:
First, choose the Operating system(e.g. 64-bit, 32-bit, or Apple Silicon(ARM64)), and then click on the “Installer” download button to begin the downloading of the Kali Linux ISO Image:
We have successfully downloaded the Kali Linux ISO Image. The downloading process will be the same for Mac OS and Linux, you just need to choose the respective OS type while selecting the installer Image.
Once an ISO image is downloaded and a USB(to which you want to make Kali Linux Bootable) is plugged into the system, let’s begin with our first method of making Kali Linux Bootable USB using Etcher.
Method 1: How to Make a Kali Linux Bootable USB using Etcher?
This method can be used for each of the following Operating systems:
- Windows
- Mac OS
- Linux
Step 1: Download and install Balena Etcher
Visit the official website of Balena Etcher by visiting the link. Then, download it by clicking the green colored “Download Etcher” button as shown below:
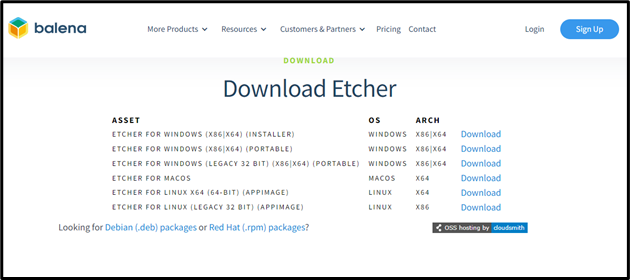
It will slide you down to the Downloads section and let you choose the appropriate installation media according to your Operating system(e.g., Windows, Linux, or Mac OS):
For demonstration, we will continue with choosing Windows.
Note: However, the rest of the process will be the same for other operations systems like Linux and Mac OS.
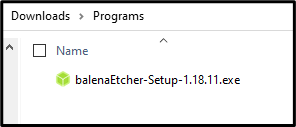
Once the installation media is downloaded, execute the balenaEtcher “exe” file and install it:
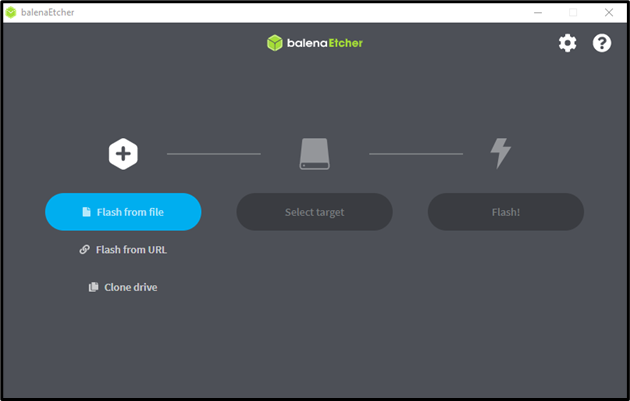
After installation, you will have the welcome/home screen in front of you of Balena Etcher(Imaging tool) as shown below:
As it can be seen from the interface, making a bootable USB is just a three-step process:
- Provide an ISO(file or URL)
- Select the Target(USB Drive or any other Drive to which you want to make a Bootable Drive)
- Flash(initiating the process of making a USB Drive Bootable)
Step 2: Provide an ISO file of Kali Linux to Etcher
Select the “Flash from File” button to select the Kali Linux ISO image:
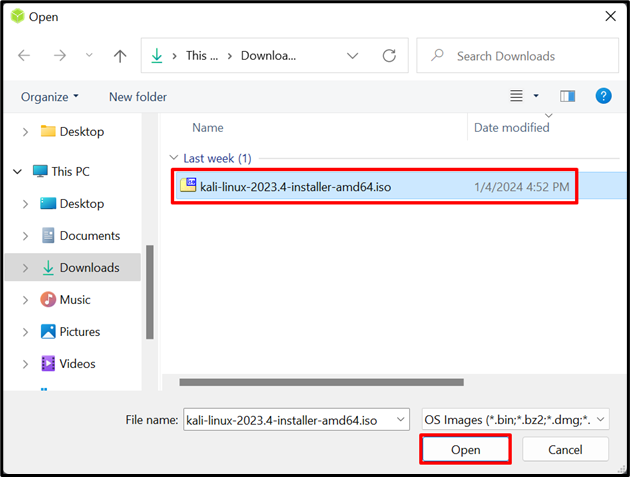
A pop window will open; go to the respective folder where the Kali Linux ISO image was downloaded and open it by hitting “Open” button:
After successfully providing the Kali Linux ISO Image to Etcher, it’s time to select the Drive(USB Drive) which you want to make Bootable.
Step 3: Select the Drive(USB Drive)
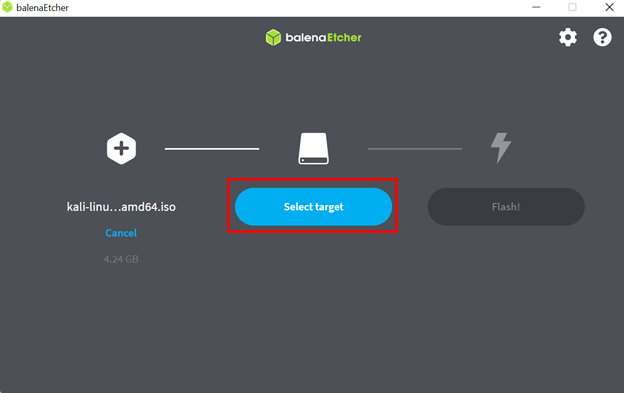
Click on the “Select Target” button and it will show all available devices:
Note: if it doesn’t show any device, make sure you have plugged in the USB properly and it is not corrupt.
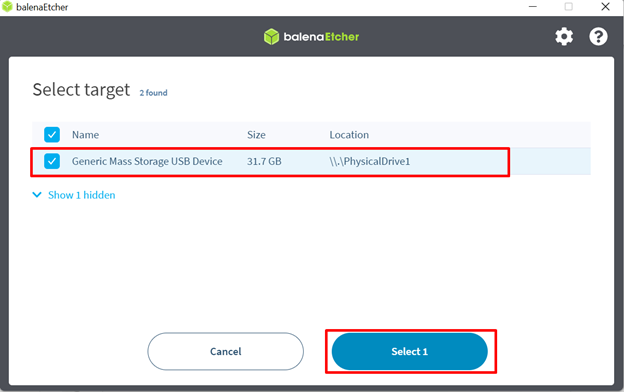
Select the desired USB device and click the blue colored “Select” button as highlighted in the below screenshot:
After providing the ISO Image and USB Drive, it’s time to Flash!
Step 4: Initiate Flashing Process
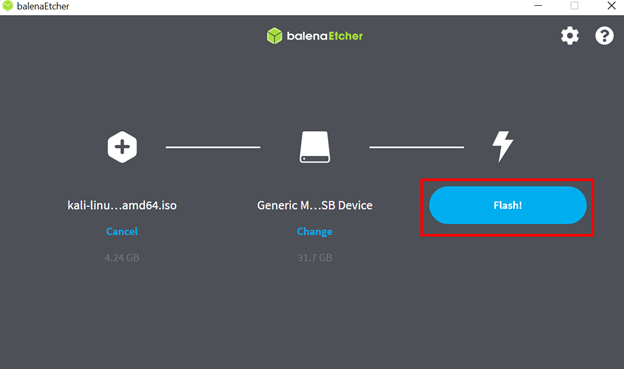
Click on the “Flash” button and it will start to make your USB Kali Linux Bootable:
After clicking the Flash button, it will initiate the process of making the Kali Linux Bootable USB:
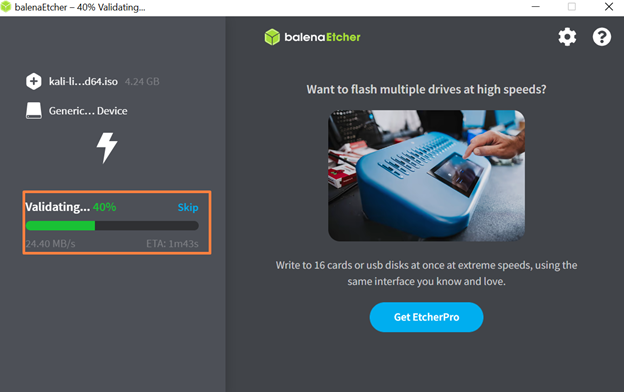
It will take a couple of minutes to flash and validate the changes to the USB based on the processing power of your system:
After Validating, it will show the success screen by mentioning “Flash Completed!”:
Your USB Device is ready to plug out of your system and install Kali Linux in any system using the respective USB Drive.
This is all about how simply you can make a Kali Linux Bootable USB through the Etcher imaging tool.
Although, this method works for all three major Operating System platforms(Windows, Linux, and MacOS); However, Linux and Mac OS provide an extra method to make Kali Linux Bootable USB which is described below.
Method 2: How to Make a Kali Linux Bootable USB in Linux?
It is supposed that a USB is attached to the system and Kali Linux ISO Image is downloaded before getting started with this method.
Creating a bootable USB for Kali Linux using the dd command(a command line utility used to interact with block devices) is just a single command running process. However, you need to execute the “dd” command by providing it with the following options:
- The ISO Image File Name
- The USB Drive Path
- Conversion Type
- Block Size
- Status(Optional)
Step 1: Move to the Directory where Kali Linux ISO Image is Residing
As it is usually downloaded in the Downloads directory; So, move to the Downloads directory from the Home directory using the cd command:
Verify whether Kali Linux ISO Image is placed or not in the present working directory using the ls command:
Note down the file name of the ISO image as it will be required by the “dd” command. In our case, it is “kali-linux-2023.4-installer-amd64.iso”.
Step 2: Note down the USB Drive Path
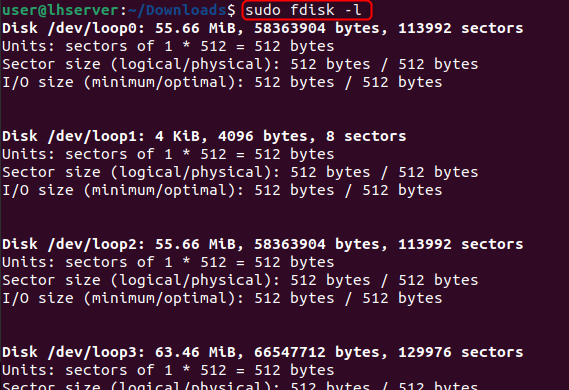
The best practice to know the right USB Drive path is to unplug the USB Drive and execute the command:
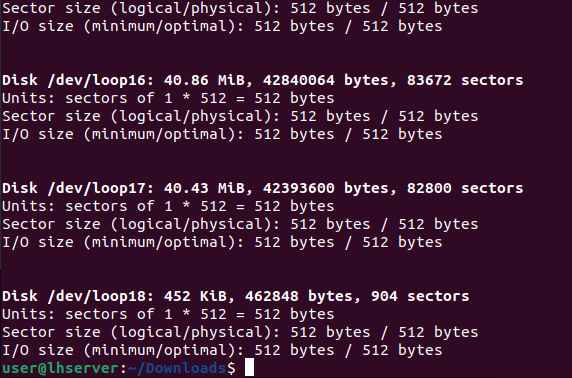
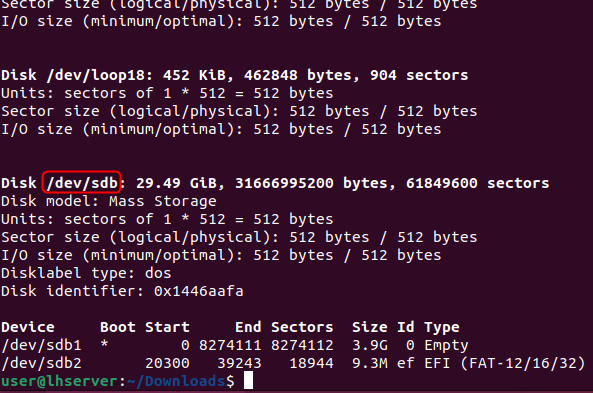
Then plug in the USB and execute the command typed below again:
You can notice that the “/dev/sdb” disk was not available before, and it is shown now by the command after plugging in the USB. You can double-check whether it is the right USB Drive(to which you want to make a Kali Linux bootable) through the size of the disk as it is “29.14 GB” in our case. Once you get the right USB path, it’s time to execute the dd command to initialize the booting process.
Step 3: Make the USB Bootable
To start making the Kali Linux Bootable USB drive, type the command below in your Linux terminal and make sure to provide/change the Kali Linux ISO image file name and USB drive path:
In the above command:
- Provide the Kali Linux ISO image file name to the if operand
- Provide the USB Drive path to the of operand
- Set the conv operand to fsync, to verify that each block is successfully copied to the USB Drive
- Set the Block size to 4 Mega Bytes(recommended, however, you can increase the size to speed up the process)
- Set status=progress to show progress while making the USB bootable(Optional).
After running the command, it will start to make the USB Bootable and it will take a couple of minutes:
After making the USB bootable, the output will show the size and total time taken to make the Kali Linux Bootable USB in Linux.
Method 3: How to Make a Kali Linux Bootable USB on Mac?
To create a Kali Linux bootable USB on a Mac, first, download the Kali Linux ISO Image and attach the USB device.
Creating a Kali Linux Image using the dd command on Mac is a straightforward and easy-to-follow method. You need to execute the dd command by providing it with the following options:
- The ISO Image file name
- The USB Drive path
- Block Size
Step 1: Recognize the USB Drive Path
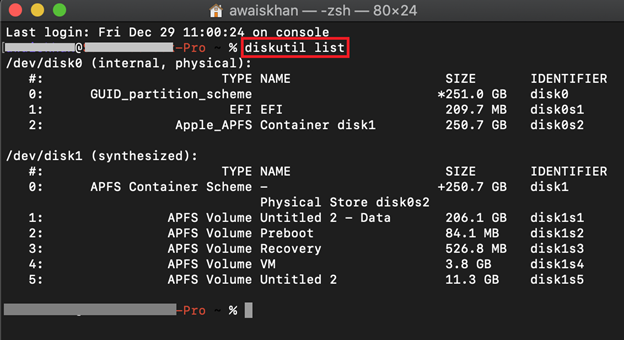
The best practice to know the right USB Drive path is to unplug the USB Drive and execute the command given below in the Mac terminal:
This command will just show up all the disks available for Mac OS.
Plug in the USB and execute the “diskutil list” command again:
The plugged-in USB drive path will be visible at the end, and you can also verify whether it is the right disk(USB Drive) by looking at the size of the USB Drive. In our case, it is “/dev/disk2”, note it down as we will be needing it going forward.
Step 2: Unmount the USB Drive
Unmount the USB Drive using the diskutil command and provide it the path of the USB Drive as mentioned below:
Step 3: Go to the Directory where Kali Linux ISO Image is Downloaded
Usually, the ISO image is downloaded in the Downloads directory. So, move to the Downloads directory from the Home directory using the cd command:
You can verify the present working directory using the pwd command as well:
Step 4: Initiate the process of making Kali Linux Bootable USB
Once you are in the directory where Kali Linux ISO Image is downloaded, initialize the process of making Kali Linux Bootable USB using the dd command with sudo privileges as shown below:
In the above command:
- Provide the Kali Linux ISO image file name to the if
- Provide the USB Drive path to the of the operand(prepend “r” to the disk name(i.e. /dev/rdisk2) for speeding up the write process)
- Set the Block size to 4 Mega Bytes(recommended, however, you can increase the size to speed up the process)
Note: use the small m instead of capital M in the “bs=4m” operand, as it throws the “dd: invalid number: ‘4M’” error:
It will not show any output and it feels like it is stuck but don’t worry it will take a couple of minutes to complete the process(based on the computing power of your system) and show output as seen in the above screenshot.
Tip: To see the progress during the process, you can use “status=progress” with the dd command. However, sometimes it throws errors due to incompatibility of this command with your macOS version. In such a case, do not use “status=progress” and have patience while it is in process.
How to Boot Kali Linux Using Kali Linux Bootable USB?
Once the Kali Linux Bootable USB is created, plug in the Kali Linux Bootable USB on your system. Restart the system and enter into the boot menu using the boot menu key(i.e. F12, F9, Delete, ESC, based on your system).
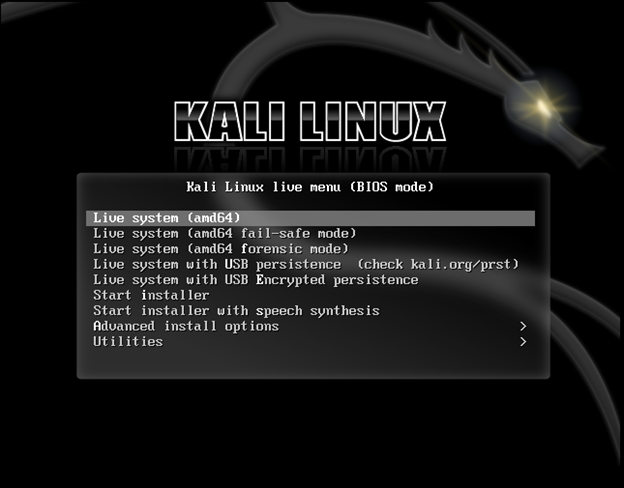
From the boot menu options, select your Bootable USB and press Enter. This will boot and start the installation process of the Kali Linux on your targeted machine:
From here onwards, you can start using Live Kali Linux or start the installer to install Kali Linux on your system.
We have covered how to make a Kali Linux bootable USB.
Conclusion
To create a Kali Linux Bootable USB, all you need is a USB Drive and a Kali Linux ISO Image to get started. The most efficient method to make a USB bootable is to use an imaging tool like Etcher(as it can work on all 3 major Operating systems e.g. Windows, Mac OS, and Linux). This article provides a detailed demonstration of how to make a USB bootable with Kali Linux using Etcher. Moreover, a step-by-step detailed guide is also demonstrated on how to make a USB bootable using the dd command on Mac OS and Linux.

