
The ESP32 is a microcontroller that is designed for use in a variety of applications, including Internet of Things (IoT) devices. One of the features of the ESP32 is the ability to display text and graphics on an OLED display using different font sizes. This can be useful for creating visually appealing user interfaces or for displaying information in a clear and easy-to-read format. In this article, we will explore how to use different font sizes on an OLED display with the ESP32 and how to choose the right font size for your application.
This lesson includes following topics:
1: Introduction to ESP32 OLED Display
2: Wiring OLED Display Module to ESP32
3: Installing Required Libraries
4: Displaying Different Font Size on OLED Display Using Arduino IDE
1: Introduction to ESP32 OLED Display
OLED (Organic Light Emitting Diode) screens are the best alternatives to LCD screens. LEDs inside the OLED screen illuminate the pixels that display us different images and text. While on the other side the LCD screen uses a backlight for illuminating its pixels. Inside the OLED display there are hundreds of LEDs that glow and display the images and text. Brightness of these pixels can be controlled pixel by pixel.
Now we will interface ESP32 with an OLED display.
2: Wiring OLED Display Module to ESP32
OLED screens mainly work on two communication protocols. These are I2C and SPI. Among these two SPI (Serial peripheral interface) is faster compared to I2C, but most of the time I2C OLED display is preferred because of a smaller number of wires.
Using I2C OLED two pins SDA and SCL are enough for displaying images and text. The given image shows ESP32 with 0.96-inch (128×64 pixels) OLED screen.

ESP32 pins connection with OLED is as follows:

As we have interfaced ESP32 with an OLED display, now we will install the necessary libraries in the Arduino IDE so we can move forward with shapes displaying on the OLED screen.
3: Installing Required Libraries
There are different libraries available inside the Arduino IDE for the SSD1306 display. Using these libraries, we can display text and images with the help of Arduino IDE.
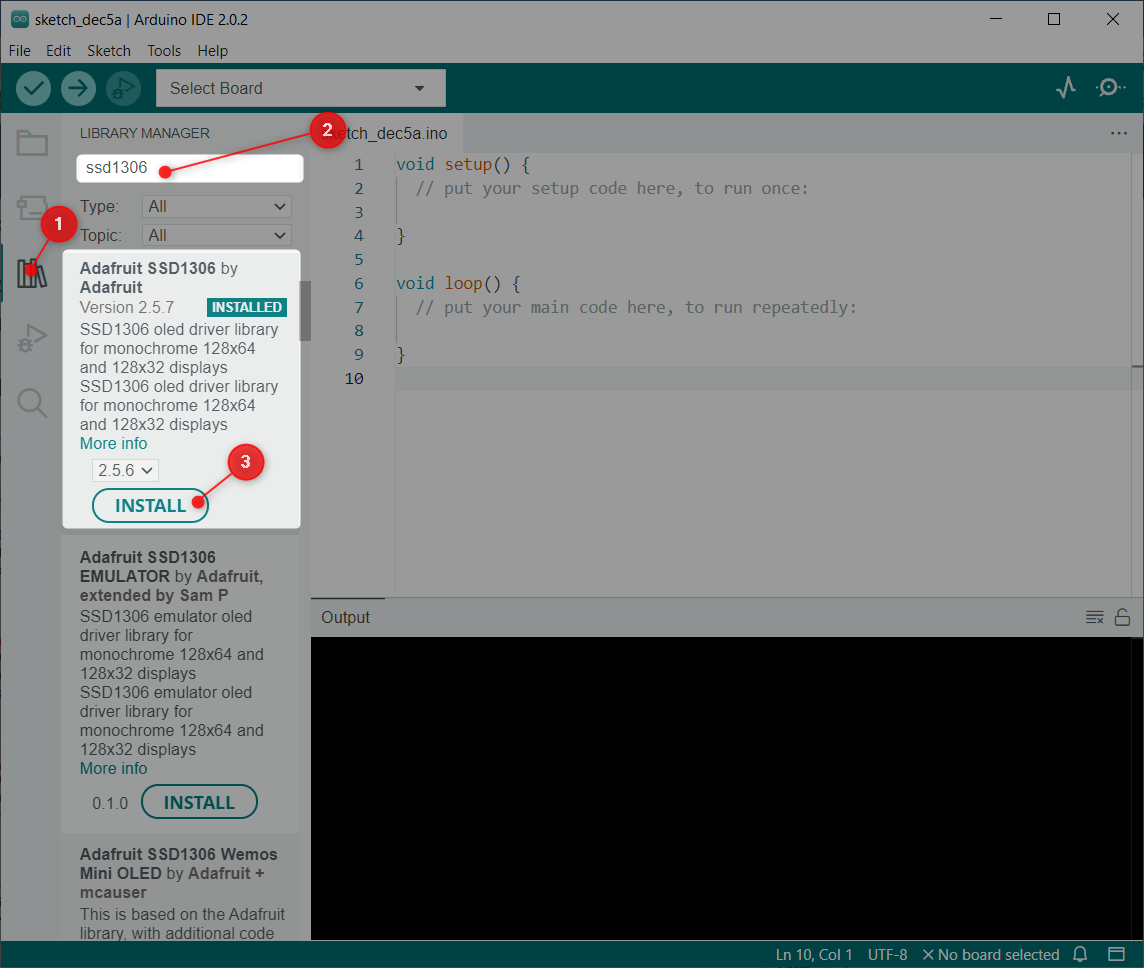
Today we will use two Adafruit libraries: SSD1306 and GFX library.
Open Arduino IDE and search for the SSD1306 library. Install the SSD1306 OLED library by Adafruit.
Other way of installing is going to: Sketch>Include Library>Manage Libraries:
Now install the GFX library by Adafruit:
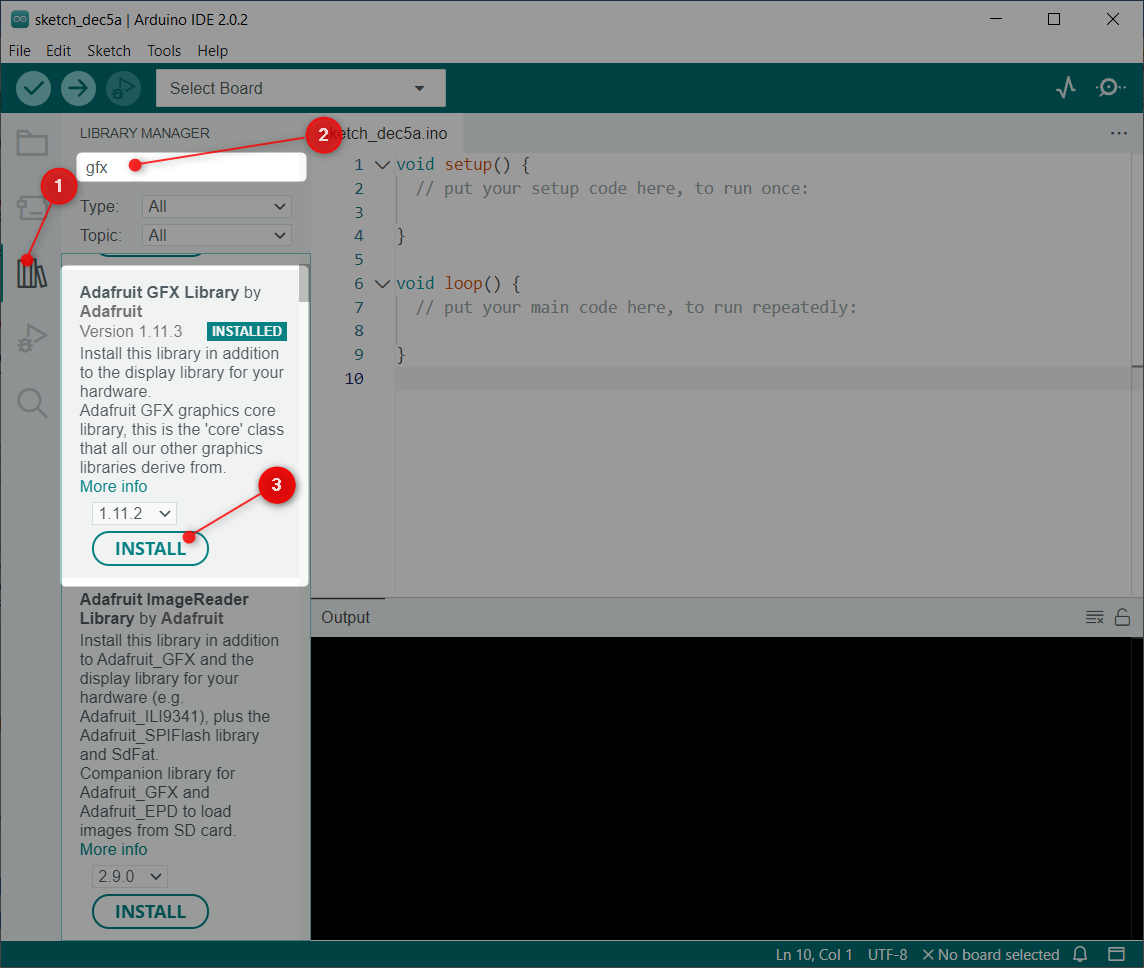
As we have installed both libraries so now, we can easily program ESP32 with an OLED display.
4: Displaying Different Font Size on OLED Display Using Arduino IDE
The font size of text displayed on an OLED can be adjusted by changing the scale factor of the font. The scale factor is a value that determines how much the font will be enlarged or reduced. For example, a scale factor of 1 will result in the normal size font, while a scale factor of 2 will result in a font that is twice as large.
In an OLED display we can adjust text size using multiple ways with the ESP32. One option is to use a library that provides functions for rendering text in different sizes, such as the Adafruit GFX Library. This library allows you to specify the scale factor when drawing text, so you can easily change the font size as needed.
When choosing the font size for your OLED display, it’s important to consider the size of the display and the distance that the text will be viewed from. Larger font sizes may be easier to read from a distance, but they may not fit as much text on the screen. Smaller font sizes may be more compact, but they may be harder to read from a distance. It is recommended to check different font sizes that fit according to your OLED screen size.
Now we will write a code with three different font size scale factors starting from 1 to 3.
4.1: Code
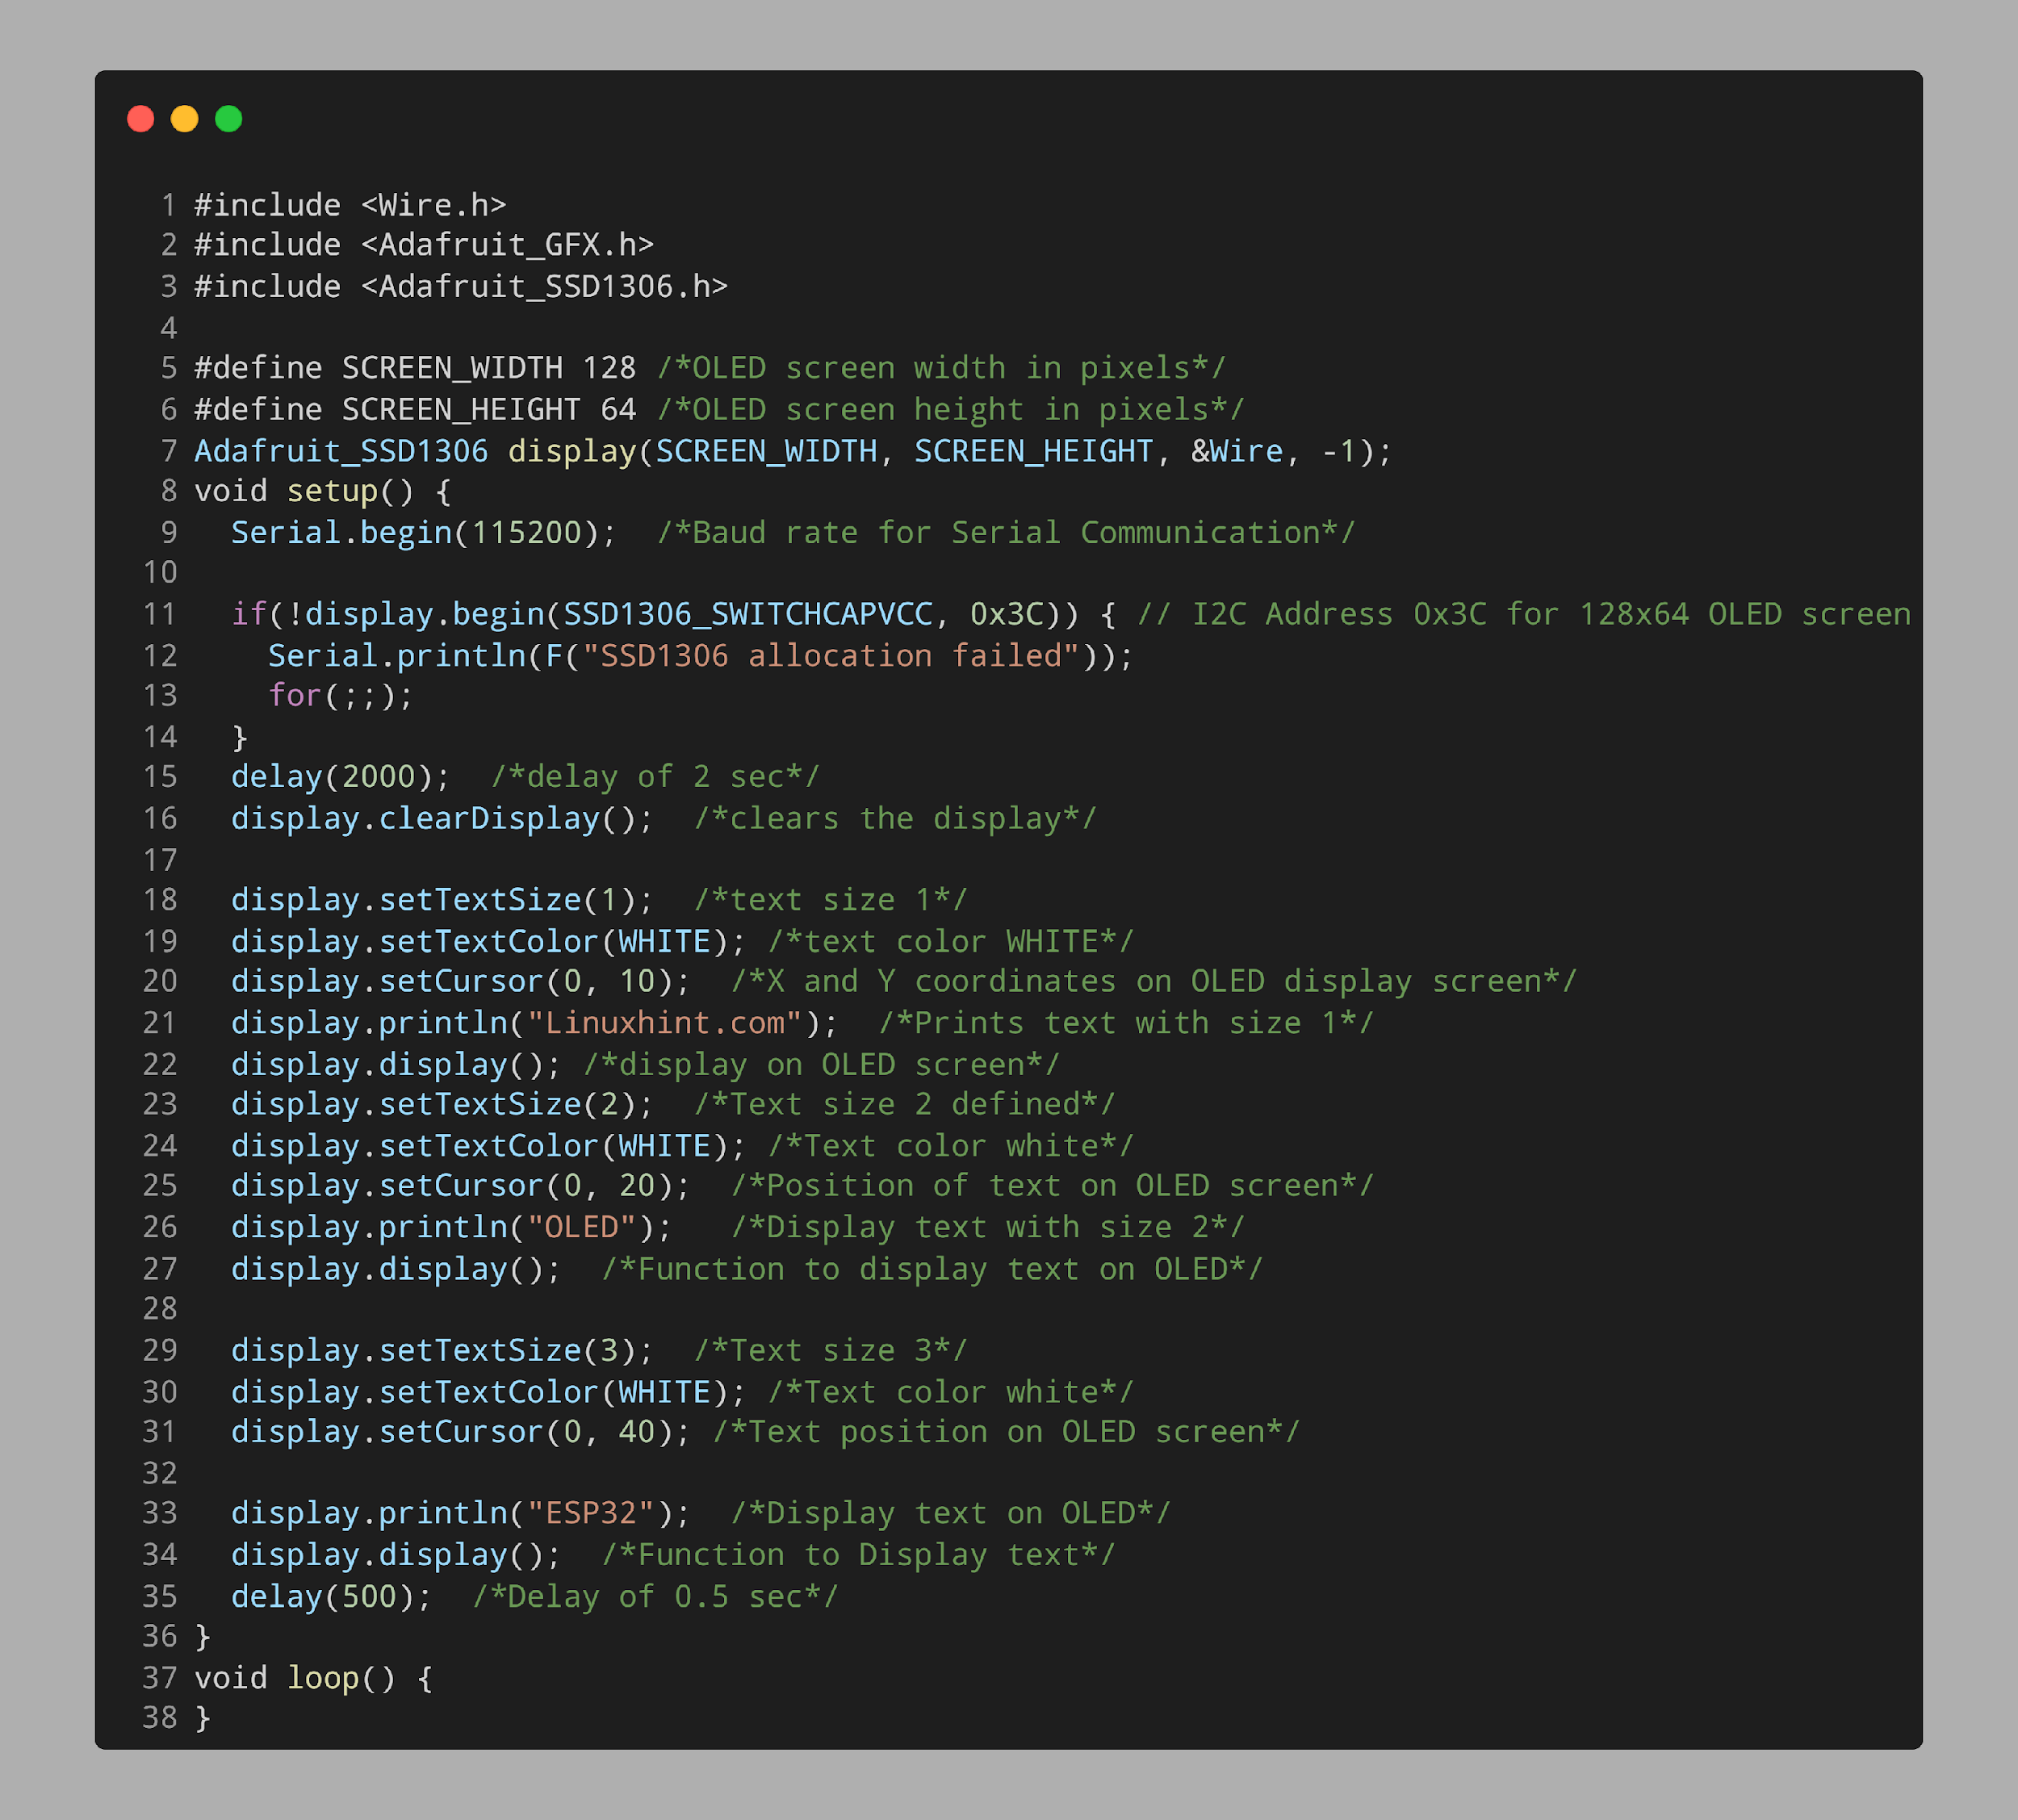
Open Arduino IDE and upload given code to ESP32 board:
#include <Adafruit_GFX.h>
#include <Adafruit_SSD1306.h>
#define SCREEN_WIDTH 128 /*OLED screen width in pixels*/
#define SCREEN_HEIGHT 64 /*OLED screen height in pixels*/
Adafruit_SSD1306 display(SCREEN_WIDTH, SCREEN_HEIGHT, &Wire, -1);
void setup() {
Serial.begin(115200); /*Baud rate for Serial Communication*/
if(!display.begin(SSD1306_SWITCHCAPVCC, 0x3C)) { // I2C Address 0x3C for 128x64 OLED screen
Serial.println(F("SSD1306 allocation failed"));
for(;;);
}
delay(2000); /*delay of 2 sec*/
display.clearDisplay(); /*clears the display*/
display.setTextSize(1); /*text size 1*/
display.setTextColor(WHITE); /*text color WHITE*/
display.setCursor(0, 10); /*X and Y coordinates on OLED display screen*/
display.println("Linuxhint.com"); /*Prints text with size 1*/
display.display(); /*display on OLED screen*/
display.setTextSize(2); /*Text size 2 defined*/
display.setTextColor(WHITE); /*Text color white*/
display.setCursor(0, 20); /*Position of text on OLED screen*/
display.println("OLED"); /*Display text with size 2*/
display.display(); /*Function to display text on OLED*/
display.setTextSize(3); /*Text size 3*/
display.setTextColor(WHITE); /*Text color white*/
display.setCursor(0, 40); /*Text position on OLED screen*/
display.println("ESP32"); /*Display text on OLED*/
display.display(); /*Function to Display text*/
delay(500); /*Delay of 0.5 sec*/
}
void loop() {
}
Code started by calling the important libraries. These libraries include the wire and the Adafruit library. After that we defined the OLED screen size. Here we are using 128×64 screen size. The given size is in pixels.
In the setup part of the code, we initialized the OLED display. Next, we displayed three different texts with separate font sizes.
First the string Linuxhint.com is displayed with scale factor / font size 1. Next another string OLED with text size or scale factor 2 is defined. Lastly a new string ESP32 with font size of 3 is displayed.
Remember to define the correct position of all three texts. If the text size is too big, the OLED will show a blank screen. It’s recommended to check different text sizes according to your display size.
If the text overlaps, try replacing the x and y coordinates. This will help to find the balanced position for all text.
4.2: Output
After uploading code to ESP32 we can see text with different sizes on the OLED. Three different texts with size 1 ,2 and 3 are displayed on screen.
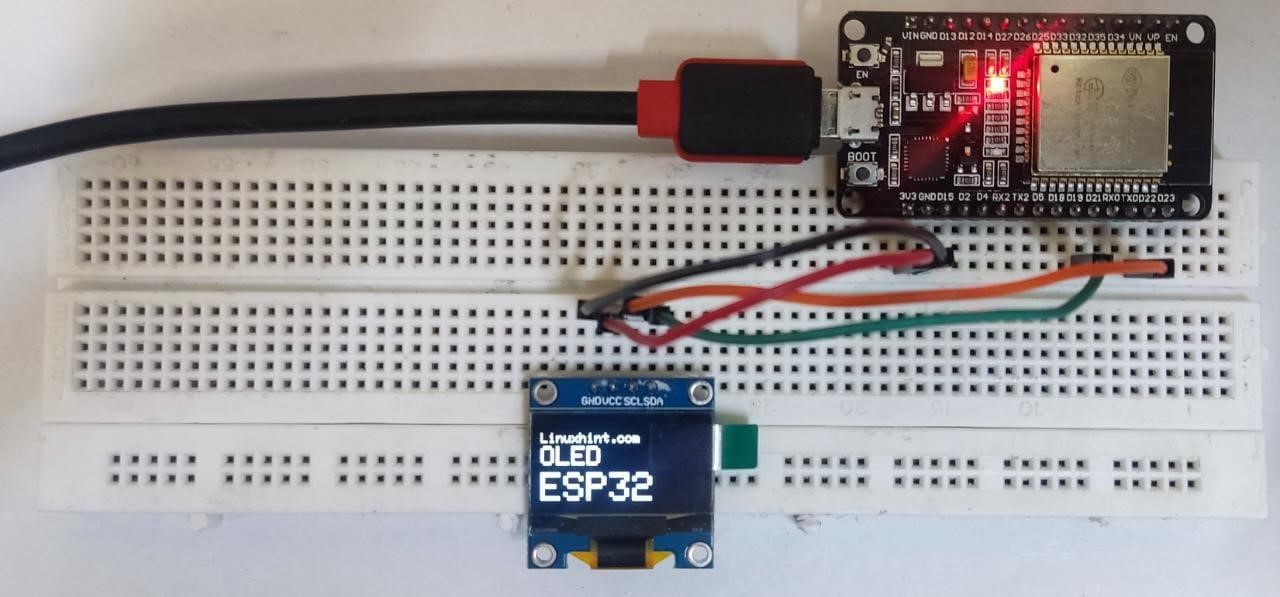
We have successfully displayed text with different font sizes.
Conclusion
ESP32 is a microcontroller board which can interface with an OLED screen to display different graphics. Here this article covers the code for displaying text with different sizes. It is important to note that text size depends upon the position and size of the OLED screen. If the text goes out of screen dimension a black screen will be visible. For a more detailed guide read the given article.