MicroPython with ESP32
MicroPython is written in C and compatible with Python 3, and it is designed in such a way to run efficiently on microcontrollers and embedded systems. Just like Python programming, MicroPython is also easy and accessible for programming microcontrollers boards. However, it doesn’t support all libraries that Python does but still we can get most out of it.
Using MicroPython we can get the most out of the ESP32 board. ESP32 is a great chip for running MicroPython. To program an ESP32 board with MicroPython we just need to install an IDE like Thonny IDE which can burn code inside the ESP32 board.
Setup ESP32 Access Point Using MicroPython
Now we will write a MicroPython code for ESP32 to enable it as an access point. To write a code we need an editor here will move forward with Thonny IDE.
Before we continue here is a basic introduction to all three WiFi modes which one must know.
ESP32 WiFi Modes
Before we move forward, we must have knowledge of ESP32 WiFi working modes. ESP32 WiFi can be used in three different modes.
- Station
- Access Point
- Station + Access Point
The network module inside ESP32 can configure WiFi connection. ESP32 contains two interfaces for its WiFi. One is used for configuring ESP32 as access point and second to use ESP32 as station. To configure these two modes following object are called inside the code:
sta_if = network.WLAN(network.STA_IF)
ap_if = network.WLAN(network.AP_IF)
Following modes can be called using the network.WLAN() function by defining the desired mode inside the argument of this function.
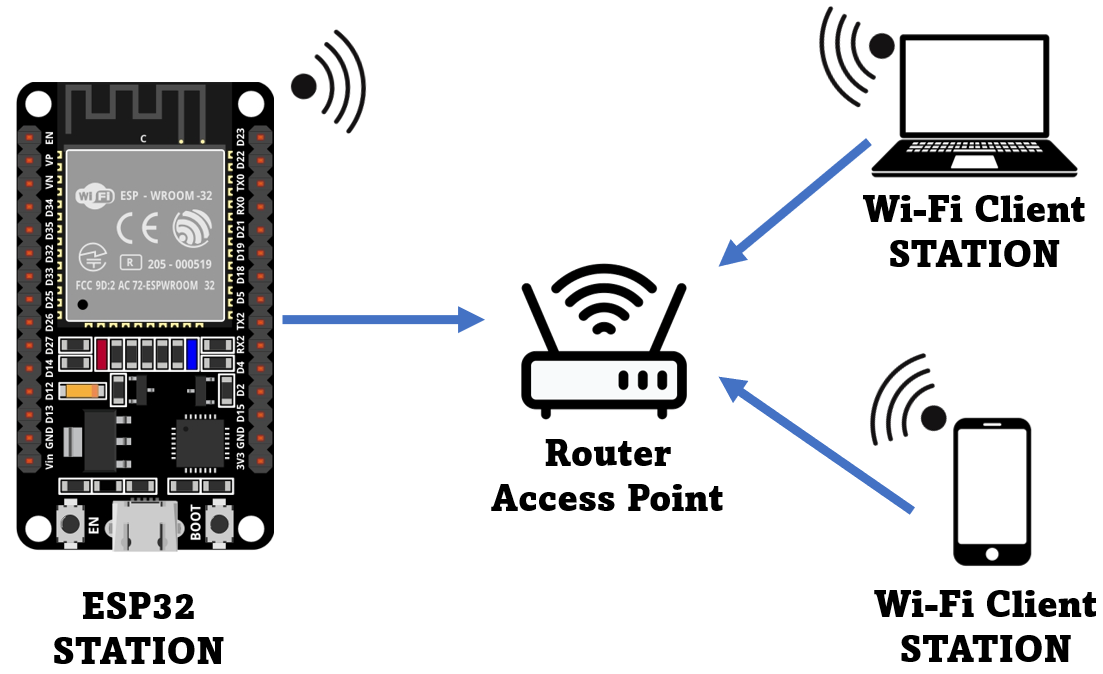
In most of the situations ESP32 works in Station mode. During this mode ESP32 is connected to WiFi of any access point such as the router. Following image shows ESP32 connected to an access point along with other devices.
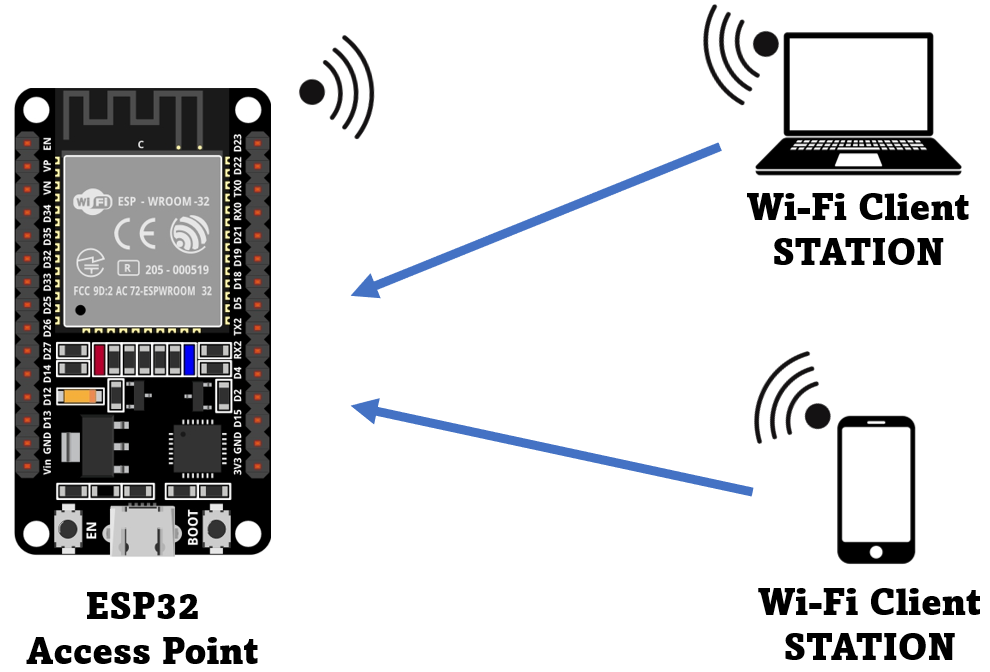
But we can also use ESP32 WiFi to work as hotspots for other devices. In short using the ap_if = network.WLAN(network.AP_IF) command we will be using ESP32 as an Access point where it will create its own WiFi network. Now any device with WiFi capabilities can connect to it.
The given image below demonstrates the working of ESP32 as an access point for other devices.
As the ESP32 board doesn’t have wired network capability it only supports wireless networks, so we called this access point as Soft-AP (Soft Access Point).
Last mode of WiFi for the ESP32 board is both Access and Station point. Here the ESP32 board will be connected to some other router and will act as a station while it also advertises its hotspot to other devices so they can connect to ESP32 WiFi.
Image given below highlights the structure of ESP32 board working in both station and access point.
How to Use ESP32 Board as an Access Point
Connect ESP32 board with PC and open Thonny IDE. By default, MicroPython is not flashed into the ESP32 board. So, the first thing before starting programming ESP32 boards is to flash/upload the firmware on ESP32.
To install MicroPython firmware in ESP32 board different methods can be used and Thonny IDE is one of them that assists installation of MicroPython in ESP32 board.
Go to the MicroPython Firmware Download page. Select the board for which we need to download firmware. Download the latest release for firmware and make sure not to download the night builds version as they more target advanced programmers. Once firmware is installed the ESP32 board is ready to be programmed.
ESP32 Access Point Code
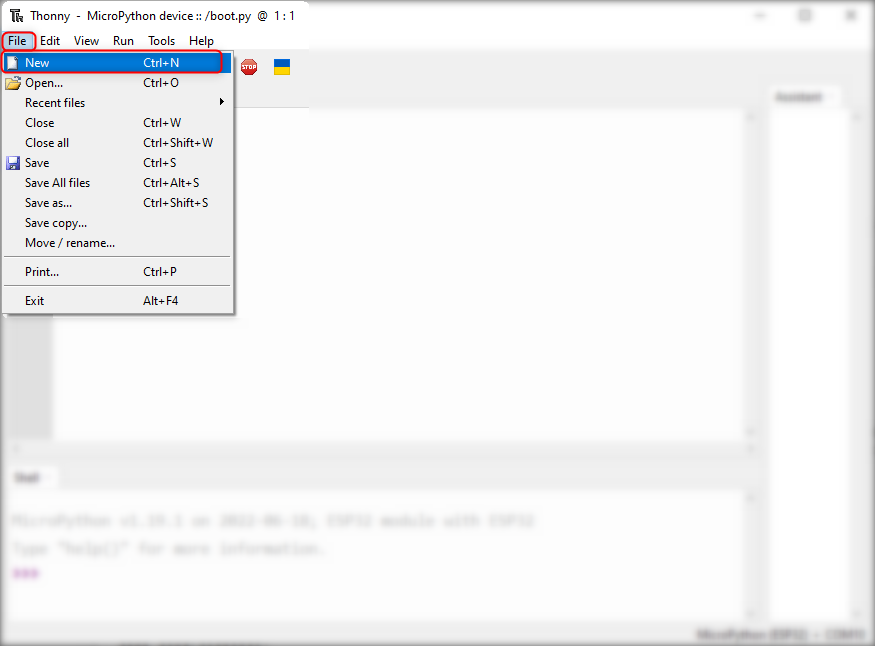
Once the Thonny IDE is ready. Create a new file Go to: File>New or press Ctrl + N
Type the code given below in the editor window.
import usocket as socket
except:
import socket
import network
import esp
esp.osdebug(None)
import gc
gc.collect()
ssid = 'ESP32'
password = '123456789'
ap = network.WLAN(network.AP_IF)
ap.active(True)
ap.config(essid=ssid, password=password)
while ap.active() == False:
pass
print('Connection successful')
print(ap.ifconfig())
def web_page():
html = """<html><head><meta name="viewport" content="width=device-width, initial-scale=1"></head>
<body style="background-color:powderblue;"><h1 style="text-align:center; font-size:70px;color:#ed0e42;">Linuxhint.com</h1><h2 style="text-align:center; font-size:30px;">ESP32 Access Point </h2></body></html>"""
return html
s = socket.socket(socket.AF_INET, socket.SOCK_STREAM)
s.bind(('', 80))
s.listen(5)
while True:
conn, addr = s.accept()
print('Connection established from %s' % str(addr))
request = conn.recv(1024)
print('Content = %s' % str(request))
response = web_page()
conn.send(response)
conn.close()
To access the ESP32 WiFi, SSID and password is mandatory. In the above code we used the SSID name as ESP32 and password is 123456789, but it can be modified.
password = '123456789'
Next, we initiated ESP32 access point by defining following command
To activate access point type below command:
Access point is configured through SSID and password.
To print the IP address, write below line of code.
Default IP address for ESP32 is 192.168.4.1.
The access point is successfully created using MicroPython and Thonny IDE.
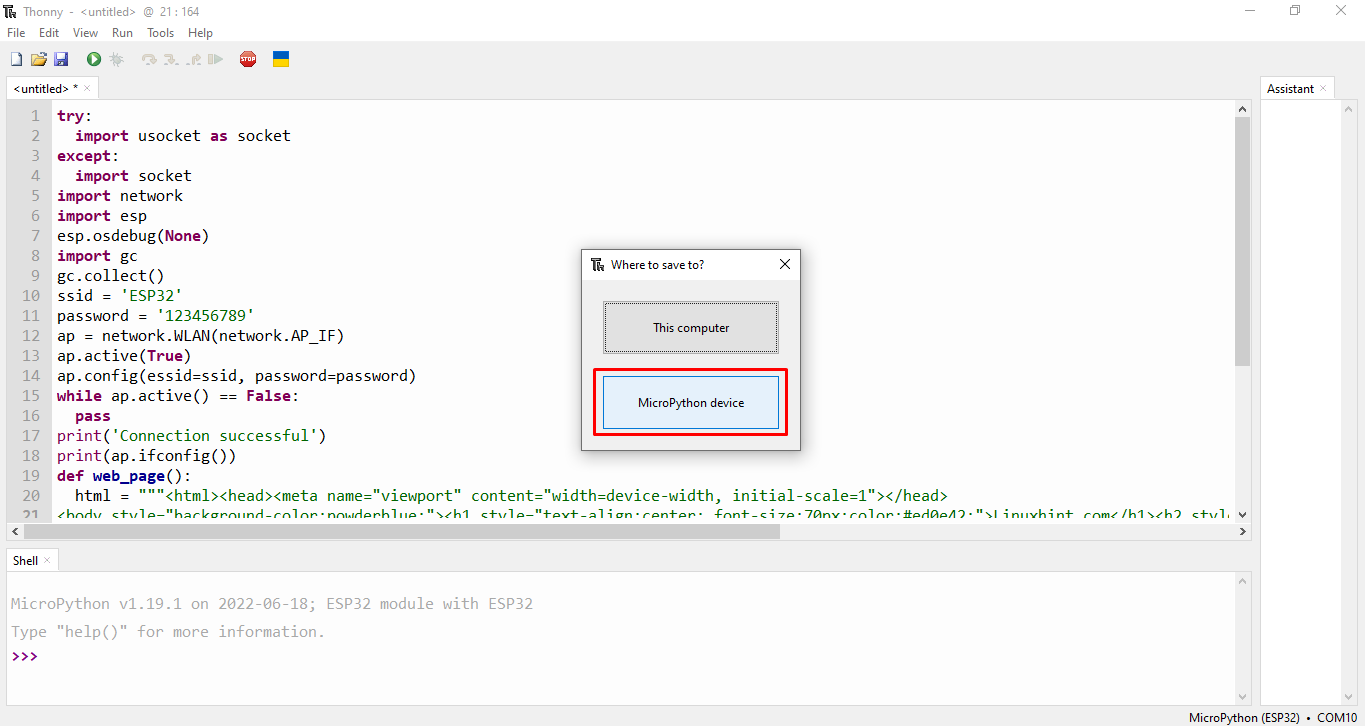
Now save the code written file in the ESP32 board. Go to: File>Save or press Ctrl + S. Now click MicroPython device.
Save file with name of boot.py and click OK.
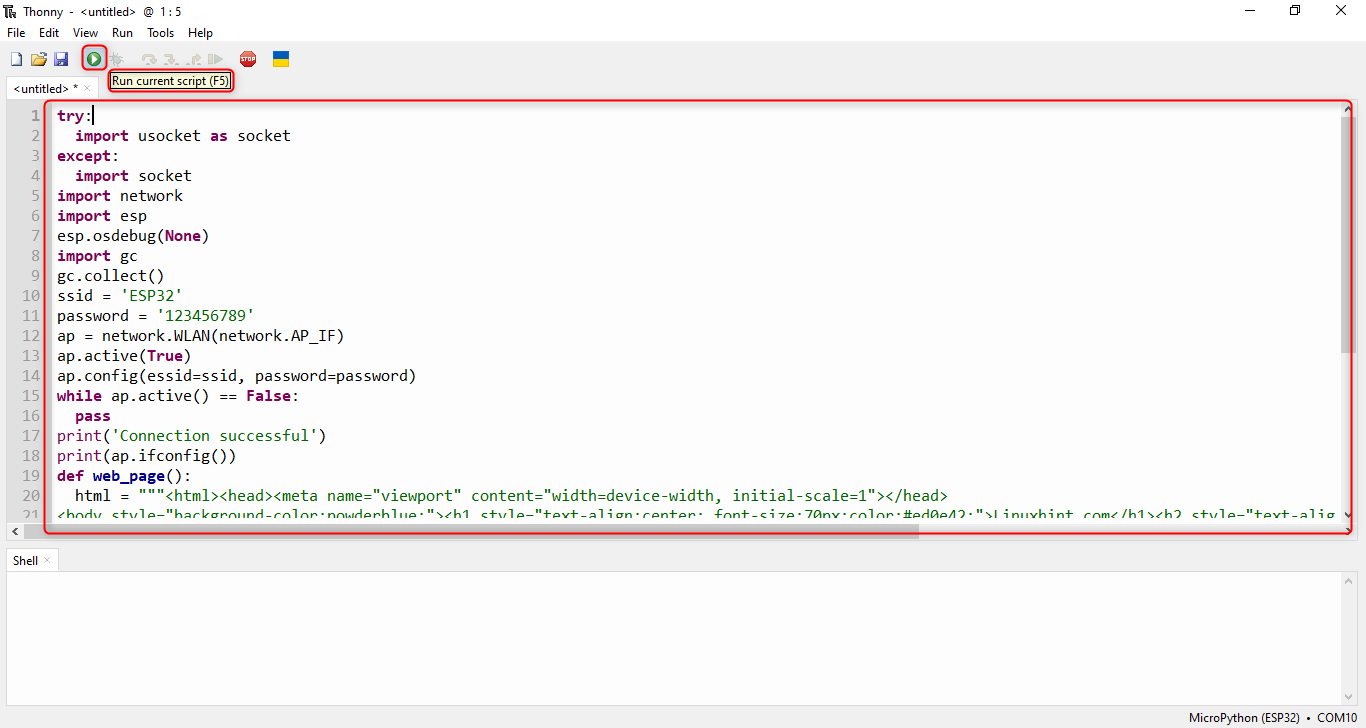
Now run the file saved in ESP32 by clicking the green play icon or pressing F5 key.
Output on Shell Terminal of Thonny IDE
Following output will appear once the code is successfully compiled. We can see the IP address (192.168.4.1) to access the web server. Now any WiFi device can connect to ESP32 hotspot or access point.
Here below output represents the 4 values. First, we can see the IP address to access the server, next it printed the netmask of ESP32 access point and after that gateway and DNS are also returned.
How to Connect Devices to ESP32 Access Point
ESP32 access point can be connected to any of the WiFi supported devices. Now we will connect the following devices with ESP32 WiFi (access point).
How to Connect ESP32 Access Point with Smartphone
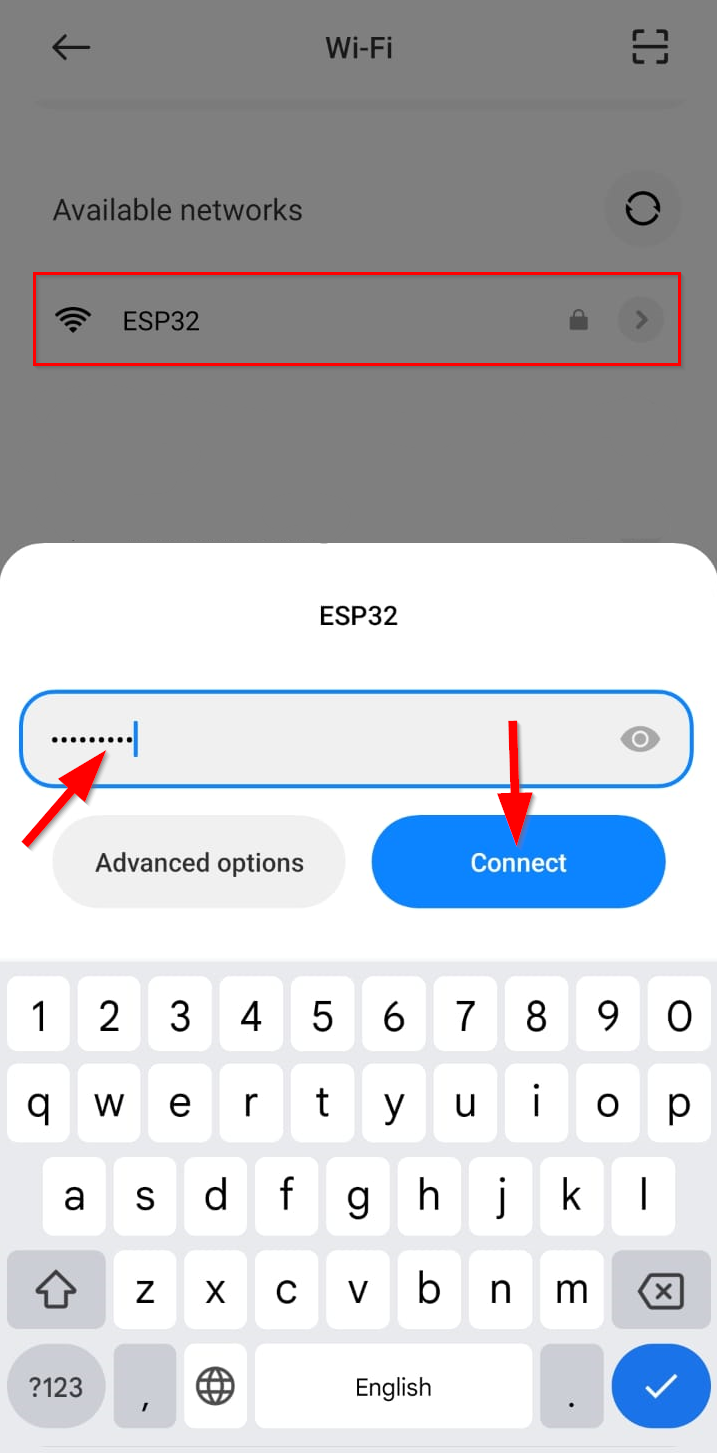
First, we will connect a Smartphone with an ESP32 access point. Go to the WiFi settings of the smartphone connect to ESP32 board by typing the password defined in code.
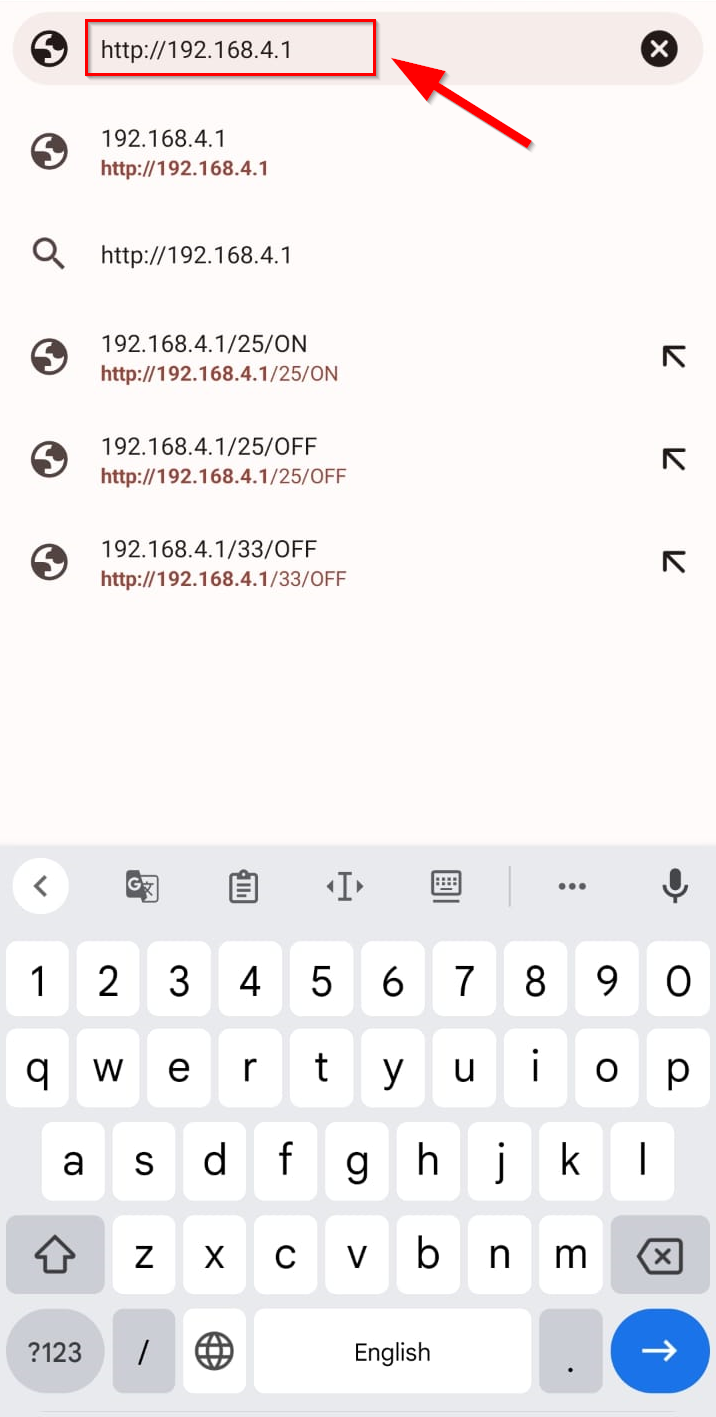
Once the ESP32 is connected, open the browser type ESP32 access point IP address (192.168.4.1) of ESP32 board and press Enter.
Following window will be shown on the web server after accessing the ESP32 access point.
How to Connect ESP32 Access Point with PC
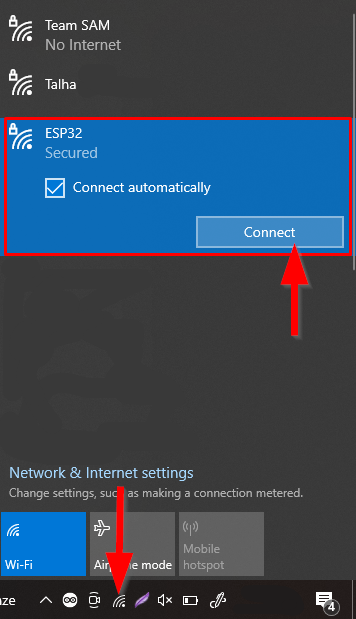
Just like we did in smartphones, the same procedure will be followed to connect the PC with ESP32 Access point. Open the WiFi setting using the task bar and click the ESP32 WiFi.
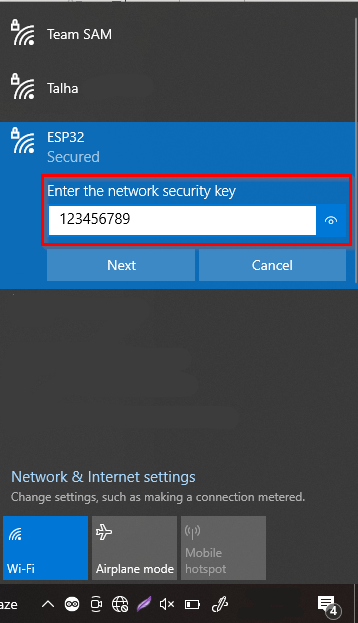
Now type the password for SSID defined in code and click next. The PC will connect itself to the ESP32 Access point.
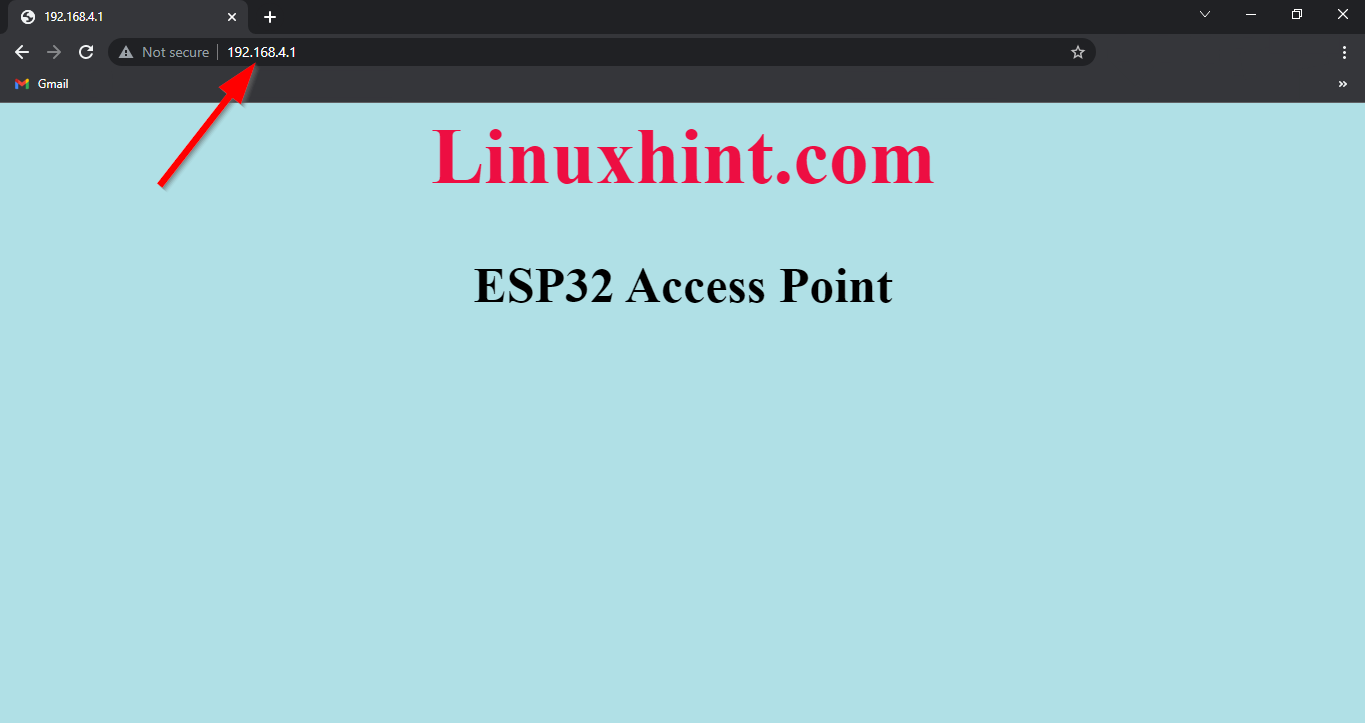
Now open the browser and type ESP32 IP address. Following tab will open showing us a similar interface like we did in smartphones.
We have successfully operated ESP32 in access mode using the MicroPython code.
Conclusion
ESP32 board WiFi operates in three different modes: station, access point or both. Here we have enabled ESP32 in access mode and connected different devices with it. We have written code for ESP32 in MicroPython. Using this article any one can connect ESP32 board in access point mode and operate it as a hotspot device.

