Logs allow you to collect information about the services and applications running on your system and save that log to a file for future use.
This tutorial will learn how to collect detailed information about the Apache Tomcat service by enabling the DEBUG mode.
NOTE: We do not cover the installation of Apache Tomcat in this tutorial. Check out our tutorials on the topic to learn more.
How to Enable Apache Tomcat Debug Logging in Linux
To enable debug logging for Apache Tomcat in Linux, edit the logging.properties file. The file is located in the conf directory under the root Apache Tomcat installation.
For example:
Locate the following entry:
Change the value from FINE to ALL.
The final entry should be.
Save the file and close. You will need to restart the Tomcat Service to enable the log levels.
If you do not want all the log messages from Tomcat, you can set various levels using the JULI log levels as:
- SEVERE – Serious Failure messages
- WARNING – Potential Errors
- INFO – Information logs
- FINE – Trace logs
- CONFIG – Static config logs
- FINEST – Highly detailed trace logs
- FINER – Detailed trace logs
- ALL – all messages (debug mode)
You can also enable logging for Apache Tomcat internals by changing the following values to all.
java.util.logging.ConsoleHandler.level=FINE
To:
java.util.logging.ConsoleHandler.level=ALL
How to Enable Apache Tomcat Debug Log in Windows
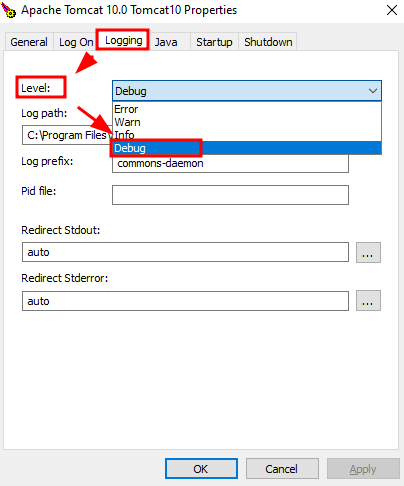
Suppose you are running Apache Tomcat on a Windows machine. You can use the provided configuration interface to manage the log levels.
Open the start menu and search for “Configure Tomcat.”
Launch the application and navigate to the logging tab. Select the Log level and set it to DEBUG.
Next, click on Apply and navigate to the General tab. Finally, click on Stop and then Start to restart the Apache service.
Conclusion
This tutorial showed you how to enable debug logging for the Apache Tomcat on Windows and Linux systems.
Thank you for reading.


