The grep command is a Linux command line utility used to find some string or file from a vast amount of data. It makes the searches based on regular expressions or strings. The grep filters the result based on the provided pattern and displays the whole line by which the provided pattern matches. The windows operating system also provides commands that are equivalent to the Linux command “grep”. In windows, the two command line applications i.e., CMD and PowerShell can perform the same operations as of grep on windows.
This blog will demonstrate various methods that are said to be the grep equivalent in windows.
Method 1: grep Equivalent Commands in Windows Command Prompt
Command Prompt in a Windows command line user interface is used to execute commands for administrative use. The “Findstr” and “Find” commands are said to be the grep equivalent in windows. Let’s discuss these commands one by one along with the examples:
Method 1.1: Findstr Command as Grep Equivalent
Findstr command is a Windows command used to find the file that contains/matches a specific string. Go through the below-listed examples to check out the basic use of the Findstr command.
Example 1: Use Findstr to Find Files Created on Specified Date
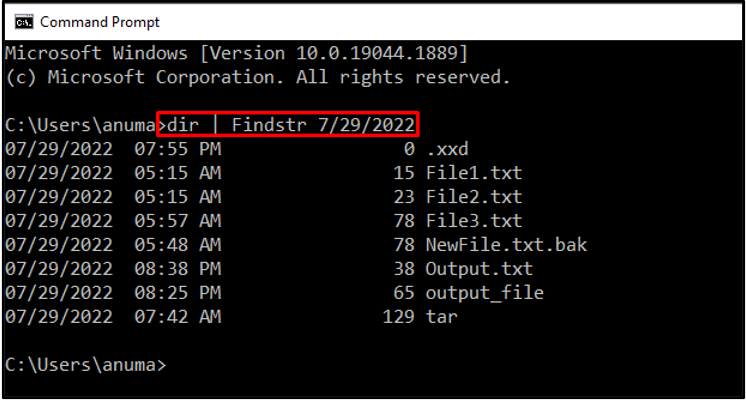
Files can be located using different patterns such as date, time, and file name. The following command will retrieve all those files that are updated on the date “7/29/2022”. To do so, the “dir” command is piped with the “Findstr” command by providing the date “7/29/2022”:
The list of files is printed that have the creation/updating date as mentioned in the command.
Example 2: Utilize the Findstr That Exactly Matches the String
To match the string or regular expression, you need to utilize the “/X” option with the “Findstr” command:
We have searched “Welcome” from all text files and no results found that match exactly to a provided string:
Example 3: Use Findstr for Case Sensitive Search
By default, if we do not specify any option, the “Findstr” command will do case sensitive search:
For a clearer understanding of the case-sensitive phenomenon, we have searched the “welcome” string inside all the “txt” files:
It is observed that no result is printed which shows that the case of the word does not match.
Example 4: Use Findstr for Case Insensitive Search
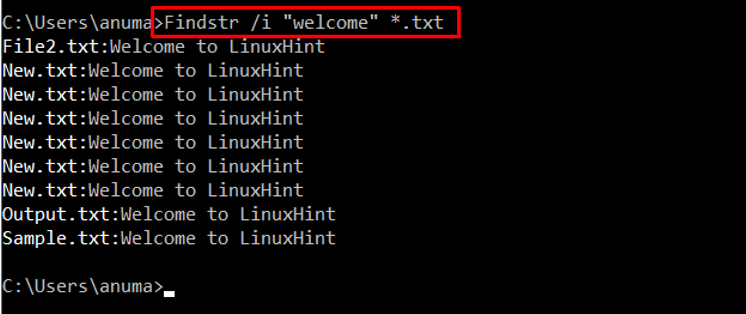
Utilize the “/i” option with the “Findstr” command for case insensitive search. The following command searches for the “welcome” string inside the “txt” files:
All the file lines of the text files are printed that contain the “welcome” keyword irrespective of the case.
Method 1.2: Use the Find Command as Grep Equivalent
Find command is a Windows command used to find files, directories, tasks as well as strings from files. To check out how to use the Find command in Command Prompt, follow the examples provided below.
Example 1: Utilize Find to Locate Specified String
The below-mentioned command will search for the “welcome” string in all the text files present in the current directory:
The respective text file names and their lines are printed on the window.
Example 2: Utilize Find to Locate Specific Tasks
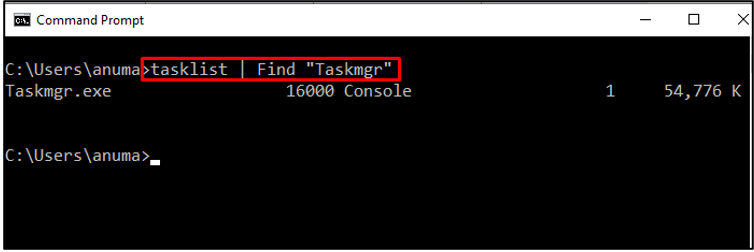
As we have discussed, the Find command is used to locate string, files, tasks, and directories. Let’s check out the use of the Find command to locate a specific task. The “tasklist” will access all the tasks and send them to the “Find” command using the pipe “|” operator. Then “Find” command will show the specified task on the screen:
Method 2: grep Equivalent Commands in Windows PowerShell
The Windows PowerShell is used as a scripting language or command line tool that manages administrative tasks and is also used to build and deploy solutions. In Windows PowerShell, the “Select-String” command is used as the equivalent to the grep command.
Check out the use of the “Select-String” command by utilizing the provided examples in Windows PowerShell.
Example 1: Utilize Select-String to Make a Case-Sensitive Search
The “Select-String” is used to find strings from files. Check out the below-provided command to understand the use of “Select-String”:
In the above command:
-
- The “Select-String” is used to search for a specific string.
- The “-Path” is utilized to define the file location.
- The “Pattern” defines the string for which we are making a search.
- At the end we have mentioned the option “-CaseSensitive” to make the search case-sensitive.
The line (from the text file “file.txt”) containing the word “Hello” is printed on the PowerShell console.
Example 2: Utilize Select-String to Locate String Not Matching to Specified String
Utilize “Select-String” to find out the text that is not matching with the specified string. For this purpose, we have mentioned the “-NotMatch” option at the end of the command:
As you can see, the above-provided command displayed all strings except “Hello” from the “File2.txt”:
It is observed that the line printed on the console does not contain the “Hello” word.
That’s it! You have come to know about the Grep equivalent commands in windows.
Conclusion
The grep command is used in Linux to locate files and strings from files. The “Findstr” and “Find” commands of Windows Command Prompt are equivalent to Linux grep command line utility. You can utilize the “Select-String” command as a grep command in Windows PowerShell. In this post, we have provided a list of examples that demonstrate the usage of the “Findstr”, “Find”, and “Select–String” commands that are used as Grep alternatives in Windows.


