The most fundamental building block of a Weaviate knowledge-based graph is a class. A class in Weaviate refers to a schema definition for various objects that wish to store in the database.
In this tutorial, we will learn how to work with the “Create Class” operation in Weaviate which allows us to initialize a new class for a given Knowledge graph.
Requirements:
To follow along with this post, ensure that you have the following:
- Weaviate instance. You can create a locally hosted Weaviate cluster using Docker or Kubernetes or get one that is hosted from the Weaviate cloud.
- Basic knowledge of working with HTTP requests, JSON, and API endpoints.
- Basic Python knowledge for interacting with the Weaviate cluster using the Python client.
Create a Class
We can use the API endpoint to create a new class in Weaviate to the /v1/schema. We can make a POST request to this endpoint with the class definition.
Class Parameters
When creating a class in Weaviate, we can specify the various parameters that describe the data that we wish to store. The following are the properties and their corresponding meaning:
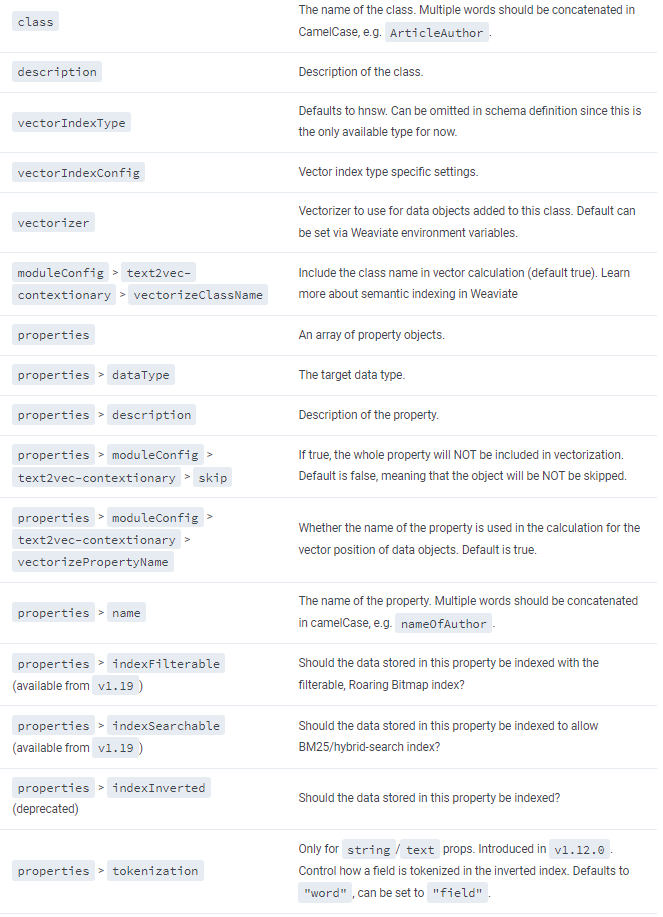
We need to specify each parameter in the request body which allows Weaviate to read the data and apply the specified configuration to the server.
Create a Class in Weaviate Using API
The following example demonstrates how to use the /v1/schema API endpoint to create a new class using a basic POST request:
-X POST \
-H "Content-Type: application/json" \
-d '{
"class": "DatabaseServer",
"description": "Information about a database server",
"properties": [
{
"dataType": [
"string"
],
"description": "Hostname of the database server",
"name": "hostname"
},
{
"dataType": [
"string"
],
"description": "IP address of the database server",
"name": "ipAddress"
},
{
"dataType": [
"string"
],
"description": "Type of the database, such as MySQL, PostgreSQL, MongoDB, etc.",
"name": "dbType"
},
{
"dataType": [
"int"
],
"description": "Port number of the database server",
"name": "portNumber"
}
]
}' \
http://localhost:8080/v1/schema
As you can see from the previous command, we use the cURL utility to make a POST request to the /v1/schema endpoint. We pass the request body in the request which defines the class structure as JSON.
In this case, the class parameters include the name, data type, and description.
NOTE: Attempt to create an existing class with result in an error as shown in the following output:

Create a Class in Weaviate Using the Python Client
As mentioned, Weaviate provides us with a Python client that allows to connect to the cluster and perform various operations.
To create the DatabaseServer class using Python, we can run the code as follows:
client = weaviate.Client("http://localhost:8080")
class_obj = {
"class": "DatabaseServer",
"description": "Information about a database server",
"properties": [
{
"dataType": [
"string"
],
"description": "Hostname of the database server",
"name": "hostname"
},
{
"dataType": [
"string"
],
"description": "IP address of the database server",
"name": "ipAddress"
},
{
"dataType": [
"string"
],
"description": "Type of the database, such as MySQL, PostgreSQL, MongoDB, etc.",
"name": "dbType"
},
{
"dataType": [
"int"
],
"description": "Port number of the database server",
"name": "portNumber"
}
]
}
client.schema.create_class(class_obj)
The previous code starts by importing the Weaviate package. We can use the weaviate.client to create a client object that allows us to connect to the target cluster. You can change the address to your target Weaviate address.
You can also specify all the properties during the class creation as demonstrated in the following:
client = weaviate.Client("http://localhost:8080")
class_obj = {
…
}
],
"shardingConfig": {
"virtualPerPhysical": 128,
"desiredCount": 1,
"desiredVirtualCount": 128,
"key": "_id",
"strategy": "hash",
"function": "murmur3"
},
"invertedIndexConfig": {
"stopwords": {
"preset": "en",
"additions": ["star", "nebula"],
"removals": ["a", "the"]
},
"indexTimestamps": True
},
"replicationConfig": {
"factor": 3
}
}
client.schema.create_class(class_obj)
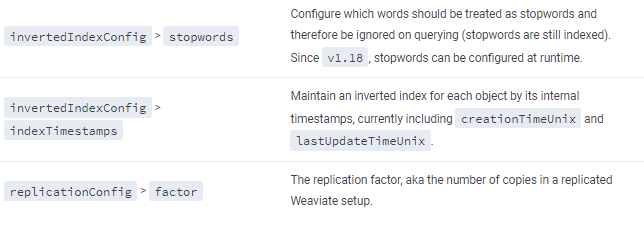
In this case, we specify the custom class parameters such as the replication factor, functions, strategies, etc. You can reference the class parameters in the previous sections to learn more.
Conclusion
We learned what a Weaviate class is, its role, how it works, and how we can use the provided Weaviate API and Python SDK to create a Weaviate class.