Synology NAS products are very capable of doing a lot of things. Virtualization is no exception. You can install the Virtual Machine Manager app on your Synology NAS and create virtual machines very easily. Other than that, you can install any Linux distributions on the virtual machines of your Synology NAS to create developer environments and work on your projects locally or remotely.
In this article, I am going to show you how to create an Ubuntu 20.04 LTS virtual machine on your Synology NAS and create a developer environment on the virtual machine where you can work on your projects locally or remotely using Visual Studio Code. So, let’s get started!
Things You Will Need:
To follow this article, you need to have:
- A Synology NAS with at least 8 GB or more memory installed.
- Virtual Machine Manager app installed on your Synology NAS.
- A computer or laptop to connect to the Web GUI of the Synology NAS.
- Internet connection on your Synology NAS and computer/laptop.
If you need any assistance on installing the Virtual Machine Manager app on your Synology NAS, then you may need to first read the article on How to Setup Virtualization on Synology NAS at LinuxHint.com.
Downloading Ubuntu 20.04 LTS ISO Image:
You can download the ISO image of Ubuntu 20.04 LTS from the official website of Ubuntu.
First, visit the official website of Ubuntu from your favorite web browser. Once the page loads, click on Download > 20.04 LTS from the Ubuntu Desktop section, as marked in the screenshot below.
NOTE: If your Synology NAS has only 4 GB of memory installed, and you don’t want to upgrade the memory or try out virtualization before you upgrade the memory, then download the Ubuntu Server 20.04 LTS ISO image instead. To download the Ubuntu Server 20.04 LTS ISO image, click on Download > Get Ubuntu Server from the Ubuntu Server section and follow the instructions.
Your browser should prompt you to save the Ubuntu 20.04 LTS ISO image. Select a directory where you want to save the Ubuntu 20.04 LTS ISO image and click on Save.
Your browser should start downloading the Ubuntu 20.04 LTS ISO image, as you can see in the screenshot below. It may take a while to complete.
Creating an Ubuntu 20.04 LTS Virtual Machine:
Once the Ubuntu 20.04 LTS ISO image is downloaded, you can create a virtual machine on your Synology NAS and install Ubuntu 20.04 LTS on it using the ISO image.
To create an Ubuntu 20.04 LTS virtual machine, open the Virtual Machine Manager app on your Synology Web GUI.
Virtual Machine Manager app is opened.
From the Image section of the Virtual Machine Manager app, click on Add, as marked in the screenshot below.
Click on From computer, as marked in the screenshot below.
Select the Ubuntu 20.04 LTS ISO image that you’ve just downloaded and click on Open.
The Ubuntu 20.04 LTS ISO image should be selected. Now, click on Next.
Select the volume where you want to store the ISO image and click on Apply.
The Ubuntu 20.04 LTS ISO image is being uploaded to the Synology NAS, as you can see in the screenshot below. It may take a while to complete.
At this point, the Ubuntu 20.04 LTS ISO image should be uploaded to the NAS.
Now, to create a virtual machine, go to the Virtual Machine section and click on Create, as marked in the screenshot below.
Select Linux and click on Next.
Select the volume where you want to store the virtual machine data and click on Next.
Type in a name for the virtual machine, select the number of CPU cores you want to assign to it and select the amount of memory you want to allocate to the virtual machine.
I will call the virtual machine s01, then assign 2 CPU cores and allocate 8 GB of memory to it.
NOTE: If your Synology NAS has 8 GB of memory installed, then you won’t be able to allocate 8 GB of memory to the virtual machine. In that case, allocate 4, 5, or 6 GB of memory to the virtual machine, and it will still work. But, if your Synology NAS has 4 GB of memory installed, and you don’t want to upgrade the memory or try out virtualization before you upgrade the memory, then, use Ubuntu Server 20.04 LTS ISO image instead and allocate 2 GB of memory to the virtual machine.
Once you’re done, click on Next.
Type in the amount of disk space you want to allocate to the virtual machine.
I will allocate 100 GB of disk space to it.
Once you’re done, click on Next.
Click on Next.
Now, you have to select the Ubuntu 20.04 LTS ISO image as an ISO file for bootup.
Select the Ubuntu 20.04 LTS ISO image from the ISO file for bootup dropdown menu, as marked in the screenshot below.
Once you’re done, click on Next, as marked in the screenshot below.
Select the users you want to allow access to the virtual machine and click on Next.
The settings that will be used to create the virtual machine should be displayed. To create a virtual machine with those settings, click on Apply.
Once the virtual machine s01 is created, select it and click on Power on, as marked in the screenshot below.
The virtual machine s01 should be Running. Once it is running, click on Connect, as marked in the screenshot below.
A new browser tab should be opened with the display of the virtual machine s01, as you can see in the screenshot below.
The Ubuntu 20.04 LTS installer should be loaded by the time you connect to the virtual machine. You can install Ubuntu 20.04 LTS on the virtual machine from here.
To install Ubuntu 20.04 LTS on the virtual machine s01, click on Install Ubuntu.
Select your keyboard layout and click on Continue.
As you will be setting up an Ubuntu development environment on the virtual machine s01, you probably don’t need any office software, games, or media players. So, the Minimal installation method may be the right thing to do here.
Of course, you can always go for the Normal installation method if needed. It’s all up to your preference.
Once you’re done selecting an installation method, click on Continue.
As I am installing Ubuntu 20.04 LTS on a virtual machine, I won’t manually partition the hard drive of the virtual machine s01. I will use automatic partitioning, just to make things a little easier.
So, select Erase disk and install Ubuntu and click on Install Now, as marked in the screenshot below.
The Ubuntu 20.04 LTS installer will automatically create all the required partitions, and it will ask you whether you would like to save the changes to the disk. Click on Continue.
Select your time zone and click on Continue.
Type in your personal information and click on Continue.
Ubuntu 20.04 LTS is being installed on the s01 virtual machine. It may take a while to complete.
Ubuntu 20.04 LTS is being installed on the virtual machine.
Once Ubuntu 20.04 LTS is installed, click on Restart Now.
Press <Enter> to boot Ubuntu 20.04 LTS from the hard drive of the virtual machine s01.
As you can see, Ubuntu 20.04 LTS booted from the hard drive of the virtual machine s01.
Now, you can log in to your Ubuntu 20.04 LTS virtual machine with the username and password you’ve set during the installation.
Once you log in, you should see the Ubuntu 20.04 LTS desktop environment, as shown in the screenshot below.
Now, you should install QEMU Guest Agent on the Ubuntu 20.04 LTS virtual machine. It will report usage information (network, disk, memory, CPU, etc.) to the Virtual Machine Manager app of your Synology NAS.
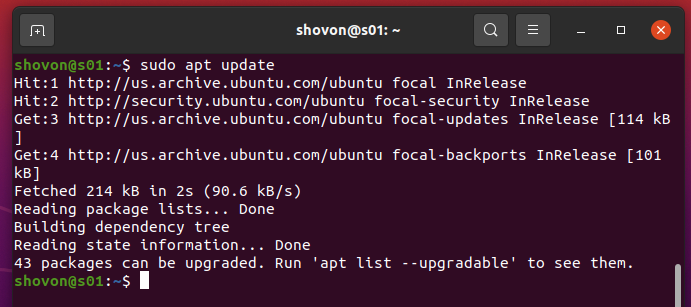
Press <Ctrl> + <Alt> + T to open a Terminal on your Ubuntu 20.04 LTS virtual machine, and to update the APT package repository cache, run the following command:
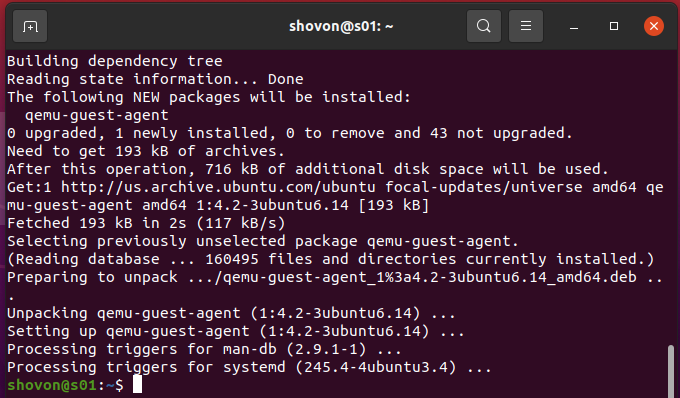
To install QEMU Guest Agent on your Ubuntu 20.04 LTS virtual machine, run the following command:
QEMU Guest Agent should be installed.
Now, to power off the Ubuntu 20.04 LTS virtual machine, run the following command:
Now, you should remove the Ubuntu 20.04 LTS ISO image from the virtual machine s01.
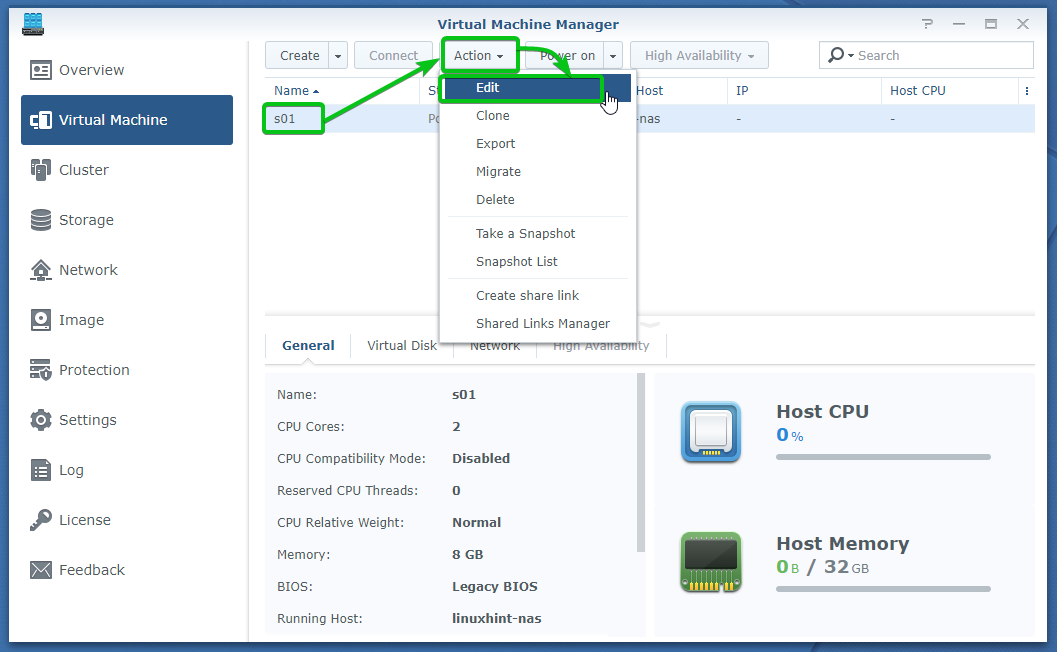
Make sure that the virtual machine s01 is powered off. Then, select the virtual machine s01 and click on Action > Edit, as marked in the screenshot below.
The settings window of the virtual machine s01 should be opened.
Navigate to the Others tab of the settings window of the virtual machine.
As you can see, the virtual machine s01 has the Ubuntu 20.04 LTS ISO image selected as an ISO file for bootup.
Select Unmounted from the ISO file for bootup dropdown menu, as marked in the screenshot below.
Once you’ve selected Unmounted from the ISO file for bootup dropdown menu, click on OK.
The Ubuntu 20.04 LTS ISO image should be removed from the virtual machine s01.
Now, select the s01 virtual machine and click on Power on.
Once the virtual machine s01 is Running, select it and click on Connect.
You should be connected to the display of the virtual machine s01, as shown in the screenshot below.
Changing Display Resolution of the Virtual Machine:
By default, the display resolution of the virtual machine will be 800×600 pixels. You will most likely have a bigger monitor than this. So, you will probably want to change the display resolution to match it.
To change the display resolution of the Ubuntu 20.04 LTS virtual machine, right-click (RMB) on the desktop of the virtual machine and click on Display Settings, as marked in the screenshot below.
As you can see, the display resolution is set to 800×600 pixels.
To change the display resolution, click on the Resolution dropdown menu, as marked in the screenshot below.
All the supported screen resolution of the virtual machine should be displayed, as shown in the screenshot below. Depending on the display resolution of your monitor, select the correct display resolution from the list.
Once you’ve selected a display resolution, click on Apply.
To confirm the changes, click on Keep Changes.
The display resolution of the virtual machine should be changed.
Once you’ve set the correct display resolution, you should disable scaling for the display of the virtual machine.
To do that, click on the settings toggle button, as marked on the screenshot below.
You should see the display settings panel.
Click on the gear icon, as marked in the screenshot below.
As you can see, the Scaling Mode is set to Local Scaling. It means scaling is turned on.
To disable scaling, set Scaling Mode to None, as marked in the screenshot below.
Scaling should be disabled for the display of the virtual machine.
You can also full-screen the display of the virtual machine so that it spans the entire display of your monitor. It will make working with the Ubuntu 20.04 LTS development environment you’re setting up on the virtual machine easier.
To full-screen the display of the virtual machine, click on the full-screen icon () from the display settings of the virtual machine, as marked in the screenshot below.
The display of the virtual machine should use up the entire display of your monitor, as shown in the screenshot below.
NOTE: I am using a 1080p monitor. So, I have set the display resolution of Ubuntu 20.04 LTS to 1920×1080 pixels after I have full-screened the display of the virtual machine.
Once you’ve full-screened the display of the virtual machine, click on the display settings toggle button, as marked in the screenshot below to hide the display settings.
Your virtual machine should be ready for developing amazing apps and websites.
If you want to exit the full-screen display, press <Esc>.
You can also click on the full-screen icon while you’re in full-screen mode to exit the full-screen display of the virtual machine.
Local Development Setup on the Virtual Machine:
Ubuntu 20.04 LTS has many editors, IDEs, compilers, programming languages, databases, and other apps in the snap store, and the official package repository for different development purposes. This will save you a lot of time and labor that you would need in order to install things on your Ubuntu 20.04 LTS virtual machine.
You can search for your development tools on the snap store from the command-line.
For example, let’s say, you want to search for the available JetBrains IDEs in the snap store. To do that, you can search the snap store with the keyword jetbrains as follows:
As you can see, all the JetBrains IDEs are listed.
In the same way, you can search for Visual Studio Code text editor as follows:
As shown below, the Visual Studio Code text editor snap package name is code.
To install Visual Studio Code from the snap store, run the following command:
As you can see, Visual Studio Code is being installed from the snap store. It may take a while to complete.
Visual Studio Code is being installed from the snap store.
At this point, Visual Studio Code should be installed, as shown in the screenshot below.
Once Visual Studio Code is installed, you should find it in the Application Menu of Ubuntu 20.04 LTS, as you can see in the screenshot below.
Many development tools will not be available in the snap store, but they may be available in the official package repository of Ubuntu 20.04 LTS.
Before you try to search for any development tools or install them on your virtual machine, it’s a good idea to update the APT package repository cache of Ubuntu 20.04 LTS first.
To update the APT package repository cache, run the following command:
Once the APT package repository cache is updated, you can search for your desired packages in the official package repository of Ubuntu 20.04 LTS.
For example, you can search for the CodeBlocks C/C++ IDE with the following command:
As you can see, the CodeBlocks C/C++ IDE is available in the official package repository of Ubuntu 20.04 LTS.
To install CodeBlocks C/C++ IDE from the official package repository of Ubuntu 20.04 LTS, run the following command:
To confirm the installation, press Y and then press <Enter>.
CodeBlocks C/C++ IDE is being installed on your Ubuntu 20.04 LTS virtual machine. It may take a while to complete.
At this point, the CodeBlocks C/C++ IDE should be installed.
Once CodeBlocks C/C++ IDE is installed, you can find it in the Application Menu of your Ubuntu 20.04 LTS virtual machine, as shown in the screenshot below.
If you don’t like to use the command-line that much, you can use the Ubuntu Software app to download your required development tools from the official package repository of Ubuntu 20.04 LTS, as well as the snap store.
You can find the Ubuntu Software app in the Application Menu of Ubuntu 20.04 LTS, as shown in the screenshot below. Click on the Ubuntu Software app icon to start it.
Ubuntu Software app should be opened.
The packages and apps are categorized nicely in the Ubuntu Software app, as shown in the screenshot below. You can click on any of the Categories listed in the Ubuntu Software app to see what is available in that category.
To see which apps or packages are available in the Development category, click on Development from the Categories section, as marked in the screenshot below.
All the apps and packages in the Development category should be listed.
Android Studio, Atom, PyCharm, WebStorm, PhpStorm, Brackets, and other popular text editors and IDEs are available.
You can also search for a package in the official package repository of Ubuntu 20.04 LTS and the snap store using the Ubuntu Software app.
To search for a package, click on the search icon, as marked in the screenshot below.
Type in your search keywords.
The packages or apps that matched the search keywords should be displayed, as shown in the screenshot below.
To learn more about a package or app (let’s say, PyCharm CE), click on it.
A lot of information about the selected package (in this case, PyCharm CE) should be displayed, as shown in the screenshot below.
If you do like the package (in this case, PyCharm CE), click on Install to install it on your virtual machine.
Type in your login password and click on Authenticate.
As you can see, the app (PyCharm CE) I have selected is being installed. It may take a while to complete.
At this point, the app (PyCharm CE) should be installed.
Once the app (in this case, PyCharm CE) is installed, you should find it in the Application Menu of Ubuntu 20.04 LTS, as shown in the screenshot below.
Once you’ve installed the necessary apps, you may want to organize the apps on the Dock of Ubuntu 20.04 LTS desktop to make the opening and closing of the apps easier.
To remove an app from the Dock, right-click (RMB) on it and click on Remote from Favorites, as marked in the screenshot below.
The app should be removed from the Dock, as shown in the screenshot below.
Let’s remove the Ubuntu Software app from the Dock as well.
To add a new app to the Dock, right-click on the app from the Application Menu of Ubuntu 20.04 LTS and click on Add to Favorites, as marked in the screenshot below.
As you can see, the Visual Studio Code app is added to the Dock.
In the same way, you can add the Terminal app to the Dock.
As you can see, the Terminal app is added to the Dock.
Once you’ve installed the necessary apps and configured the Ubuntu 20.04 LTS desktop environment, depending on your need, you can start writing codes on your Ubuntu 20.04 LTS virtual machine.
To keep all the projects, you will create organized. It’s a good idea to create a dedicated directory for your projects and keep them there. I usually create a Projects/ directory in my HOME directory and keep each of the projects in their own dedicated directories.
Let’s do that in this part!
To create a new directory, open the Nautilus app, right-click (RMB) on an empty location, and click on New Folder, as marked in the screenshot below.
Type in Projects as the directory name and click on Create.
A new directory Projects/ should be created, as shown in the screenshot below.
I will create a simple C++ project just to show you how to develop a program on your Ubuntu 20.04 LTS virtual machine. To keep the project files organized, create a new directory cpp-helloworld/ inside the Projects/ directory in the same way as before.
Now, open a Terminal and install the C/C++ compilers with the following command:
To confirm the installation, press Y and then press <Enter>.
All the required packages are being downloaded from the internet. It may take a while to complete.
Once the download is complete, the packages will be installed on the virtual machine. It may take a few seconds to complete.
At this point, the C/C++ compilers and all the required packages should be downloaded.
Now, open Visual Studio Code from the Dock or the Application Menu of Ubuntu 20.04 LTS.
Click on File > Open Folder…, as marked in the screenshot below.
Select the cpp-helloworld/ project directory and click on OK, as marked in the screenshot below.
The cpp-helloworld/ project directory should be opened in the Visual Studio Code app.
Right-click (RMB) on the project file explorer section of the Visual Studio Code app and click on New File, as marked in the screenshot below.
Type in main.cpp as the filename and press <Enter>.
A new file main.cpp should be created in the project directory.
Visual Studio Code should also recommend you the required extensions for the programming language and the tools you will be using for this project. Click on Install, as marked in the screenshot below.
As we will be using the C++ programming language in this project, Visual Studio Code is installing the C/C++ extension and all the required files to help you with IntelliSense, debugging, and other goodies.
At this point, all the required extensions should be installed.
Now, you can close the Extensions tab and go back to the main.cpp file.
As you can see, when I start writing codes, Visual Studio Code helps me with code IntelliSense.
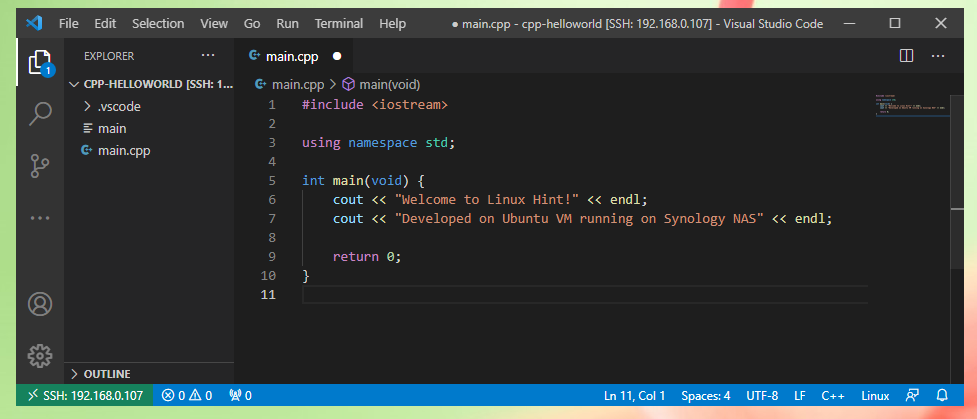
I have written a simple C++ program, as shown in the screenshot below.
Once you’re done writing the program, press <Ctrl> + S to save it.
You can compile the program manually or use the predefined build presets of Visual Studio Code. I will show you how to do both.
To use the build presets of Visual Studio Code to compile your C++ program, click on Terminal > Run Build Task…, as marked in the screenshot below.
Click on C/C++: g++ build active file from the list, as marked in the screenshot below.
As you can see, the C++ program main.cpp is compiled and a new file main is created.
To compile the main.cpp file manually, click on Terminal > New Terminal to open a terminal inside Visual Studio Code.
A new terminal should be opened, as shown in the screenshot below.
To compile the main.cpp C++ program and store the compiled program in the file main, run the following command:
Once the program is compiled, you can run the compiled program main as follows:
As you can see, the correct output is printed on the terminal.
Finding the IP Address of the Virtual Machine:
You may need to access your virtual machine from other devices on your home network. For example, you may develop websites, web apps, or other networking tools on the virtual machine and access them from other devices on your home network. To do that, you need to know the IP address of your virtual machine.
You can find the IP address of your virtual machine from the Terminal with the following command:
If you’ve installed QEMU Guest Agent on the virtual machine, you should find the IP address of the virtual machine from the Virtual Machine section of the Virtual Machine Manager app, as shown in the screenshot below.
Remote Development Setup using Visual Studio Code:
Visual Studio Code natively supports remote development. You can have it installed on a computer (Windows/Linux/macOS) and connect to the Ubuntu 20.04 LTS virtual machine running on your Synology NAS via SSH and do development there. Your computer and the Synology NAS must be in the same network for this to work.
For Visual Studio Code remote development to work, you need to have the OpenSSH server installed on the Ubuntu 20.04 LTS virtual machine.
First, update the APT package repository cache with the following command:
To install the OpenSSH server on the virtual machine, run the following command:
To confirm the installation, press Y and then press <Enter>.
OpenSSH server is being installed. It may take a few seconds to complete.
At this point, the OpenSSH server should be installed.
As you can see, the OpenSSH server is running, and it’s also enabled to start automatically on system boot.
Now, the virtual machine is ready for remote connections via SSH.
At this point, start the Visual Studio Code editor on your computer. I am using Visual Studio Code on my Windows 10 computer.
Now, you need to install the Remote Development extension on Visual Studio Code for doing remote development.
To do that, click on the Extensions icon, search for the remote development extension, and click on Remote Development, as marked in the screenshot below.
Click on Install.
The Remote Development extension is being installed. It may take a few seconds to complete.
Once the Remote Development extension is installed, you should see the following icon () at the bottom-left side of the bottom panel of Visual Studio Code, as marked in the screenshot below.
To add the Ubuntu 20.04 LTS virtual machine running on your Synology NAS to Visual Studio Code for remote development, click on the remote development icon .
Click on Remote-SSH: Connect Current Window to Host…, as marked in the screenshot below.
Click on Add New SSH Host…, as marked in the screenshot below.
Type in the SSH connection command ssh [email protected] and press <Enter>.
Here, shovon is the username, and 192.168.0.107 is the IP address of the Ubuntu 20.04 LTS virtual machine s01 running on my Synology NAS. The username and the IP address will be different for you. So, make sure to replace them with yours.
Click on one of the SSH configuration files from the list.
The Ubuntu 20.04 LTS virtual machine s01 running on the Synology NAS should be added to the SSH configuration file, as shown in the screenshot below.
Now, click on the remote development icon and click on Remote-SSH: Connect Current Window to Host…, as marked in the screenshot below.
Click on the IP address of your Ubuntu 20.04 LTS virtual machine running on your Synology NAS.
Click on Allow access to allow Visual Studio Code to access the network.
Click on Linux.
Click on Continue.
Type in the login password of the virtual machine and press <Enter>.
Visual Studio Code will download all the required files on the Ubuntu 20.04 LTS virtual machine to configure remote development on the virtual machine. It may take a while to complete.
Once the required files are downloaded, you should see the following message, as marked in the screenshot below.
It means Visual Studio Code is ready for remote development.
To open the project you were working on, click on File > Open Folder…, as marked in the screenshot below.
As you can see, the files and directories of the Ubuntu 20.04 LTS virtual machine are displayed.
Click on the Projects/ directory as follows.
As you can see, the cpp-helloworld/ project directory is here. Click on the cpp-helloworld/ project directory.
Now, click on OK to open the project directory with Visual Studio Code.
You may be asked to type in your login password. So, type in your login password and press <Enter>.
The project directory cpp-helloworld/ should be opened with Visual Studio Code, as shown in the screenshot below.
Open the main.cpp file.
Visual Studio Code should recommend you the required extensions for the programming language and the tools you will be using for this project. Click on Install, as marked in the screenshot below.
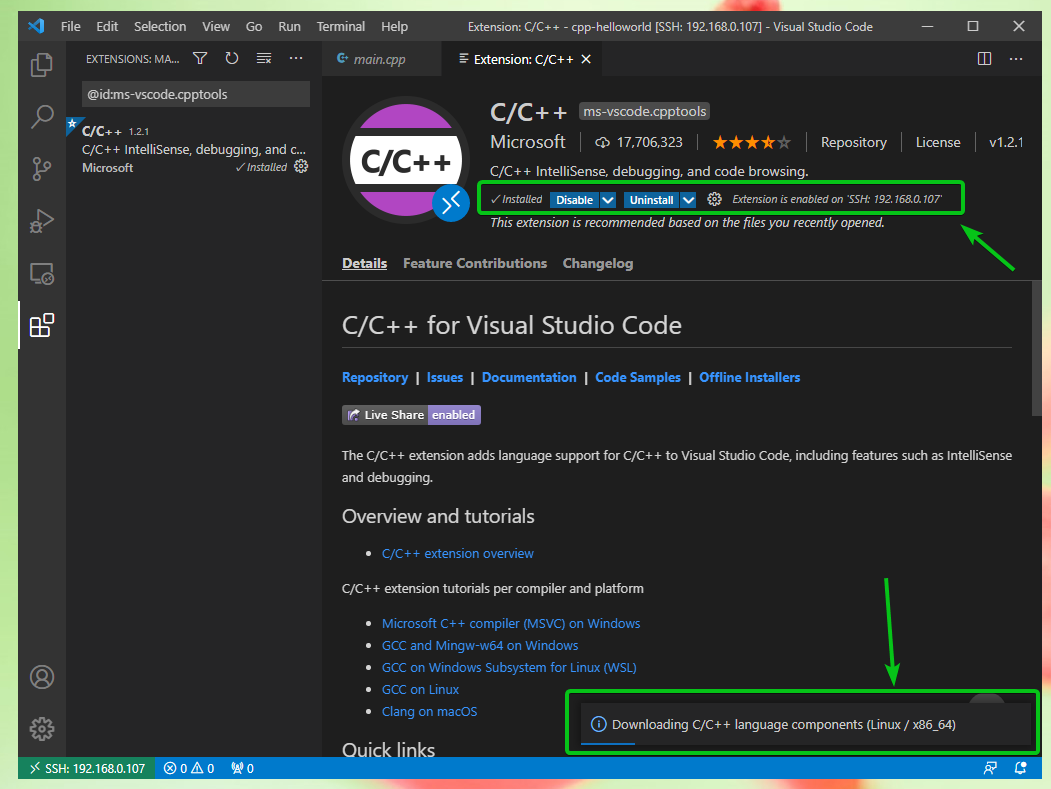
As we will be using the C++ programming language in this project, Visual Studio Code is installing the C/C++ extension and all the required files to help you with IntelliSense, debugging, and other goodies.
Once the required extensions are installed.
You can now close the Extensions tab and go back to the main.cpp file.
As you can see, IntelliSense is working on remote development projects.
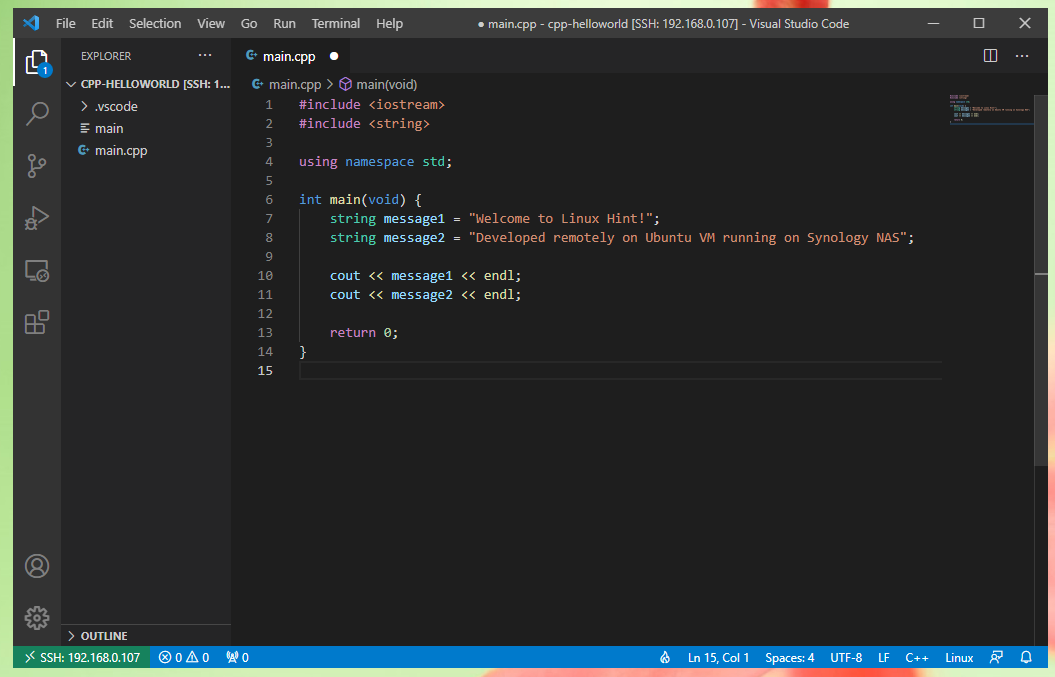
I have slightly modified the main.cpp program, as shown in the screenshot below.
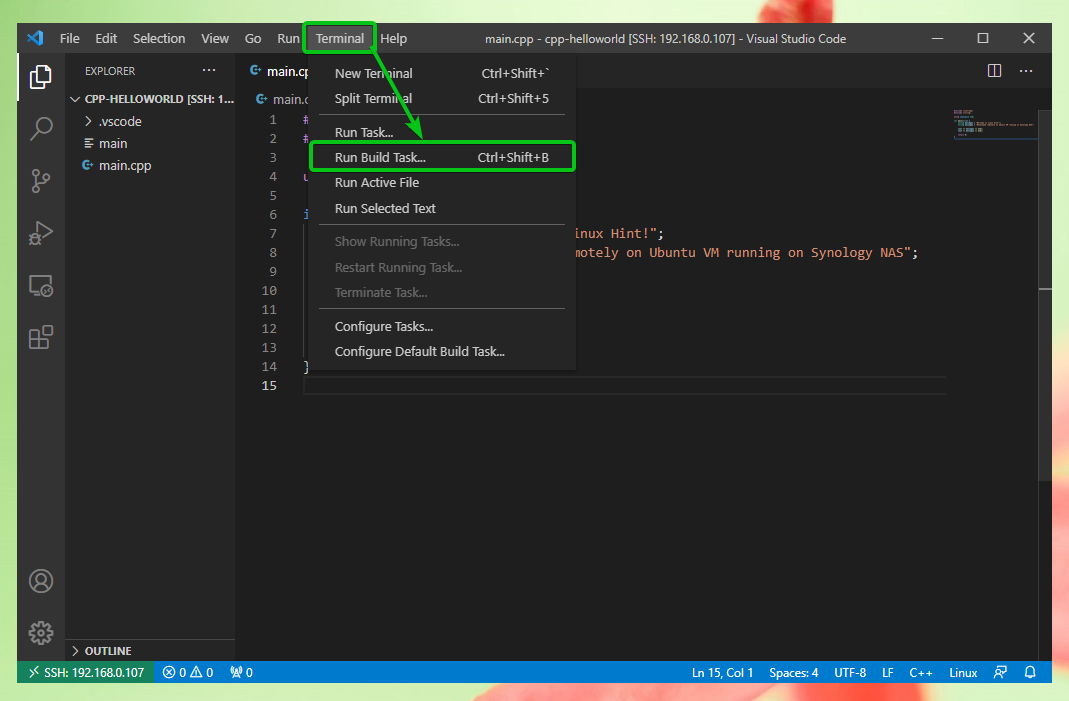
To compile the main.cpp program, click on Terminal > Run Build Task…, as marked in the screenshot below.
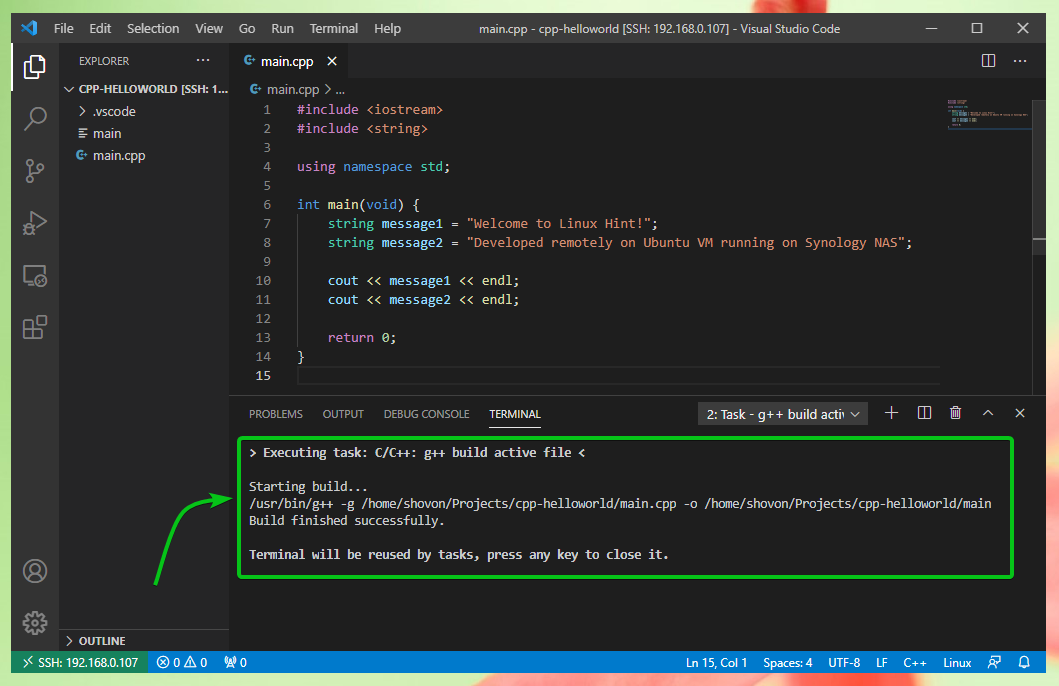
Click on C/C++: g++ build active file from the list, as marked in the screenshot below.
As you can see, the C++ program main.cpp is compiled, and the compiled file main is overwritten by the new one.
Now, click on Terminal > New Terminal, as marked in the screenshot below, to open a terminal inside Visual Studio Code.
A new terminal should be opened, as shown in the screenshot below.
Now, you can run the compiled program main from the terminal as follows:
As you can see, the correct output is printed on the terminal.
Conclusion
In this article, I have shown you how to use the Virtual Machine Manager (VMM) app of your Synology NAS to create a Linux developer environment and do local and remote development in the virtual machine. I have also shown you how to do it using Ubuntu 20.04 LTS operating system and Visual Studio Code programming editor. But remember that you can do the same with a different Linux operating system and different editors or IDEs. Synology NAS can be a great developer tool just as it is a great NAS product.


