With the help of Ultralytics Yolov8, advances in computer vision have significantly changed how we perceive, evaluate, and comprehend the visual environment. It opens up hitherto unimaginable opportunities in a variety of disciplines.
There have been significant advancements in architecture, precision, and speed. No necessary modules (such as the model architecture) from YOLOv5 have been used to implement Ultralytics’ YOLOv8 from scratch. It boasts a new high in Mean Average Precision (MAP) with a score of 53.7 and is faster and more accurate than its previous version (YOLOv7).
Yes, the Ultralytics team created and actively maintains YOLOv8 as an open-source state-of-the-art (SOTA) model. It is released under the GNU (General Public License), granting the users the freedom to share, modify, and distribute the software as needed. The YOLOv8 community is dynamic and continually expanding.
The Ultralytics team is responsible for developing and actively maintaining YOLOv8. The YOLO series of models originally originated from the work of computer scientist Joseph Redmon, who iterated through three versions, with the third being YOLOv3, all implemented using the Darknet architecture. Glenn Jocher then adapted YOLOv3 into PyTorch with some minor adjustments, giving rise to YOLOv5. YOLOv8, in turn, evolved from modifications that are made to the YOLOv5 architecture.
In this article, we will train the Ultralytics Yolov8 model with custom data. We have to follow the following mentioned steps to train our ULtralytics Yolov8 model.
- Module Installation and Configuration
- Utilizing the Pretrained Models for Object Detection
- Custom Data Training for YOLOv8
- YOLOv8 Inference with Custom Weights
We are going to explain all those four steps one-by-one in detail.
Module Installation and Configuration
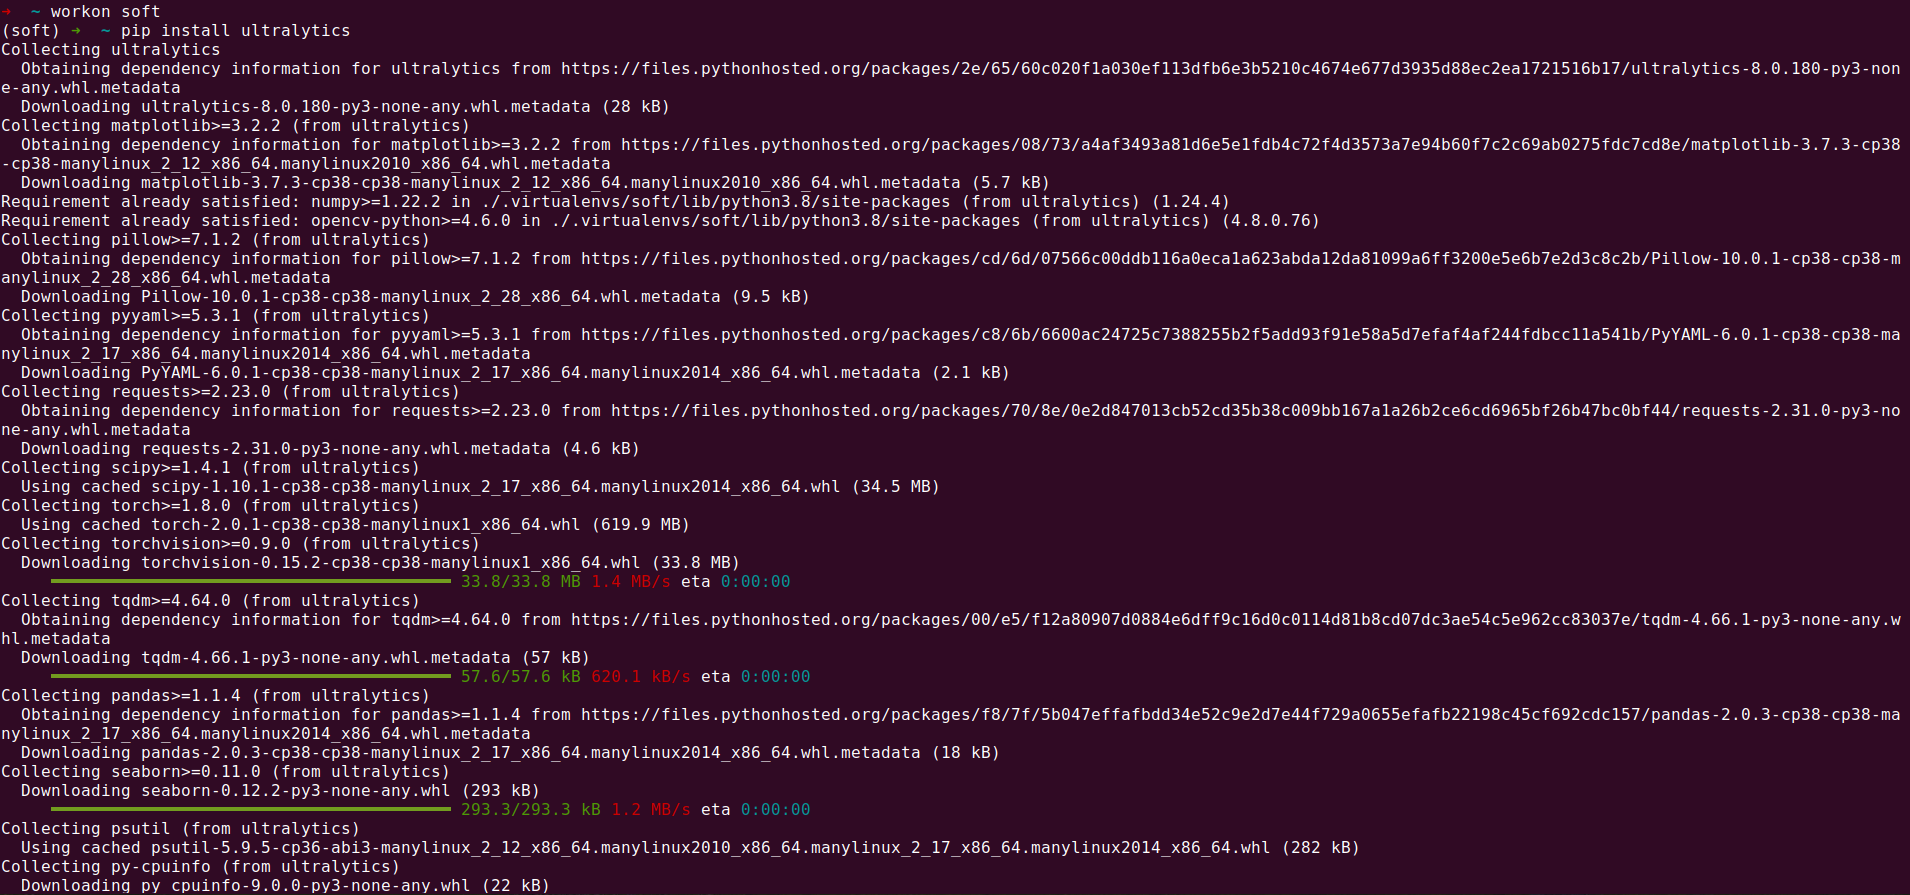
The package name for the YOLOv8 is Ultralytics. To install this, follow the provided command. There are two commands that are mentioned here: one for the specific version if you want to install according to your project requirements, and another for the always-latest version to install.
or
# for the latest version
pip install ultralytics
The previous command installs all the requirements for the YOLOv8 model. Be sure that you have the Python version 3.7.0 or higher.
Note: In the previous screenshot, you can see a virtual environment named “soft”. We installed the “ultralytics package” inside of that. Always use the virtual environment so that different project versions will not conflict. But it’s optional, and you can install it directly into the system.
If the previous package is already installed, you can update it using the following command:
Utilizing the Pretrained Models for Object Detection
Now, we install all the required packages for the YOLOv8. We test the pre-trained YOLOv8 with images and videos with the following command:
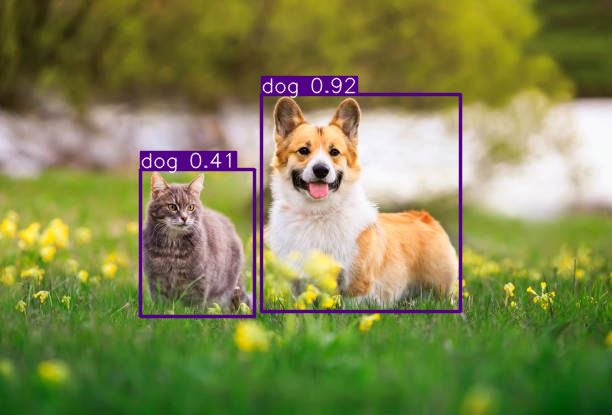
As we know, YOLOv8 also has different versions as shown in the following image:
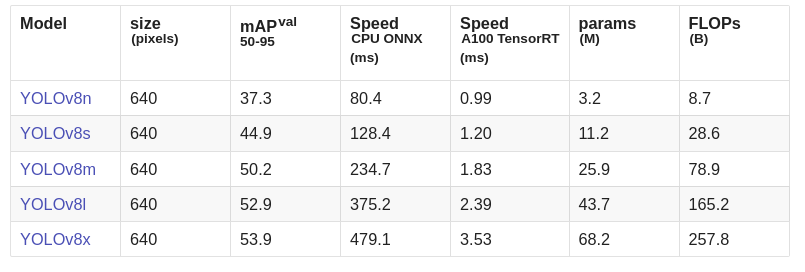
We are going to use the YOLOv8 Nano model for this pre-trained test on both images and videos.
Option 1: Using CLI (Command Line Interface)
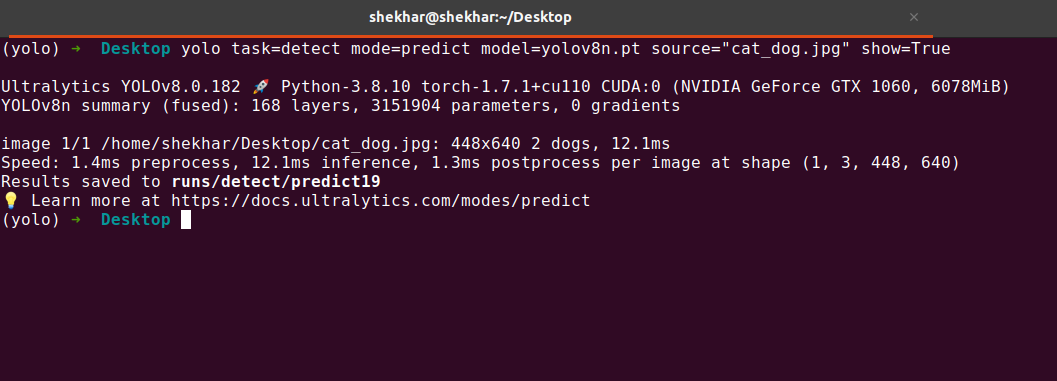
yolo task=detect mode=predict model=yolov8n.pt source="path/of/the/test/image" show=True
#for video
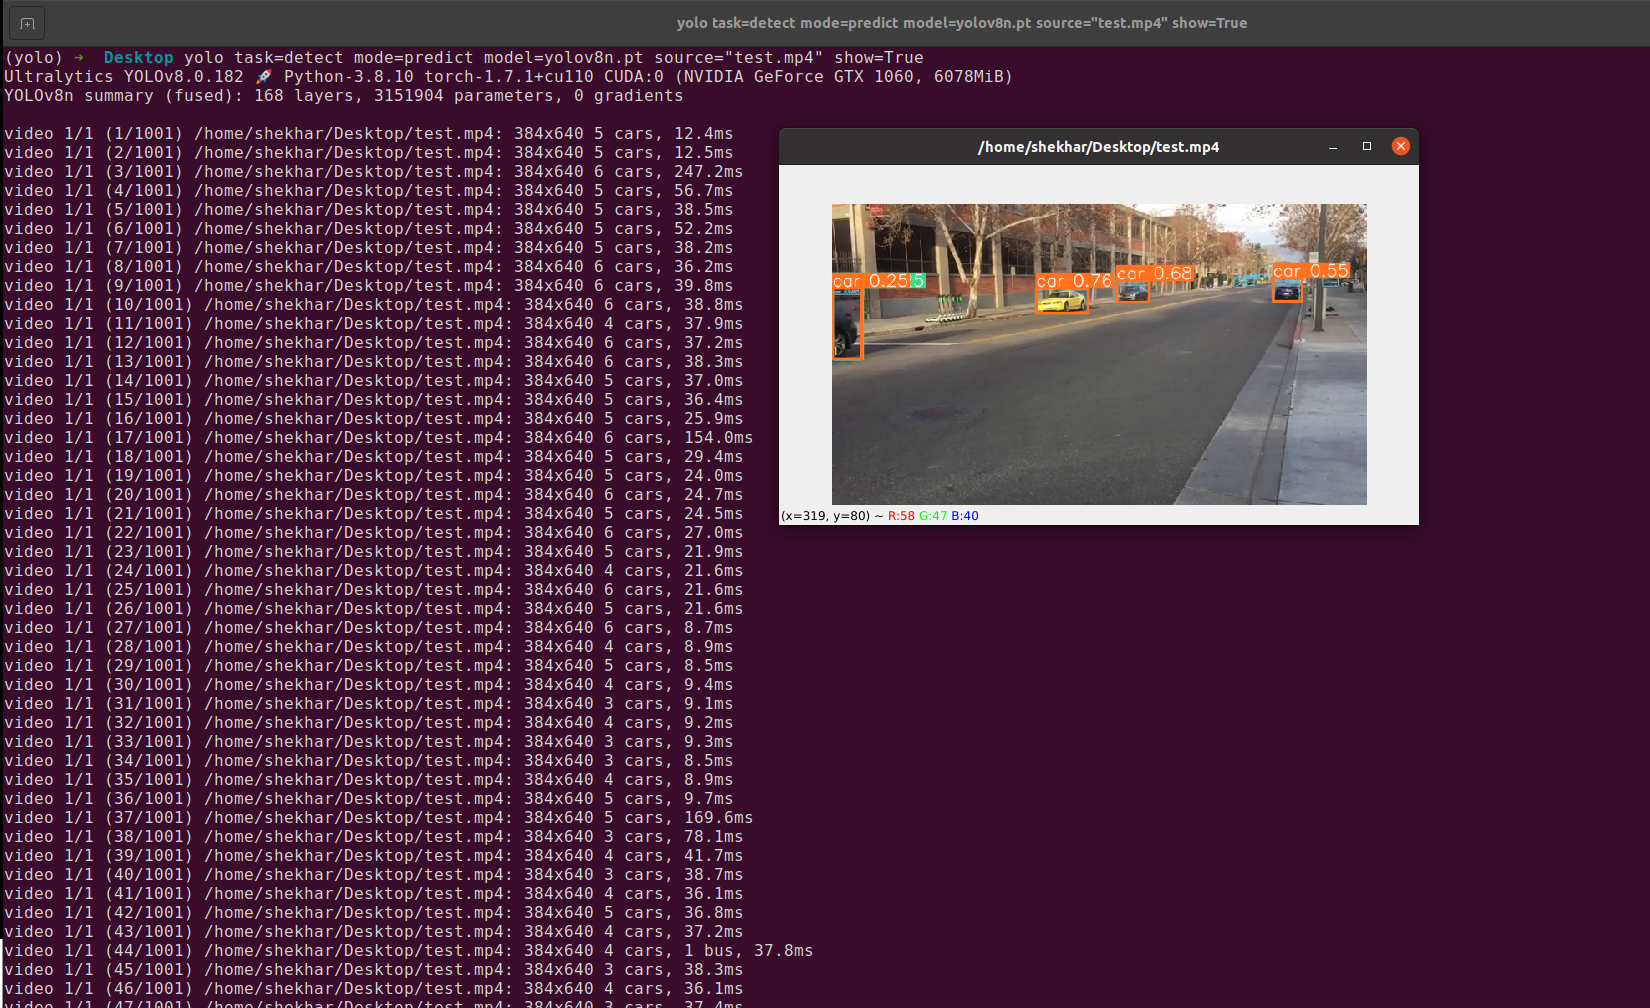
yolo task=detect mode=predict model=yolov8n.pt source="path/of/the/test/video" show=True
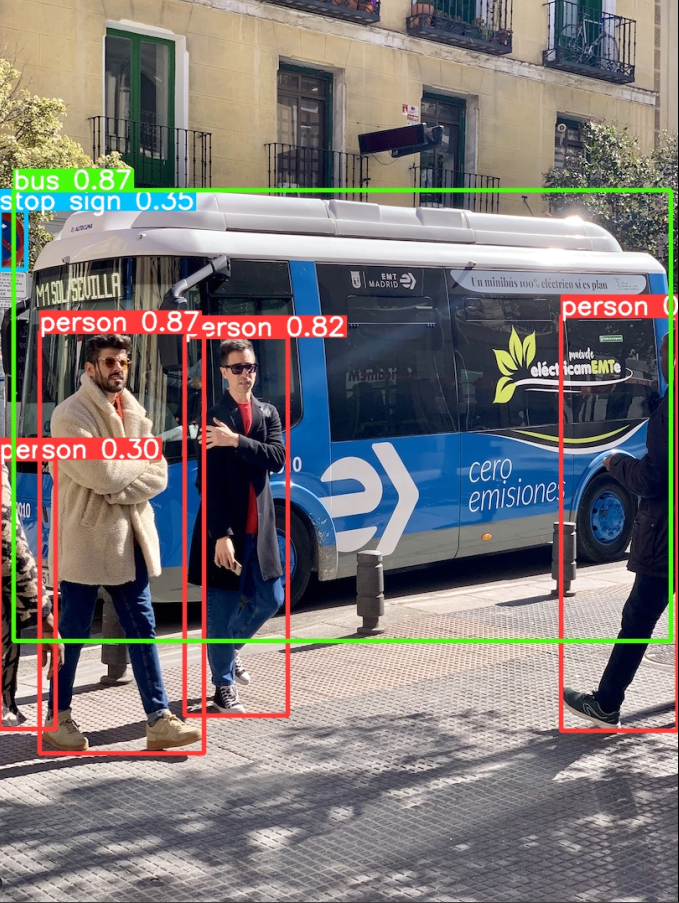
Output 1: When we run the previous command on the command line, we will see the following result:
Output 2: When we run the previous command on the command line to check on the image, we will see the following result:
Note: In the previous screenshot, you can see that when we run the previous command, it generates a directory or folder named “runs/detect/” in the same path where you run this command. In this folder or directory, all the results are saved.
Option 2: Using the Python Script
We can use the following Python script for the prediction which is similar to the previous CLI:
# Load the model
model = YOLO('yolov8n.pt')
# Object Detection result
result = model.predict(source='https://ultralytics.com/images/bus.jpg', show = True, save=True)
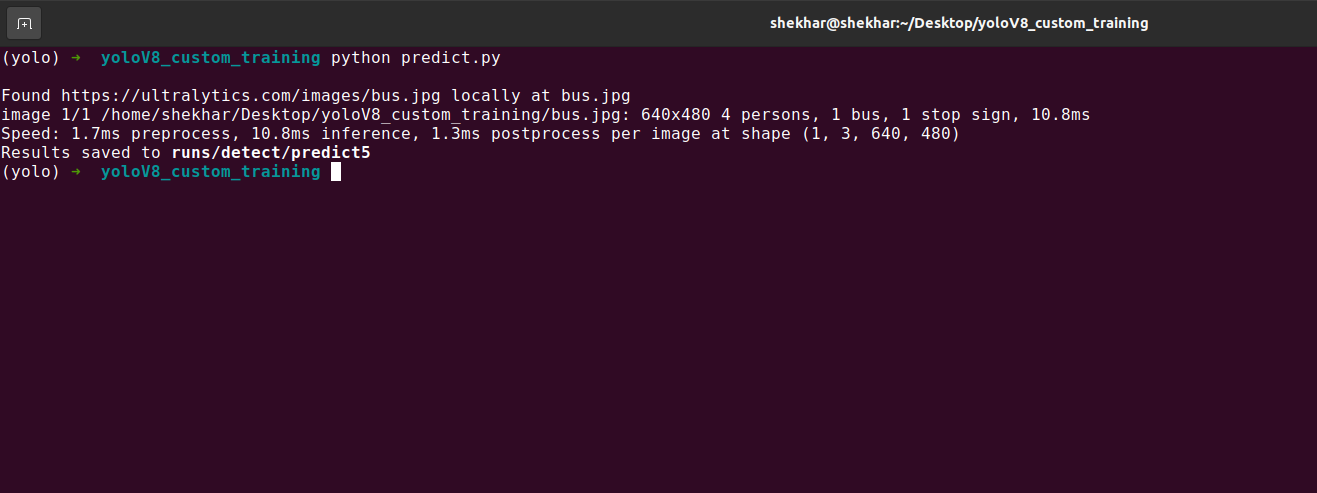
Output:
Custom Data Training for YOLOv8
To train a YOLOv8 object detection model on custom data, you can break it down into the following steps:
- Collect the dataset.
- Annotate the dataset by adding labels to the objects that you want to detect.
- Divide the dataset into training, testing, and validation sets.
- Create configuration files for the model.
- Training process.
Step 1: Collect the Dataset
We are going to collect the dataset for our custom YOLOv8 training. Since this just gives ideas about how to train the custom models, we use any dataset which is available open source.
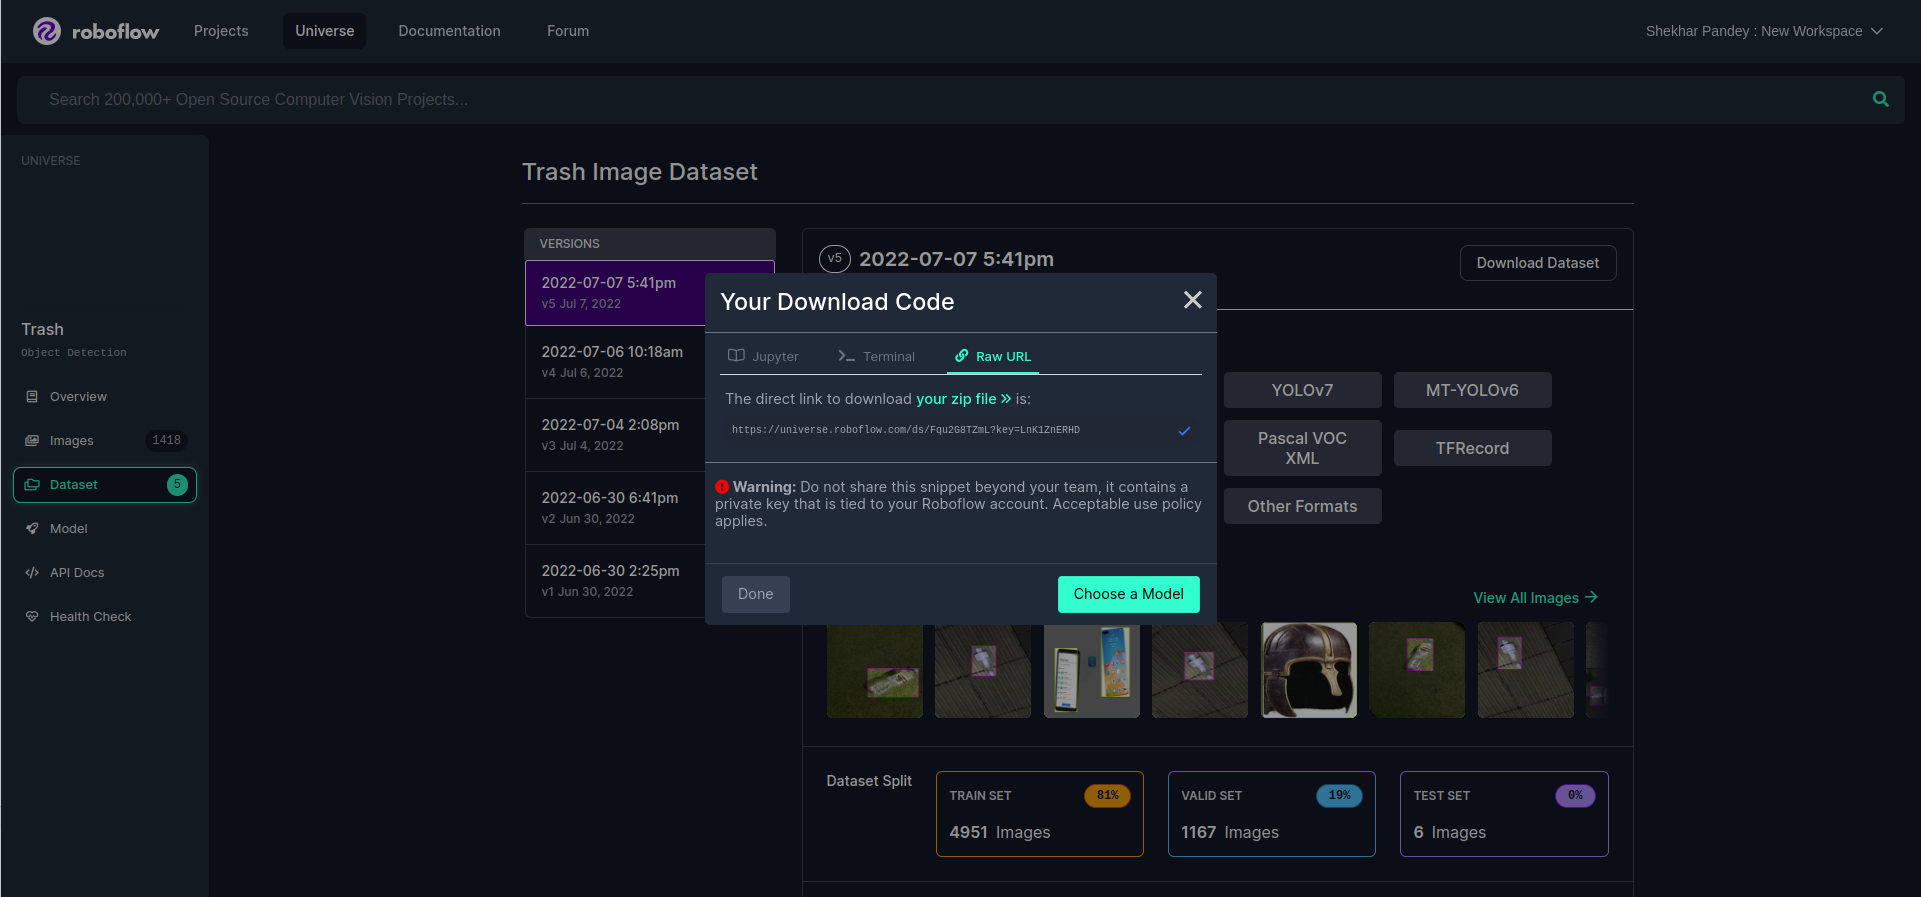
For this article, we download a dataset from the Roboflow website. But you can also download the dataset from the OpenImages website. The two website links are as follows: https://storage.googleapis.com/openimages/web/index.html and https://universe.roboflow.com/.
We download the “trash” dataset from the Roboflow database. If you want to use the same dataset as the one that we used, use this link https://universe.roboflow.com/ds/Fqu2G8TZmL?key=LnK1ZnERHD. If you have not seen any cases, go to the Roboflow website, search for “trash”, and download it as shown in the following screenshot:
Now, we have a “trash” dataset, and we keep it in a directory or folder. We have given the name of the directory as “yoloV8_custom_training”.
The YOLOv8 labeling data saves all the information about the object in a text file, and every image is associated with a single text file. Within this file, there is one line for each bounding box. The structure of each line is as follows:
- <class_id>: An integer that represents the class of the object (starting from 0 for the first class).
- <x_center>: The x-coordinate of the center of the object (normalized to the width of the image).
- <y_center>: The y-coordinate of the center of the object (normalized to the height of the image).
- <width>: The width of the object (normalized to the width of the image).
- <height>: The height of the object (normalized to the height of the image).
Example:
Here’s an example of what a YOLOv8 labeling data file might look like for an image with two objects (a car and a person):
1 0.341 0.219 0.186 0.398
In this example:
- The first line describes a car (class 0) located at (0.512, 0.634) with a width of 0.264 and a height of 0.451 relative to the image size.
- The second line describes a person (class 1) located at (0.341, 0.219) with a width of 0.186 and a height of 0.398 relative to the image size.
The following image ref is https://roboflow.com/formats/yolov8-pytorch-txt.
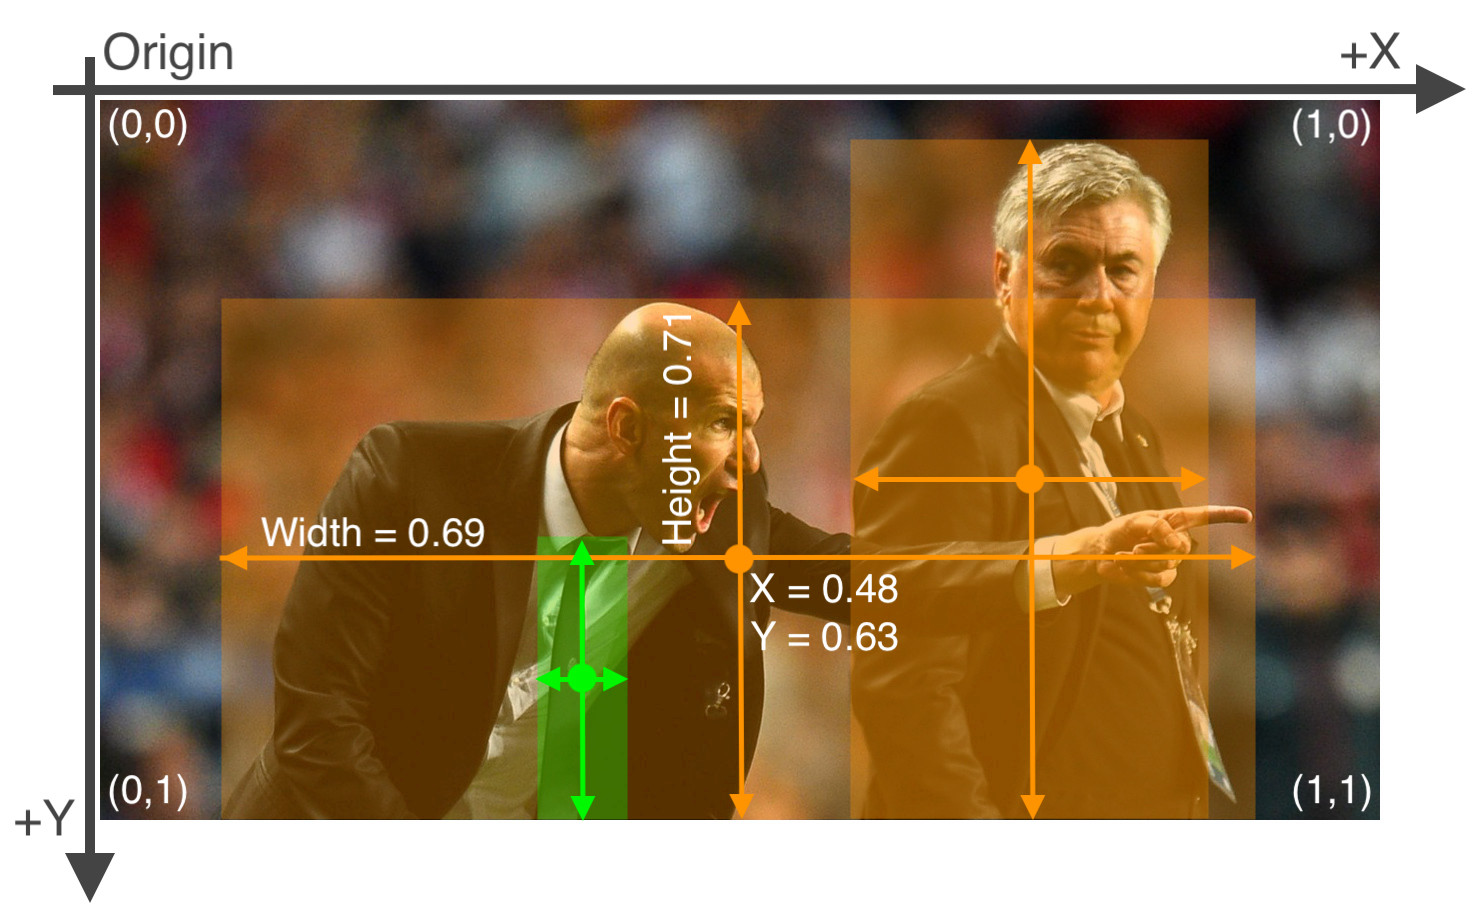
The previous image gives complete details about the text file when we label it.
Step 2: Annotate the Dataset by Adding Labels to the Objects that You Want to Detect
To annotate, you can use any open-source annotation tool like Roboflow annotation (https://roboflow.com/annotate). There are many open-source annotation tools available; you can use any one as per your choice.
Step 3: Divide the Dataset into Training, Testing, and Validation Sets
Now, we have a dataset. But when we train any model, we have to divide the whole dataset into three major parts which are training, testing, and validation sets. The training data are those that we use to teach the model, and the testing data is used to test whether the model has been learned or not.
A validation dataset is used primarily to fine-tune and evaluate the performance of a machine learning or deep learning model during the training process.
Usually, people divide the dataset in the ratio of 80%, 10%, and 10% for training, testing, and validation, respectively. This ratio also changes according to your circumstances and the amount of data you have.
For example:
1. If you have a very small amount of the dataset and you have to train the model, you can typically use almost 90% of the dataset during the training phase.
2. But if you have tons of data, you can split the data as recommended like 80%, 10%, and 10% for the training, testing, and validation datasets.
Note: You can also use the “split folder” package in Python for this task. The link for this package is https://pypi.org/project/split-folders/.
Step 4: Create the Configuration Files for the Model
We now create a configuration file in which we define all our parameters (training, testing, and validation), paths, and class details. To train your YOLOv8 model on a custom dataset, follow these simple steps to create or edit the “config.yaml” file:
path: (Full path of the dataset folder)
train: (Full path to the training dataset folder)
test: (Full path to the testing dataset folder)
val: (Full path to the validation dataset folder)
# Number of classes
nc: 1 # Modify this based on the actual number of classes in your dataset
# Class names
# Replace this list with the names of your classes
names: ['class_1', 'class_2', 'class_3', ........, 'class_n']
1: Create the File
- Begin by creating a new text file named “config.yaml” using a text editor or code editor of your choice.
2: Set the Dataset Paths
- In the “config.yaml” file, specify the paths to your dataset folders:
- train: Enter the full path to your training dataset folder.
- test: Provide the full path to your testing dataset folder.
- val: Specify the full path to your validation dataset folder.
3: Define the Number of Classes
- Find the line in the file that says “nc: 1”. Replace the number “1” with the actual number of unique object classes in your dataset.
4: Class Names
- Replace the default list of class names with the names of the objects that you want your YOLOv8 model to recognize. List them within the square brackets.
- For instance, if your dataset includes objects like computers, people, cats, and dogs, your list might look like this:
names: [‘computers’, ‘person’, ‘cats’,’dogs’]
5: Save the Configurtion File
After finishing the previous steps, save the configuration file to the same directory where the YOLOv8 custom training has to start.
Step 5: Training Process
Now, we train our custom model of YOLOv8. We can train the YOLOv8 model in two ways:
1. CLI (Command Line Interface)
2. Python API
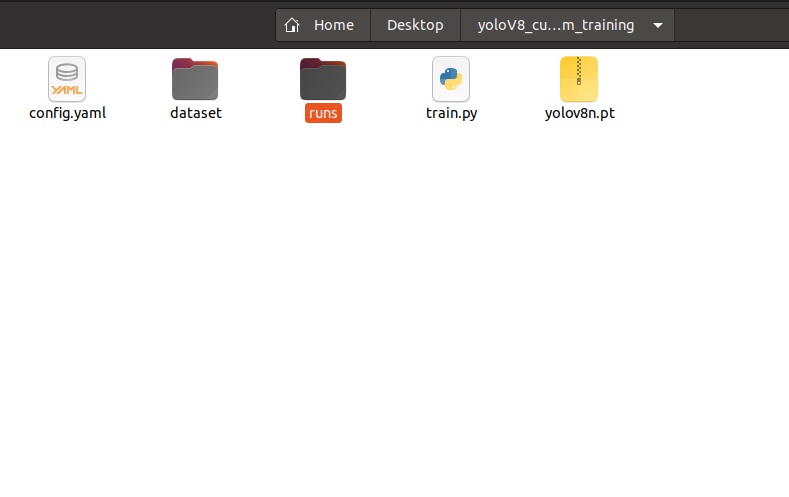
Let’s first check our YOLOv8 custom training directory or folder.
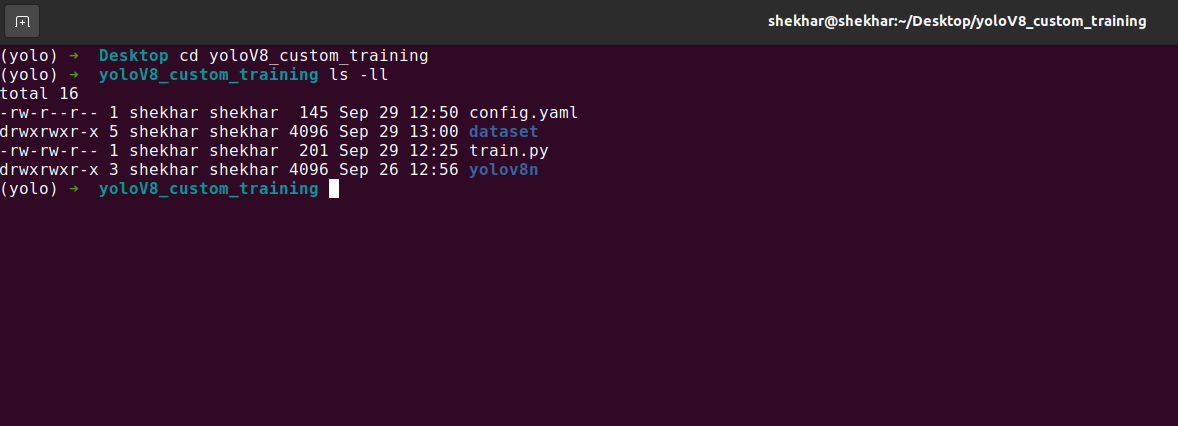
You can see that we have a config file in that directory where we define all our parameters like training, testing, and validation dataset paths and classes. We have one dataset folder or directory where we have all the images. We have one “train.py” Python file which is another method to train the model which we call API.
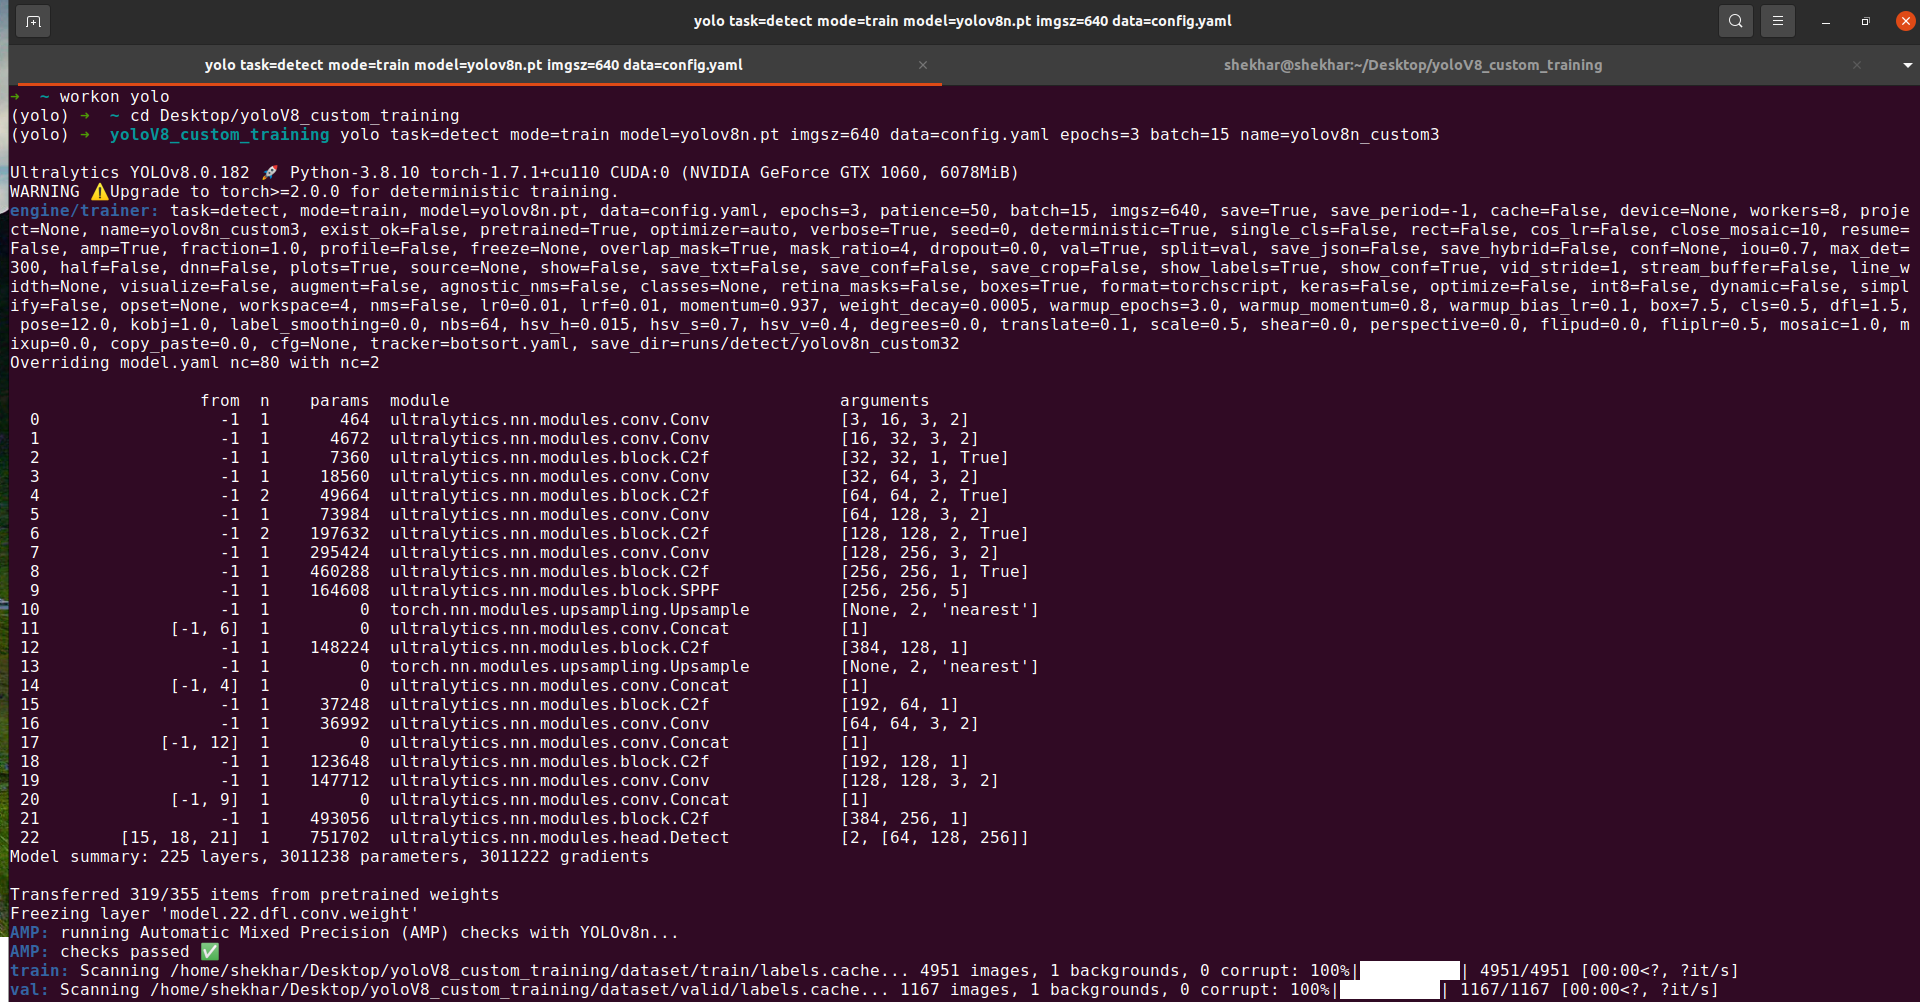
Option 1: Using CLI
If you want to train your model using the command-line interface CLI, use the command as follows. We have to just open the terminal inside the previous training directory and run the following command:
task: You can choose whether you want to find the objects, separate the objects, or categorize them in your chosen dataset.
mode: We’re currently in training mode, but you can also switch to prediction or validation mode if needed.
model: We’re using the “yolov8n.pt” model, but you can select from “yolov8s”, “yolov8l”, or “yolov8x” if you prefer.
imgsz: The default image size is 640 pixels, but you can change it to other multiples of 32, like 320 or 416, as per your requirements.
data: Tell us the location of the dataset by providing the path to a YAML file.
epochs = 50 (It can be any number)
batch: You can adjust how many images are processed at once during training based on your computer’s capabilities. Increase or decrease it as needed.
name: You can pick a name for the folder where the results of object detection will be stored under “runs/detect”.
After the training is complete, we will see one custom-trained model weight which is saved by default under the “runs” directory in the same path where your terminal is running the training. This directory is generated by YOLOv8 itself. Inside the “runs” directory, you will get one weight directory or folder, and there will be our custom-trained weight with the name of “best.pt”.
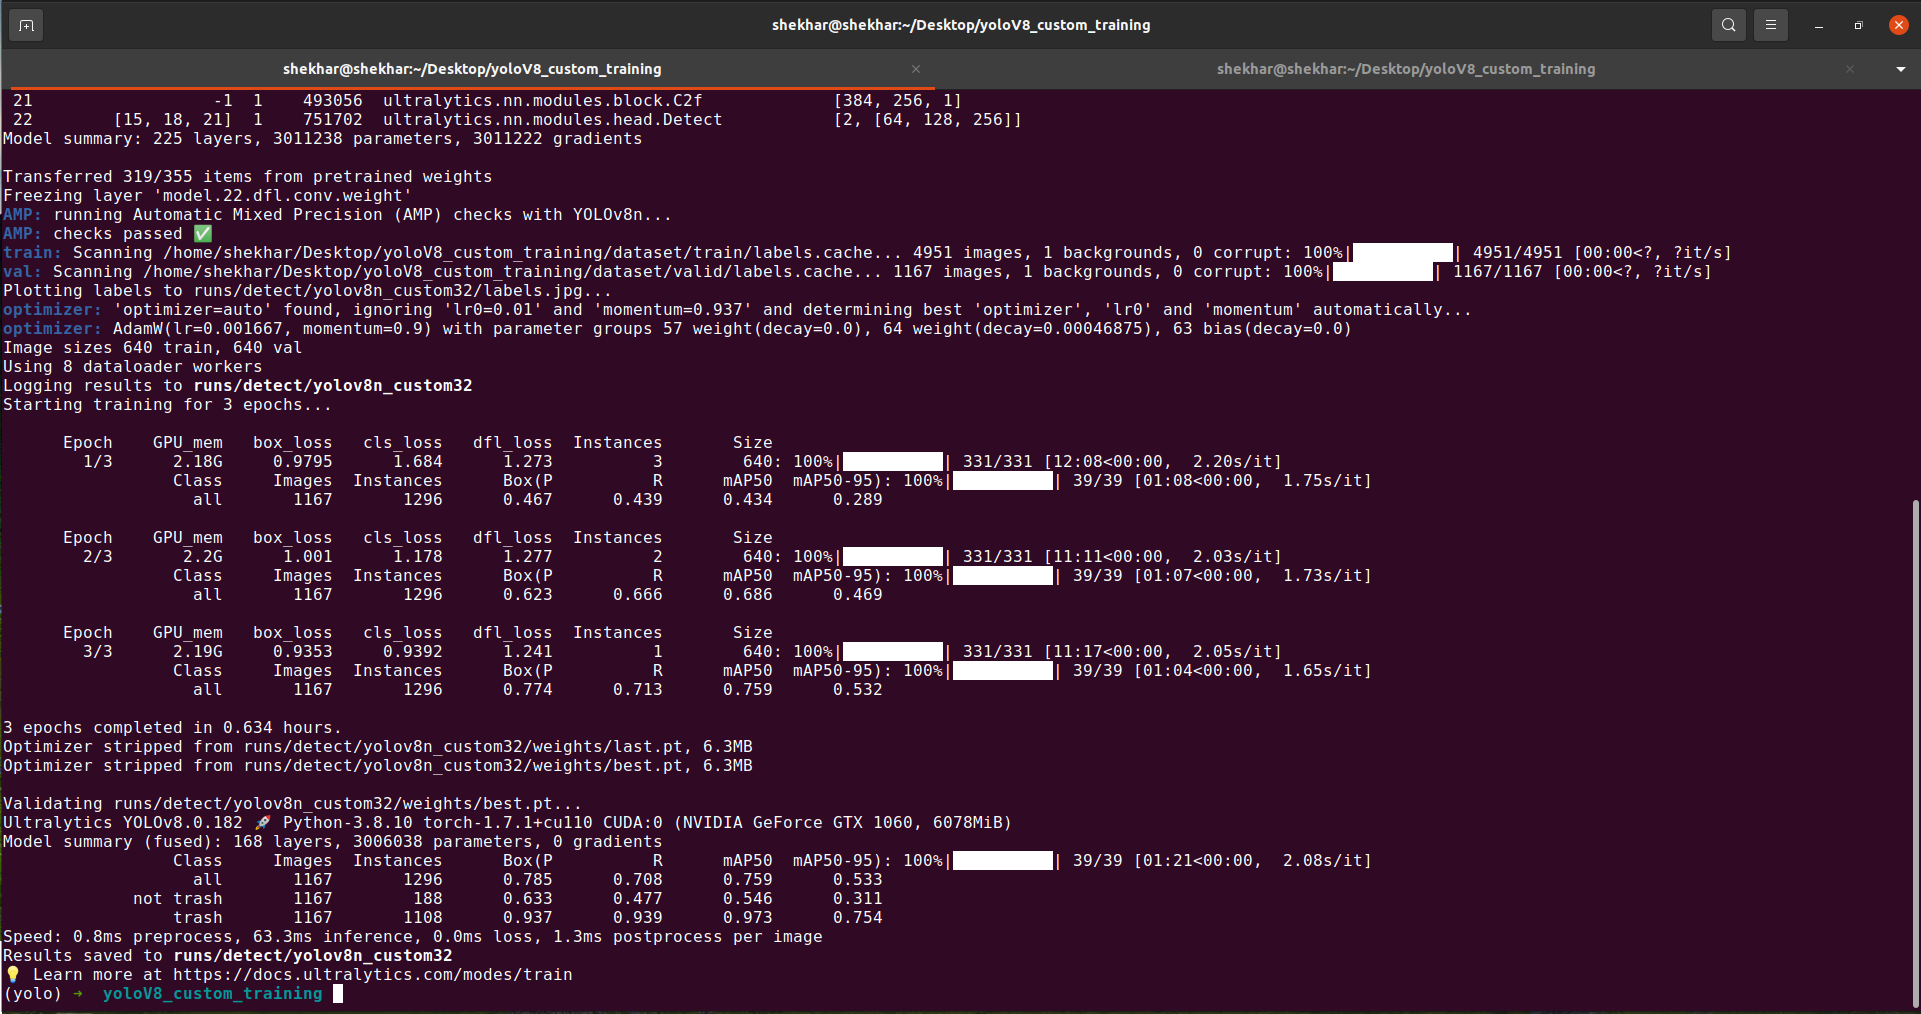
In the previous screenshot, you can see that the results are saved inside the “runs/detect/yolo8n_custom32”.
Note: You can also see that the GPU is running which means that the GPU utilization is working. If you have a GPU but its utilization is 0, your code is running on the CPU, not the GPU. Then, you must check the Pytorch compatibility with your CUDA version.
The following screenshot shows the “runs” directory inside our working directory:
Option 2: Python API
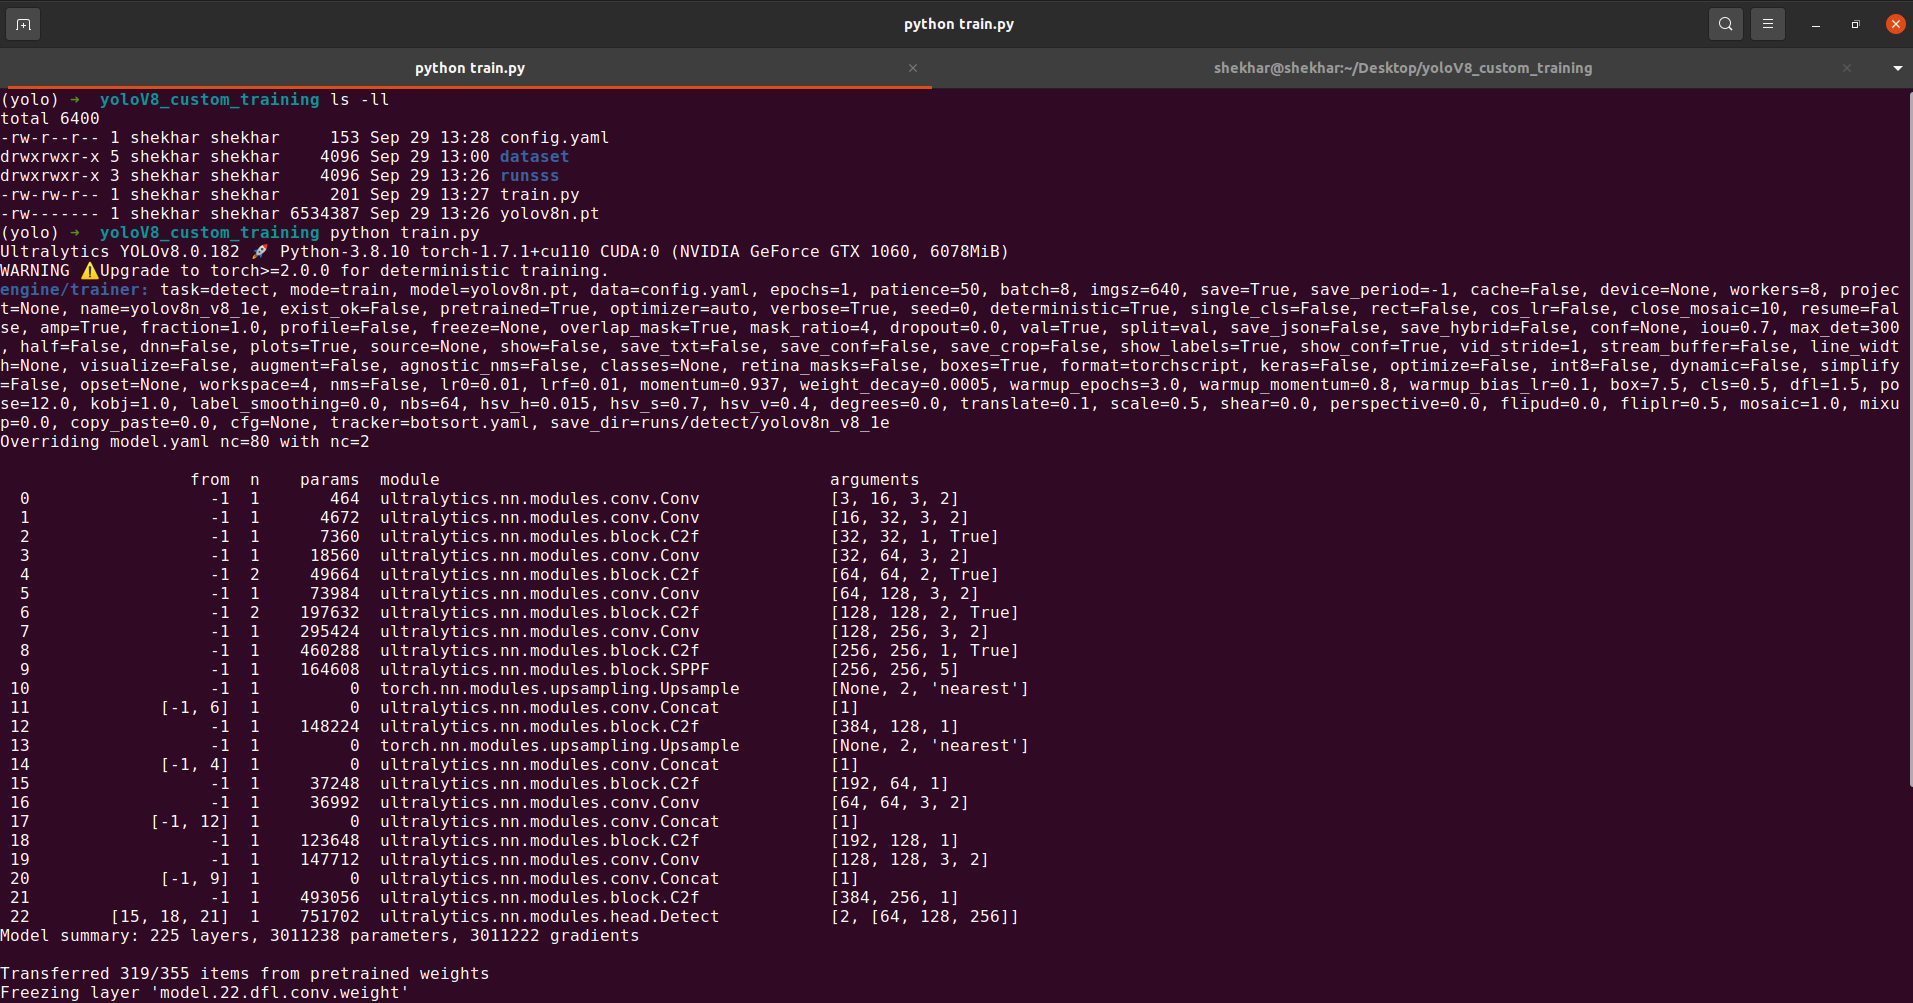
We can also train the model with the Python API. For that, we create one Python file named “train.py” and add all those CLI commands to the Python script form as shown in the following:
File name: train.py
# Load the model.
model = YOLO('yolov8n.pt')
# Training.
results = model.train(
data='config.yaml',
imgsz=640,
epochs=1,
batch=8,
name='yolov8n_v8_1e'
)
Now, we use the previous API to train our custom model which is YOLOv8. We just open the terminal in the same directory of the custom training and run the “train.py” script from there, and that’s it. You can see the following screenshot of a successfully running API:
Inference with Custom Weights
We have now finished training our custom YOLOv8 model with a custom dataset. Now, we can test our custom-saved model weight with the new image to check the result.
To check the result on the new image, we just have to change the following options in both API and CLI depending on which you want to use because we now predict the result and not train the model.
1. mode = predict
2. model = “path of the custom weight which is the newly created YOLOv8 during training”
Note: The YOLOv8 stores the newly created model inside of the “runs” directory.
For the test, we use the CLI method as shown in the following screenshot:
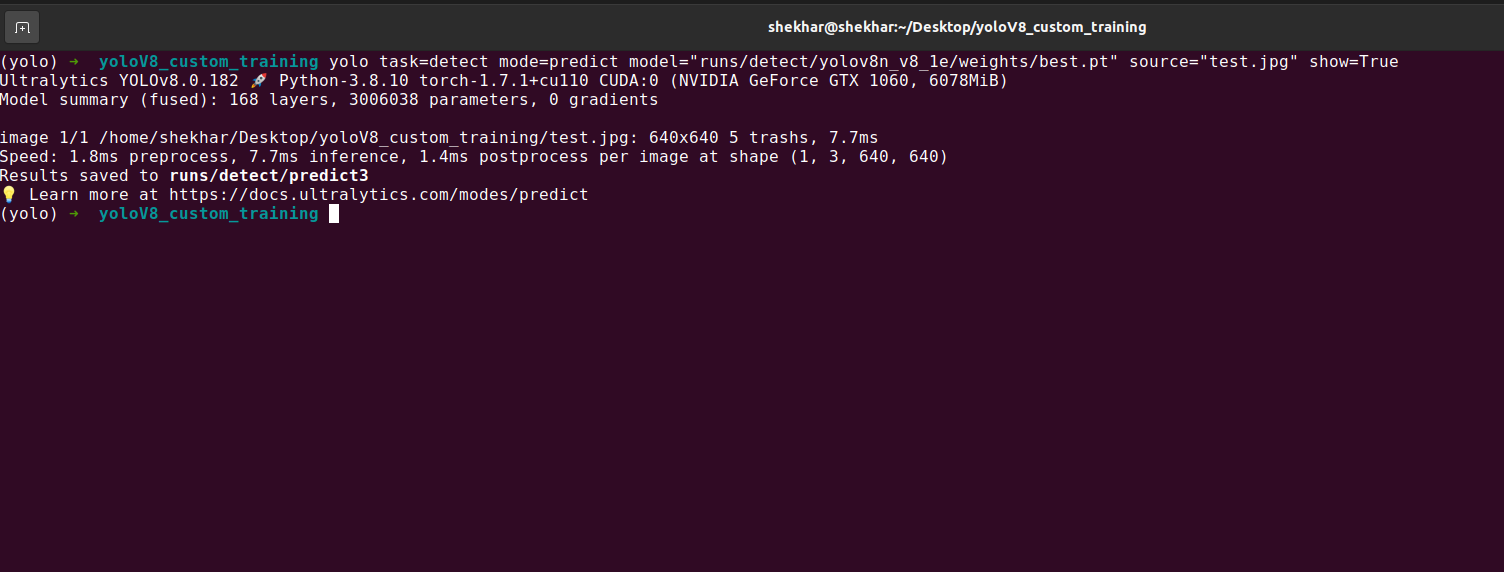
In the previous screenshot, we can see that the prediction is also saved inside the “runs” directory.
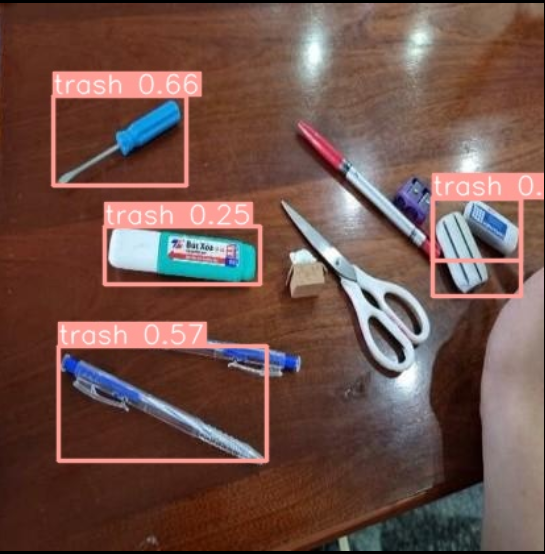
That’s all! We now learned how to train the YOLOv8 model with the custom dataset.
Conclusion
Custom training YOLOv8 allows you to tailor the object recognition to your specific needs. Using your own dataset, you can teach the model to recognize and locate the objects that are relevant to your application, whether in surveillance, robotics, or another field. This process allows you to fine-tune the performance and accuracy of YOLOv8 to your unique requirements. However, to achieve optimal results, it’s essential to follow the best practices for data preparation, model architecture customization, and hyperparameter tuning. Custom training with YOLOv8 opens up a world of possibilities to create accurate and efficient object recognition solutions that are tailored to your specific use case.