A variant of ALTER TABLE is supported by SQLite. A preexisting table can be modified, have a field retitled, have a field inserted into it, or have a field eliminated from it using SQLite’s ALTER TABLE statement. The table’s column name is renamed a new name with the RENAME COLUMN command. We can only modify a table inside the same dataset using this operation. Whereas if the table changes to include triggers or indices, these are kept just after the change. Therefore, we have decided to cover the topic of renaming columns of an SQLite table in this guide.
This article begins with the launch of the shell application first in Ubuntu 20.04 system. Using the Ctrl+Alt+T, we have opened it and started to update our system with the apt update instruction. After adding the password for the currently logged-in user, the updating process has started and been completed.

After updating the system, we have to ensure that our system and its internal packages are upgraded to the newest version. So, we have been upgrading its packages using the apt upgrade instruction, as displayed below:

After successfully updating and upgrading our system, we will be moving toward launching the SQLite database within the terminal shell. You have to utilize the single keyword “sqlite3” to start it. The SQLite shell will be launched on our screen, and we can use it for querying data.
After opening it, we have listed the tables of a database with the “.tables” instruction and found there are no tables so far in the database.
To rename a column, we must have a table in the database. Therefore, we have been making a table titled “Test” within our current SQLite database with the CREATE TABLE instruction. Within this table, we will have two columns ID and Name. The ID column will contain an integer type value representing the primary key of a table that must not be NULL. The Name column will be of Text type and must not be NULL as well. Now, we have a “test” table within the list of tables as per the “.tables” instruction. Selecting the records of a Test table, we have found that it is empty and needs some records to be inserted within it.
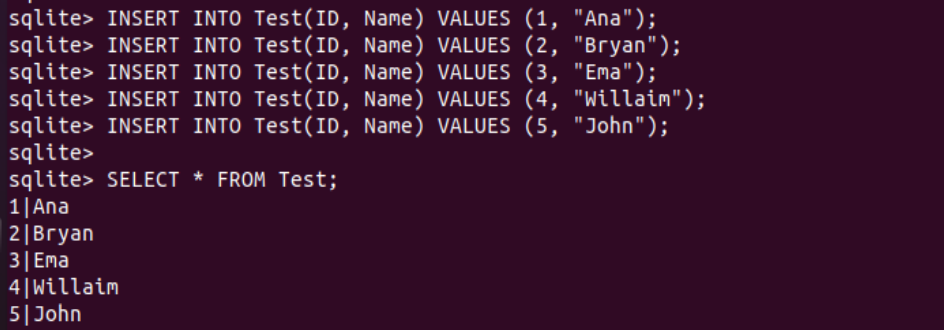
Therefore, we have inserted five records within the ID and Name column of a table “Test” using the INSERT INTO instruction using the VALUES keyword followed by the records to be inserted. The five records are unique and have no duplicate values. After inserting the records, we have been checking the table records with the help of a SELECT instruction followed by the asterisk “*” character and the table name “Test”. This query returns all the five records of this table for the ID and Name column separated by the “|” character.
Our column names are “ID” and “Name” for the Test table. Let’s start renaming the column names using the RENAME COLUMN instruction. We will be renaming the column “Name” to “Fname” using the ALTER TABLE instruction followed by the table name “Test” and the “RENAME COLUMN” using the “TO” keyword. The query was successful, as shown below:
After altering the column’s name for the table “Test”, we will use the SELECT instruction to display all the table’s records. A total of five records have been displayed, as presented below:
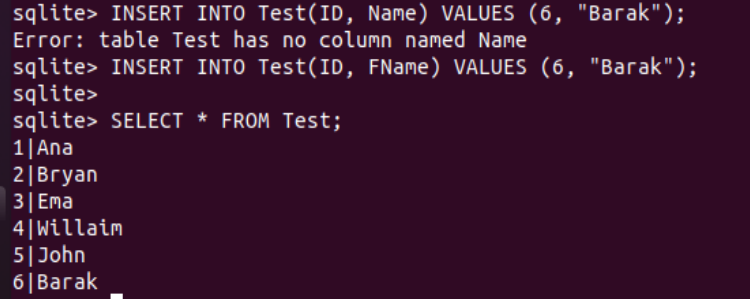
Let’s see how updating a new name works or not. Let’s insert the records within the Test table using the same original names of columns for the table Test. Thus, we have tried the INSERT INTO instruction with the original names of the “ID” and “Name” column followed by the VALUES keyword and the 6th record, i.e., (6, “Barak”). Execution of this instruction returns an error “table test has no column named “Name”. This error has occurred due to the usage of the original column’s name “Name” instead of the new column name “Fname”.
Let’s insert the same record with the new column name “Fname” instead of the original column name “Name” via the INSERT INTO instruction usage in the terminal. This time, we didn’t have any errors after executing this insertion command. We have displayed all the records of the Test table using the SELECT instruction followed by the asterisk “*” character. A total of six records have been displayed, i.e., the last record is the newest inserted record with the new column name “Fname”.
Just like the INSERT instruction, we can also use the SELECT instruction to fetch the records of a table and use the column name within it to display that the new name has been successfully added to the table column. So, we have been utilizing the SELECT instruction to display the Test table records while adding a WHERE clause condition specified. For this, we have been using the original column’s name, “Name”, to display only the records from the table where the value in the Name column is “Ana”. Execution of this query displayed an error, “no such column: Name”. The reason for this error is the newly updated column’s name to “Fname”. Let’s run the same query with the new column name “Fname” to fetch all the records where the “Fname” column contains the value “Ana”. It displayed a single record from the table and removed the error.
sqlite> SELECT * FROM Actor WHERE FName = "Ana";
Conclusion
This article discussed using the RENAME COLUMN clause within the ALTER TABLE instruction to update or modify the name of a specific column from the table. The example can be amended as well. We have done it so far in the simplest way possible and hope you like it.


