Files and folders are the necessary parts of any operating system. But, when you need to work on databases, the CSV files come in handy. The CSV files are also another name for Microsoft Excel documents used to store data in the form of rows and columns. The Excel or CSV files can be used to import data within the tables of a database. Therefore, we have decided to cover the method of importing a CSV file containing data in columns to the SQLite database table. Make sure to have SQLite C-library of SQL installed in your Ubuntu 20.04.
Let’s get started with today’s article by launching the console application within Ubuntu 20.04 with the Ctrl+Alt+T shortcut. After the successful launch of the console application, you need to update your Linux system with the help of an apt package preceded by the “sudo” keyword. It will ask for your currently working user account password to resume the updating process through this query. We have added the password, pressed the Enter key, and continued.

After a while, your system will be up to date. After this, you need to upgrade your system and its packages, i.e., modules and libraries. Try out the same instruction with the keyword “upgrade” instead of the word “update”.

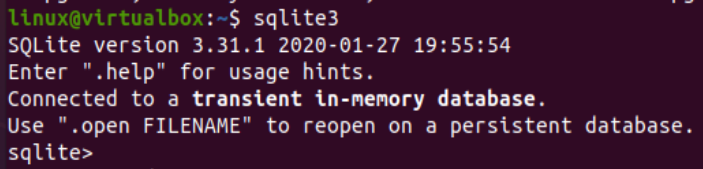
Make sure to have some CSV files within your Linux’s home folder to use within the SQLite database, i.e., import its data to a table. Thus, we have created a new CSV file named “data.csv” within the home folder to be used in the table by importing. Let’s start the SQLite database on the shell terminal of the Ubuntu 20.04 system using the keyword “sqlite3”. The query area of an SQLite will be launched as shown below:
We have been starting this guide using the “.tables” instruction in the database to display the list of tables. Right now, we don’t have any table in this database.

To import CSV files, we need a table in the database. Thus, we have to create a table with the same column names and types as we have in the CSV file. So, we have been creating a new table named DATA with the CREATE TABLE instruction containing two columns, i.e., “Country” of TEXT type and column “People” of integer type. This newly created table has no records yet.
SELECT * FROM DATA;

Let’s import the CSV file named “data.csv” within the DATA table using the “.import” instruction followed by the path to the file and the table’s name, as presented below:
![]()
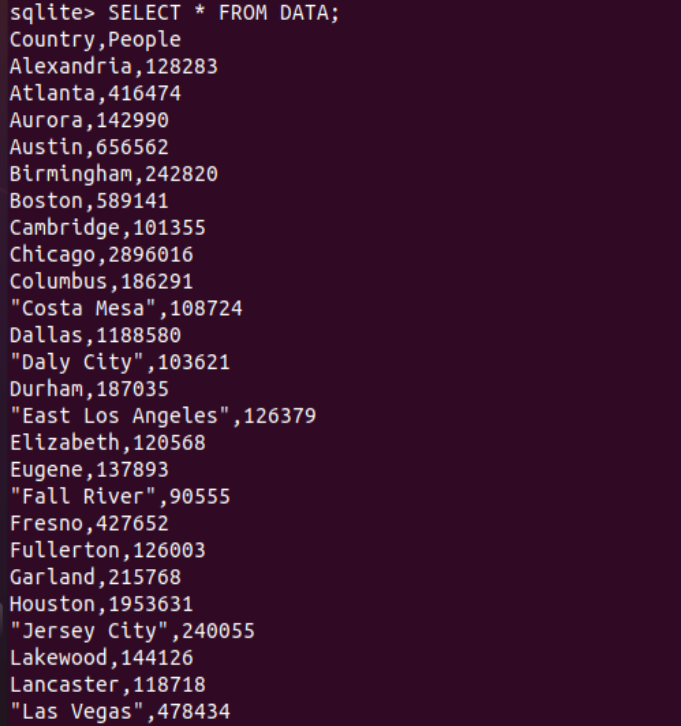
After the successful query execution, we should confirm whether the import was proper and successful. For this, you need to try out the SELECT instruction for the table DATA once again on your SQLite shell. The output of this command shows that the import is successful. All the records from the data.csv file have been imported into the DATA table properly.
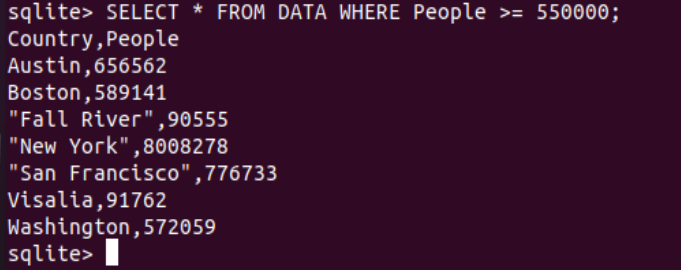
Let’s try out the condition within the SELECT query. We have added the WHERE clause to display all the records from the imported data of a table “DATA”, where the column “People” contains the values less than or equal to 550000. It returned a total of eight records.
Let’s try a SELECT query with the WHERE clause in the SQLite database to display all the records of a table “DATA” where the column “People” have a value between 550000 and 750000. For this, we have been using the BETWEEN keyword and have only three results.

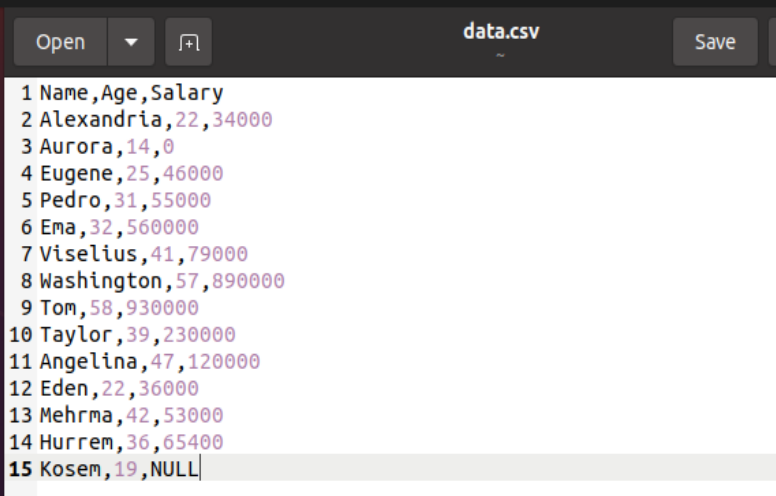
Let’s look at another example of importing the same file with a different set of records. This time, the data set contains 15 rows with the three columns, i.e., Name, Age, and Salary. The column Name and Salary are Integer types, while the column “Name” is text type.
For this data, we have been creating a new table named “Detail” containing the same name in three columns as the data.csv file, i.e., Name, Age, and Salary. Before importing the data.csv file to the Detail table, we haven’t found any record within it per the SELECT instruction executed at the SQLite shell screen, i.e., empty table.
SELECT * FROM Detail;
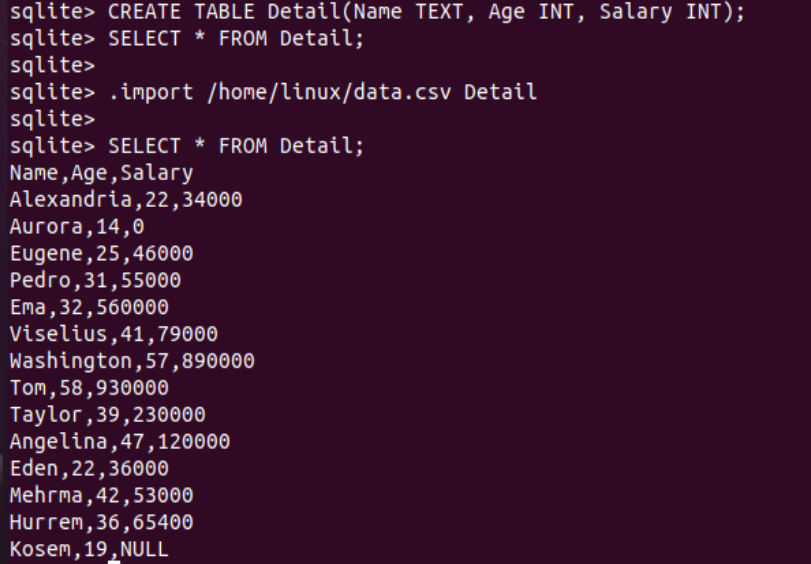
To import the data of the data.csv file within the Detail table, we need to try out the “.import” instruction followed by the path to the “data.csv” file, i.e., /home/Linux/, and the name of a table “Detail” at the end of this query. This query will return nothing showing that the import has been successful. So, we will be using the SELECT instruction once again to confirm that the import was made perfectly and efficiently. The SELECT instruction with the “*” character followed by the name of a table “Detail” displayed all the records of the data.csv file just imported to the table. This means the import was successful.
Let’s apply the WHERE clause on the imported CSV column “Salary” of the table Detail to display only the records where the value of the Salary column is less than 35000. This query with the WHERE condition returns two records as a result.

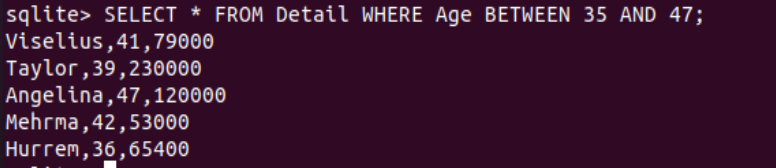
Let’s use the WHERE clause within the SELECT query to display the records of a table “Detail” where the imported data has values between 35 and 47 in the “Age” column. This time, we have five records, as presented below.
Conclusion
This article used CSV files to import data records to the SQLite database table using the “import” instruction at the shell. You need to ensure that the CSV column names and the table column names must be the same, i.e., uppercase or lowercase. We also discussed the ways to display the imported data in tables using some conditions.